What this tutorial will cover
This tutorial guides you step by step to create two workflows in OpenOps:- The first workflow, Fill the Project-Owner mapping table, fetches all project names from AWS instance metadata stored in CloudHealth and writes them to an OpenOps table. This assumes that, in your organization, cloud resource ownership is allocated on a per-project basis. The finished workflow is available here.
- The second workflow, CloudHealth Rightsizing Recommendations, fetches AWS EC2 rightsizing recommendations from CloudHealth, looks up owners of the projects they fall into, notifies owners via Slack, and implements resolutions from owners by creating Jira tickets, snoozing, or dismissing recommendations. The finished workflow is available here.
Prerequisites
To follow this tutorial, you will need:- A CloudHealth account configured to provide recommendations for AWS EC2 instances.
- A Slack workspace to send notifications to.
- A Jira Cloud instance to file issues.
Setting up connections to services
At several steps in this tutorial, OpenOps will need to interact with CloudHealth, Slack, and Jira. To enable this interaction, you need to configure what OpenOps calls “connections” to these services. While you could do this as you go, it’s easier to set up connections in advance and use them throughout the tutorial. In the left pane of your OpenOps instance, click Connections.Set up a CloudHealth connection
Click New Connection in the top right, then select CloudHealth from the list of services. This will open a new dialog that looks like this: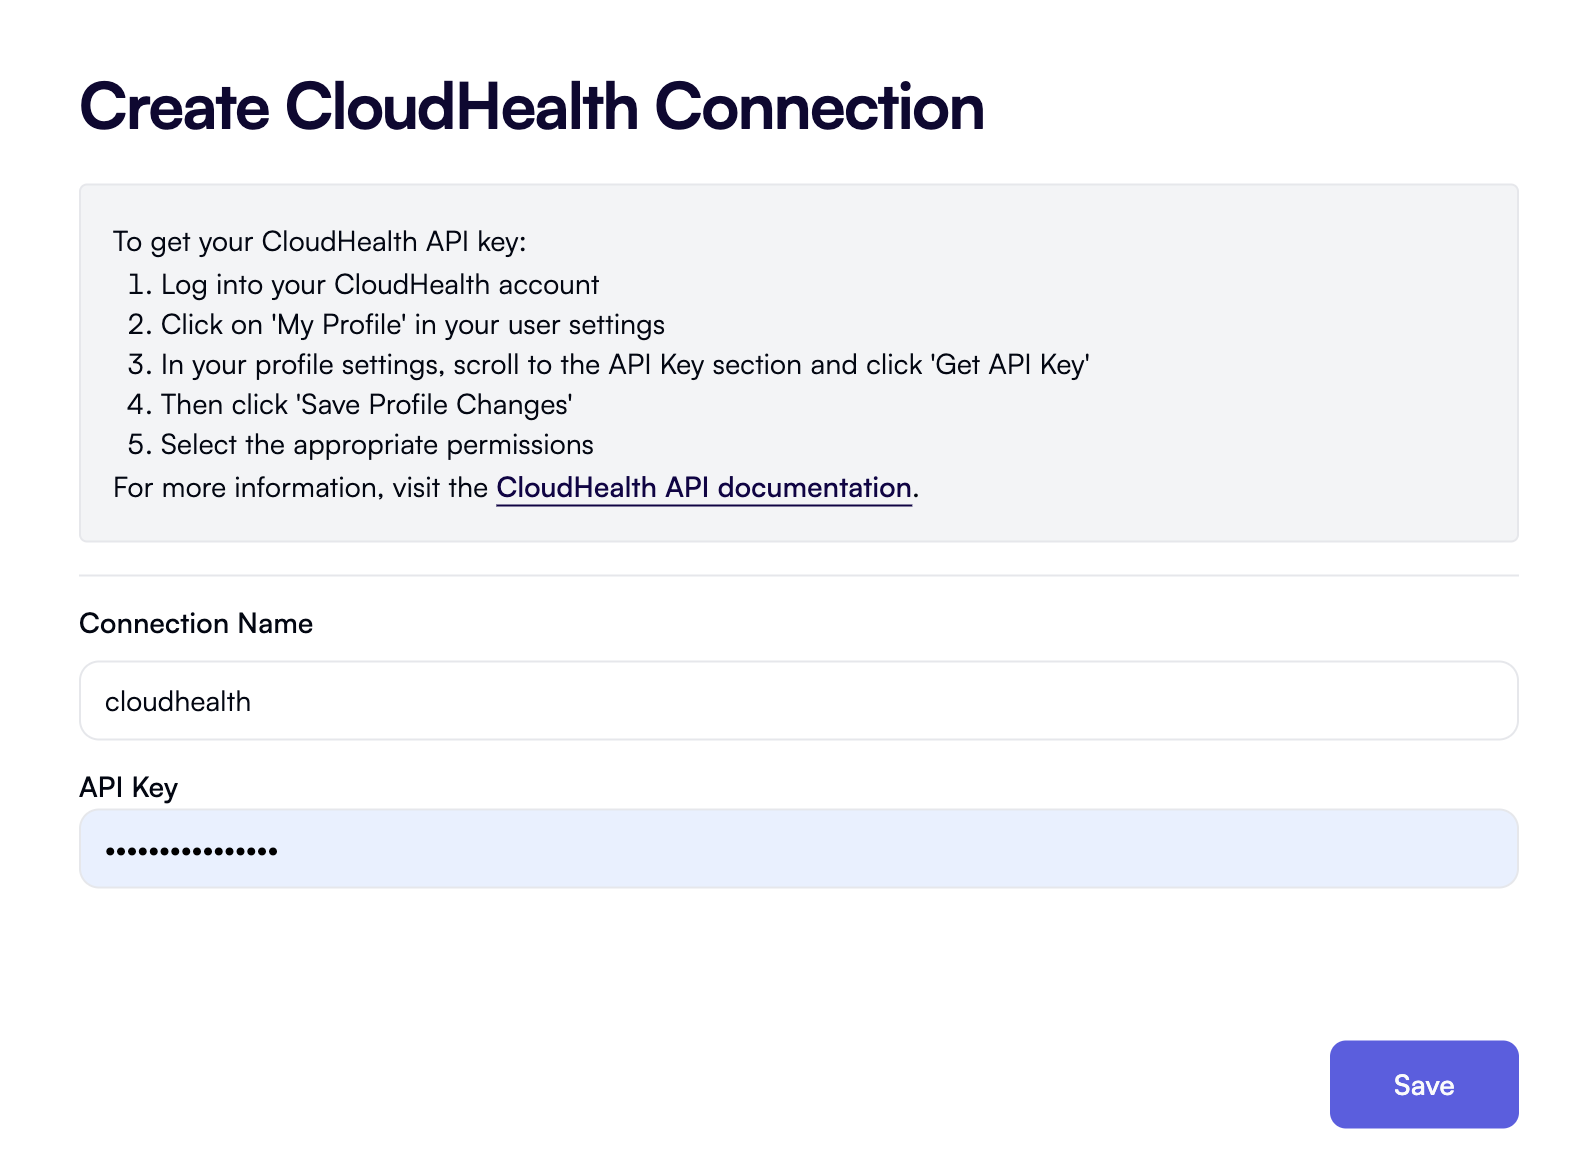
Set up a Slack connection
Click New Connection in the top right, then select Slack from the list of services. This will open the Create Slack Connection dialog that looks like this:
Set up a Jira connection
Click New Connection in the top right, then select Jira Cloud from the list of services. This will open the Create Jira Connection dialog that looks like this: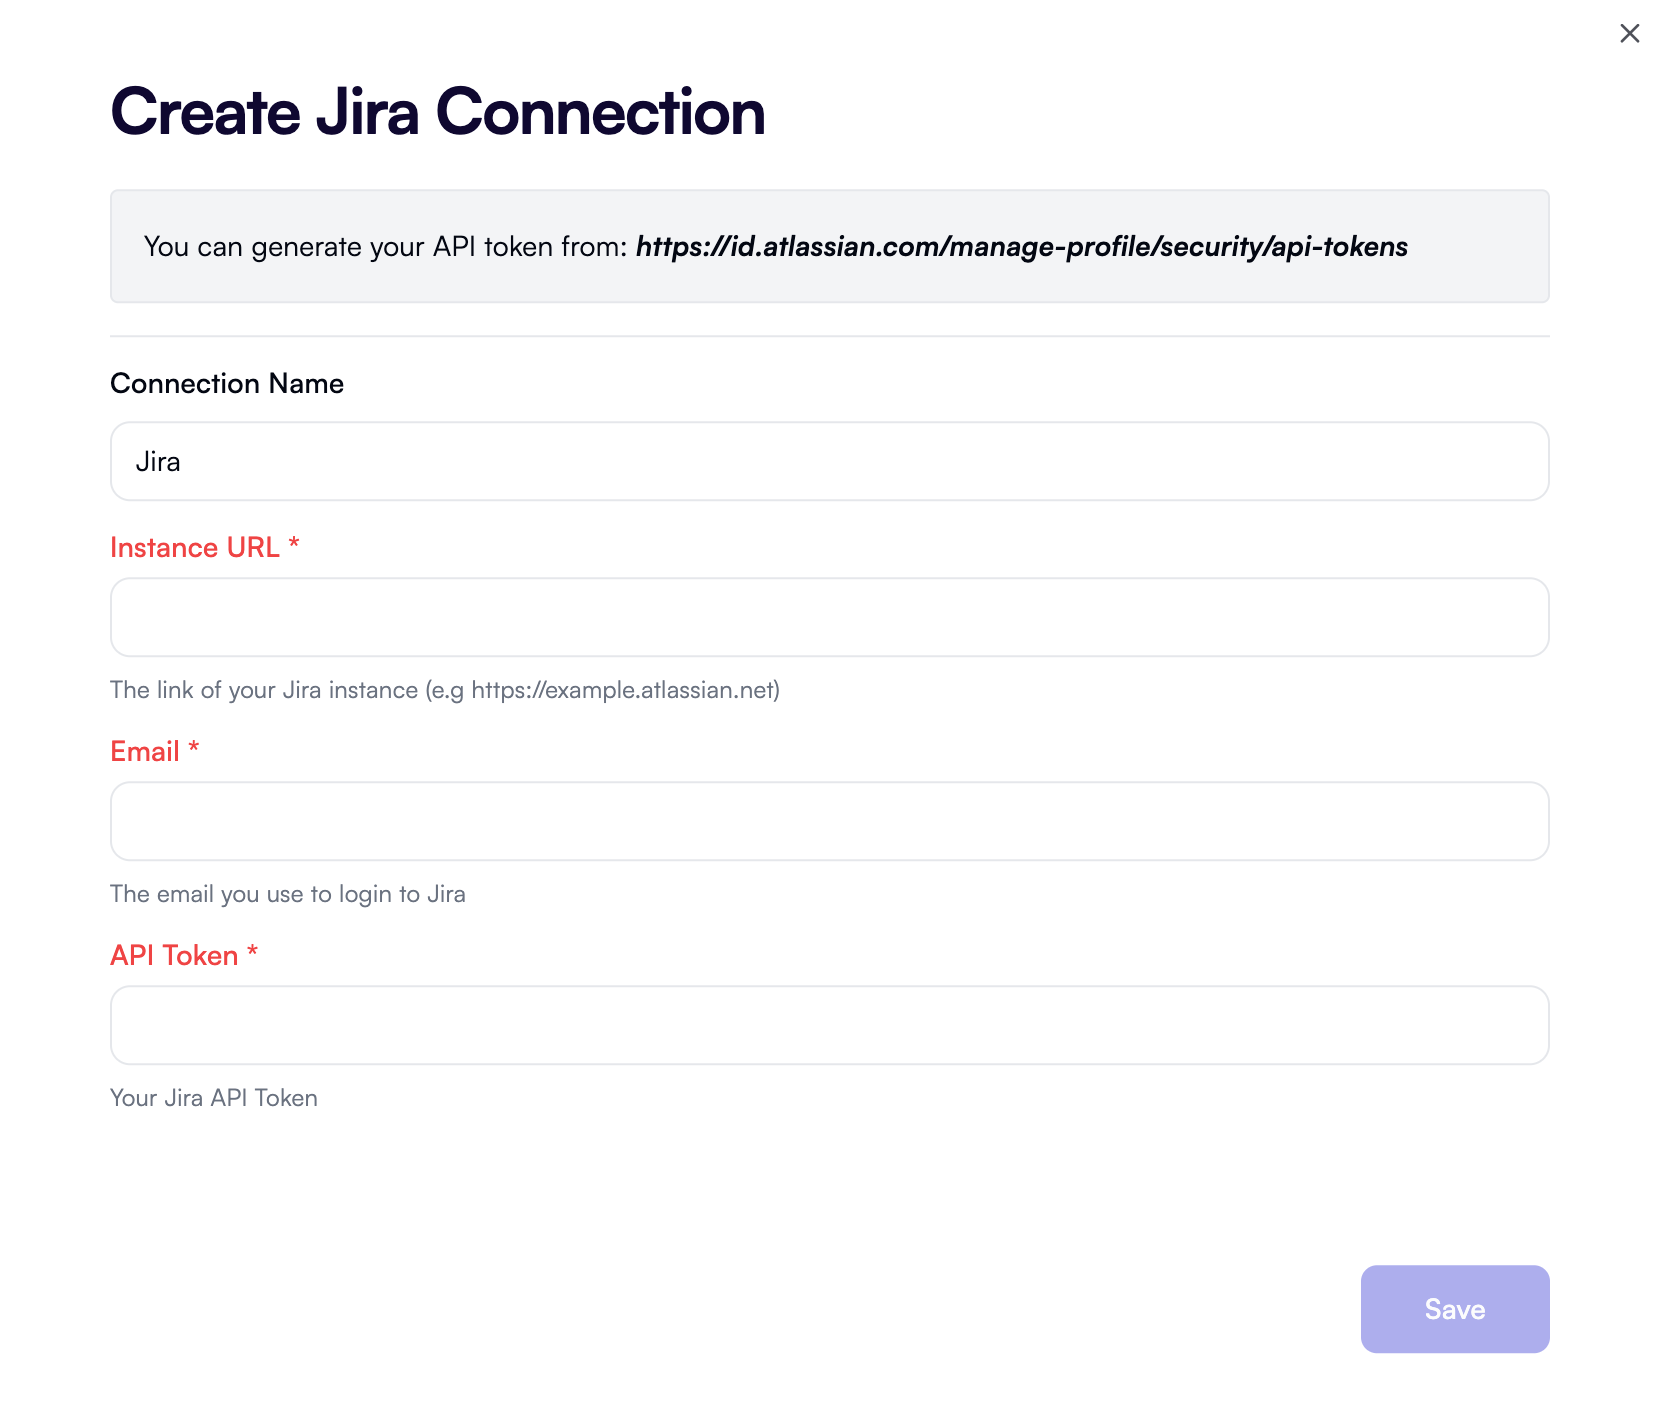
https://your-company.atlassian.net.
In Email, enter your Jira Cloud account email.
In API Token, enter a Jira Cloud API token with permissions to create issues. If you don’t have a token at hand, follow the instructions in the dialog to generate one.
Click Save.
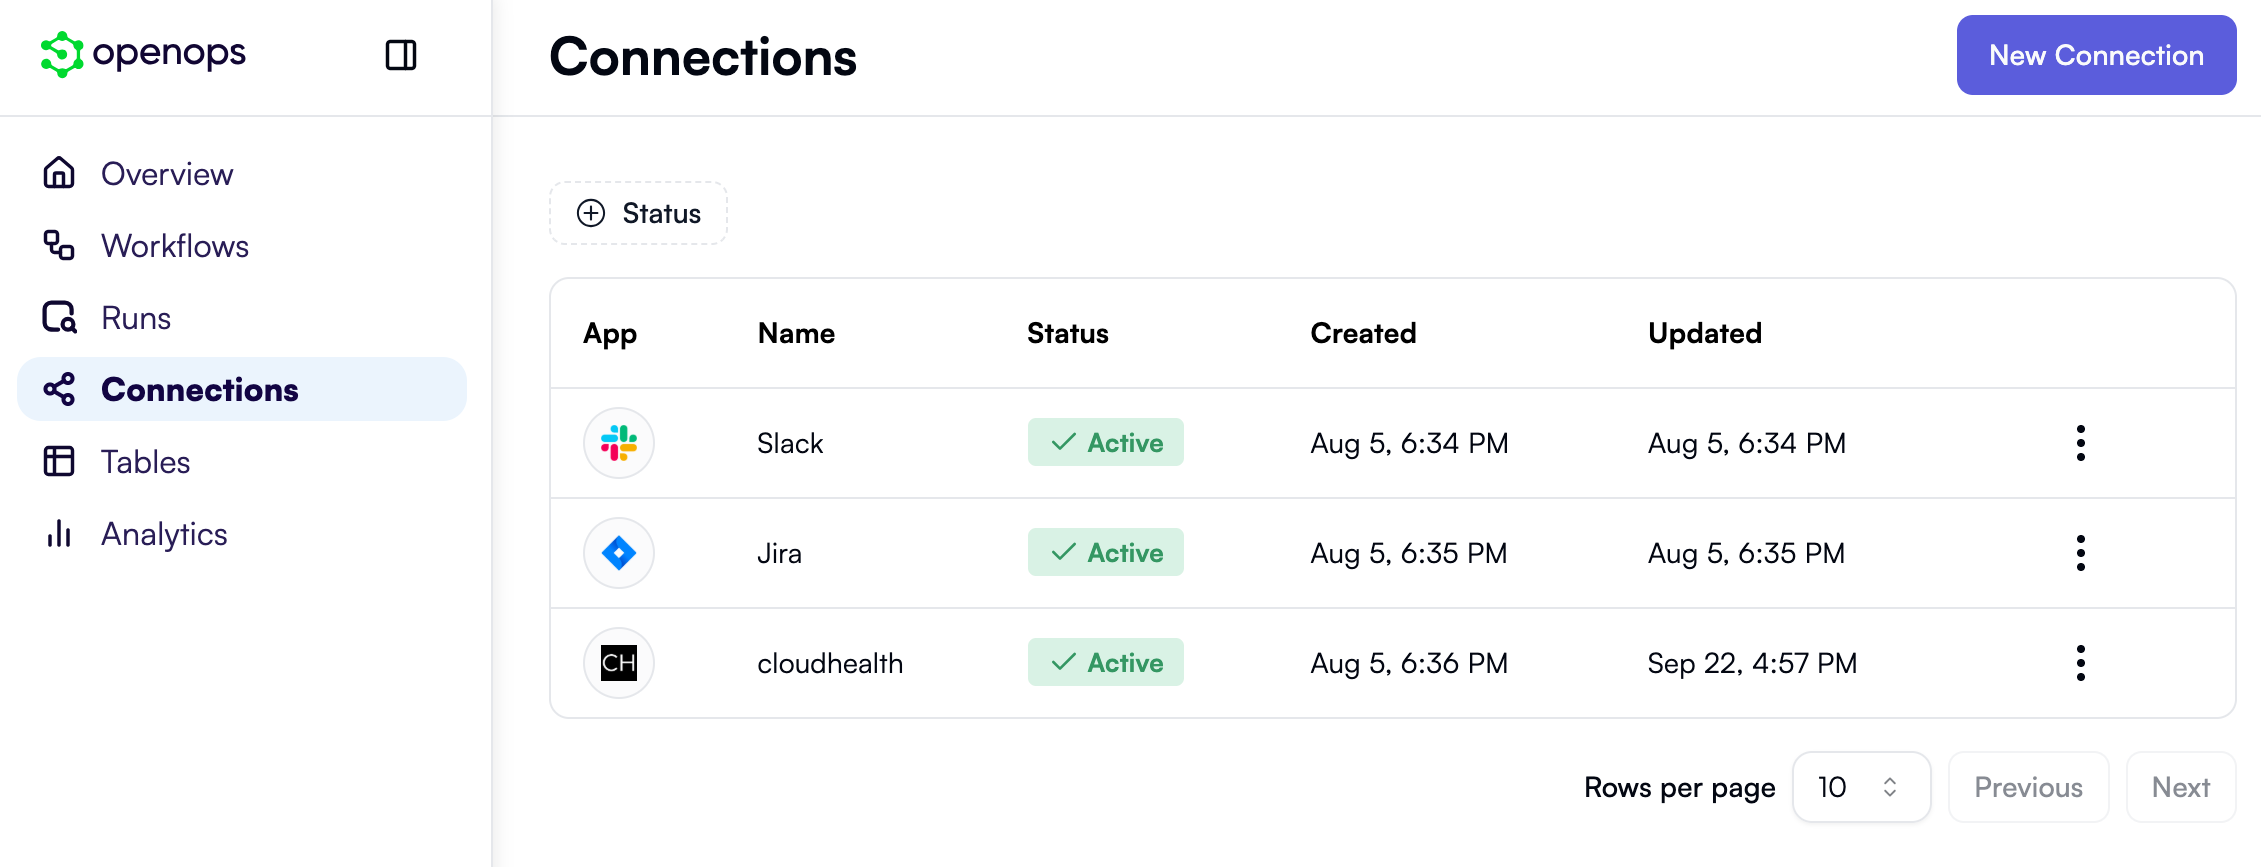
After you’ve set up all the connections, you should see them listed in the Connections view in OpenOps:
Creating a workflow to fill the project-owner mapping table
The first workflow you’re going to build will help track resource ownership by project. For this workflow to operate, it needs an OpenOps table to store project information. Let’s create the table first.If you don’t want to follow this section step by step, you can download the finished workflow and import it.
Create a project-owner mapping table
To create the table that will store project names and their owners, follow these steps:- In the left-side OpenOps menu bar, click Tables.
- Under the Tables heading, click OpenOps Dataset to expand the list of tables.
- At the bottom of the list, click New table.
- In the Name text field, enter CloudHealth project-owner mapping.
- Click Add table.
- When the new table is created, it has a few default fields (a field in OpenOps tables is what we typically call a column). You won’t need them. Instead, create two new fields. Start with a field for the project name:
- Click + in the table header to create a new field.
- In the list of field data types, click Single line text.
- Replace the default field name with CloudHealth project.
- Click Create.
- Create a second field for the owner email:
- Click + in the table header to create a new field.
- In the list of field data types, click Email.
- Replace the default field name with Owner email.
- Now, make CloudHealth project the primary field:
- Click the down arrow in the header of the Name field created by default.
- Click Change primary field.
- In the Primary field dropdown, select CloudHealth project.
- Click Change.
- Delete the three default fields: Name, Notes, and Active. For each of these fields, click the down arrow in the header, then click Delete field.
Create a new workflow
Now that you’ve prepared a project-owner mapping table, you can start creating a workflow that takes advantage of it. In the left-side OpenOps menu bar, click Workflows. When the list of workflows opens, click the + New Workflow button in the top right. OpenOps will open its workflow editor with a new untitled workflow that initially contains only an empty trigger step: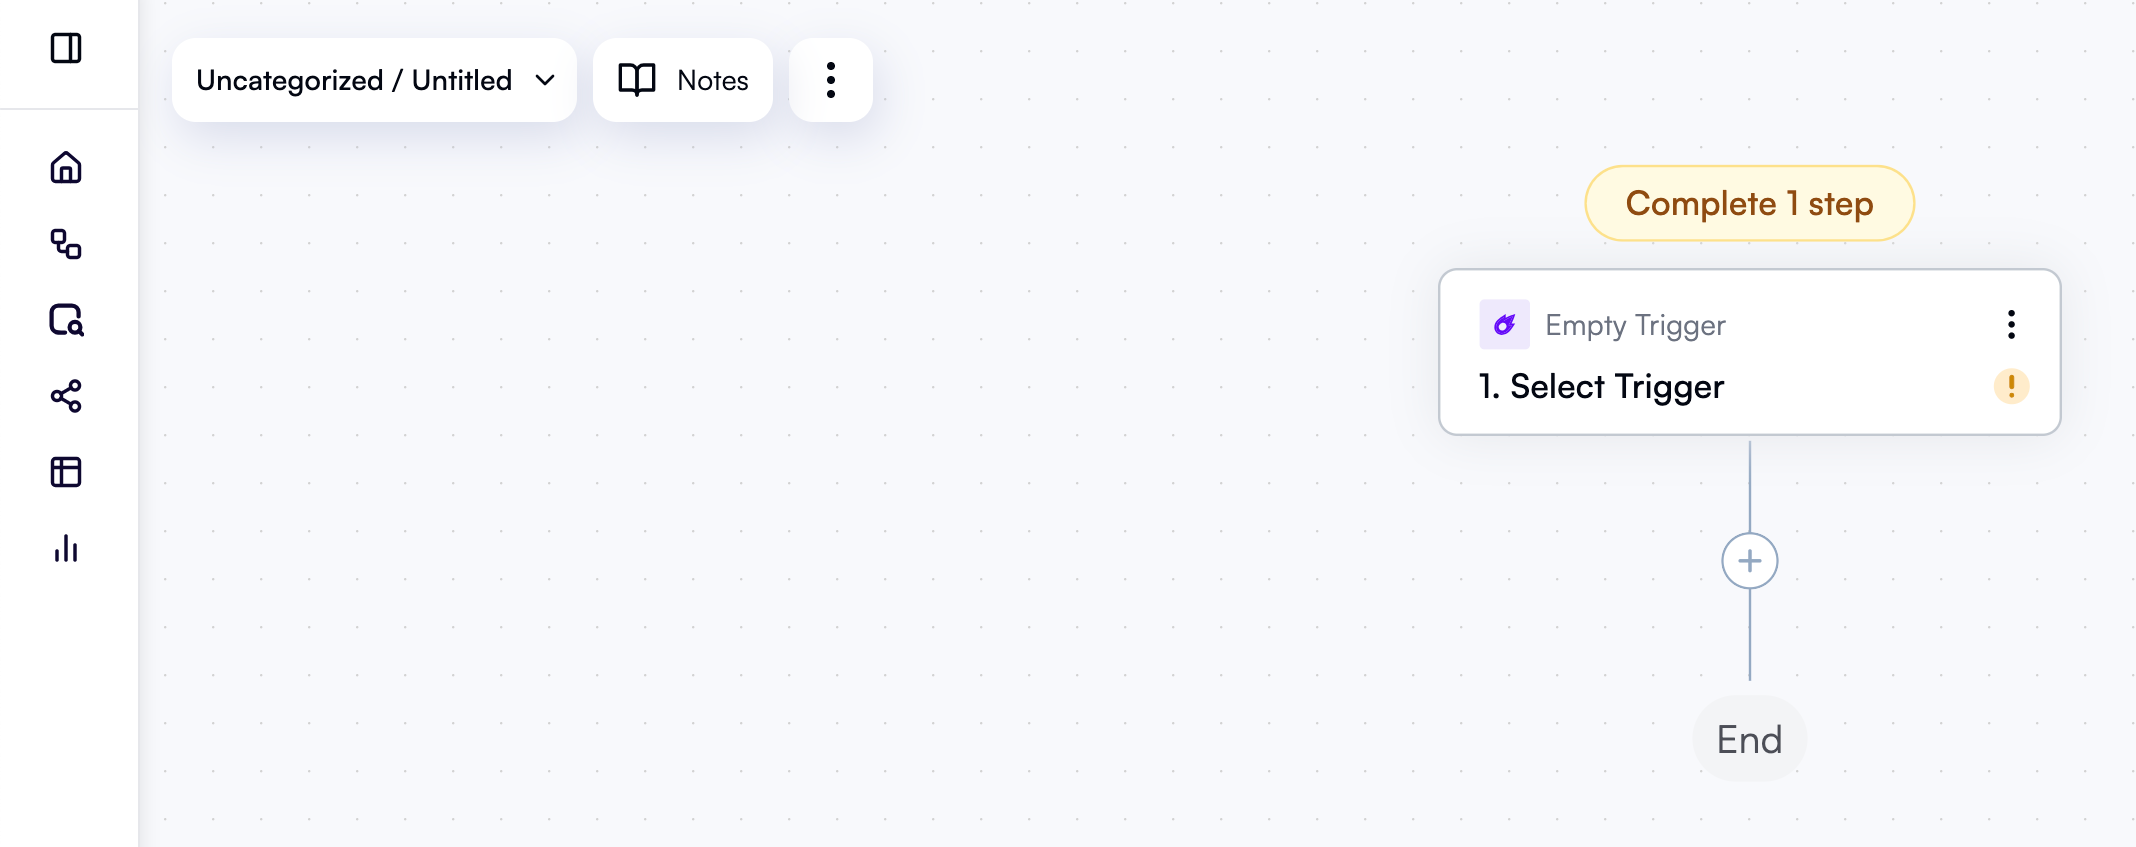
Configure the trigger to run every week
The first thing that needs to be done is to configure your workflow to run on a schedule. In the workflow editor, click the trigger step. When a dropdown with types of triggers opens, select Schedule, then Every Week. After selecting the trigger type and frequency, you’ll see the trigger step’s properties pane on the right, with the Configure tab open. Under Day of the week, select Monday. Under Hour of the day, select Noon. Keep the default time zone (UTC), or set it to the time zone you’re in. Now, open the Test tab in the properties pane. Under Step output, click Load Data. This tests your step. Going forward, you’ll need to test all steps before you can test the entire workflow. While in the case of a trigger this is more of a formality, in many cases testing individual steps will help you spot and fix configuration errors quickly. Here’s what your workflow should look like at this point: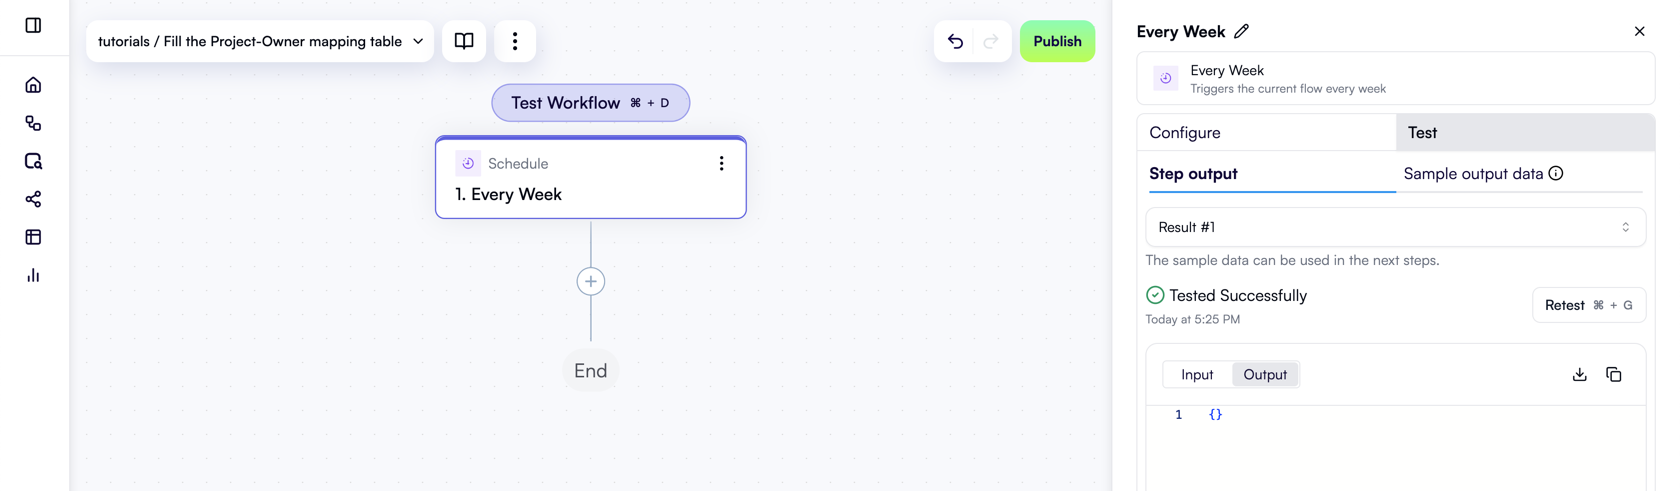
Get all AWS instances from CloudHealth
The goal of this workflow is to get all project names from AWS instance metadata stored in CloudHealth and write them to an OpenOps table. This way, the EC2 rightsizing workflow you’ll create next can look up project owners based on project names. Therefore, the first action of this workflow is to fetch information about all AWS instances from CloudHealth. In the workflow graph, under the trigger, click + to add a new step. In the pop-up menu, scroll down and click CloudHealth. In the list of CloudHealth-related actions, select Search Assets: This adds a new step to the workflow graph and displays the action’s properties pane on the right. You’ll now need to configure the action. First, at the very top of the properties pane, click Edit Step Name next to the default name and rename the step Get all AWS instances. For API Key, select your existing CloudHealth connection that you set up earlier. Set Asset Type to AWSInstance. Click the Test tab in the properties pane. Under Step output, click Test Step. This will test the action and display its output. Your workflow should now look like this: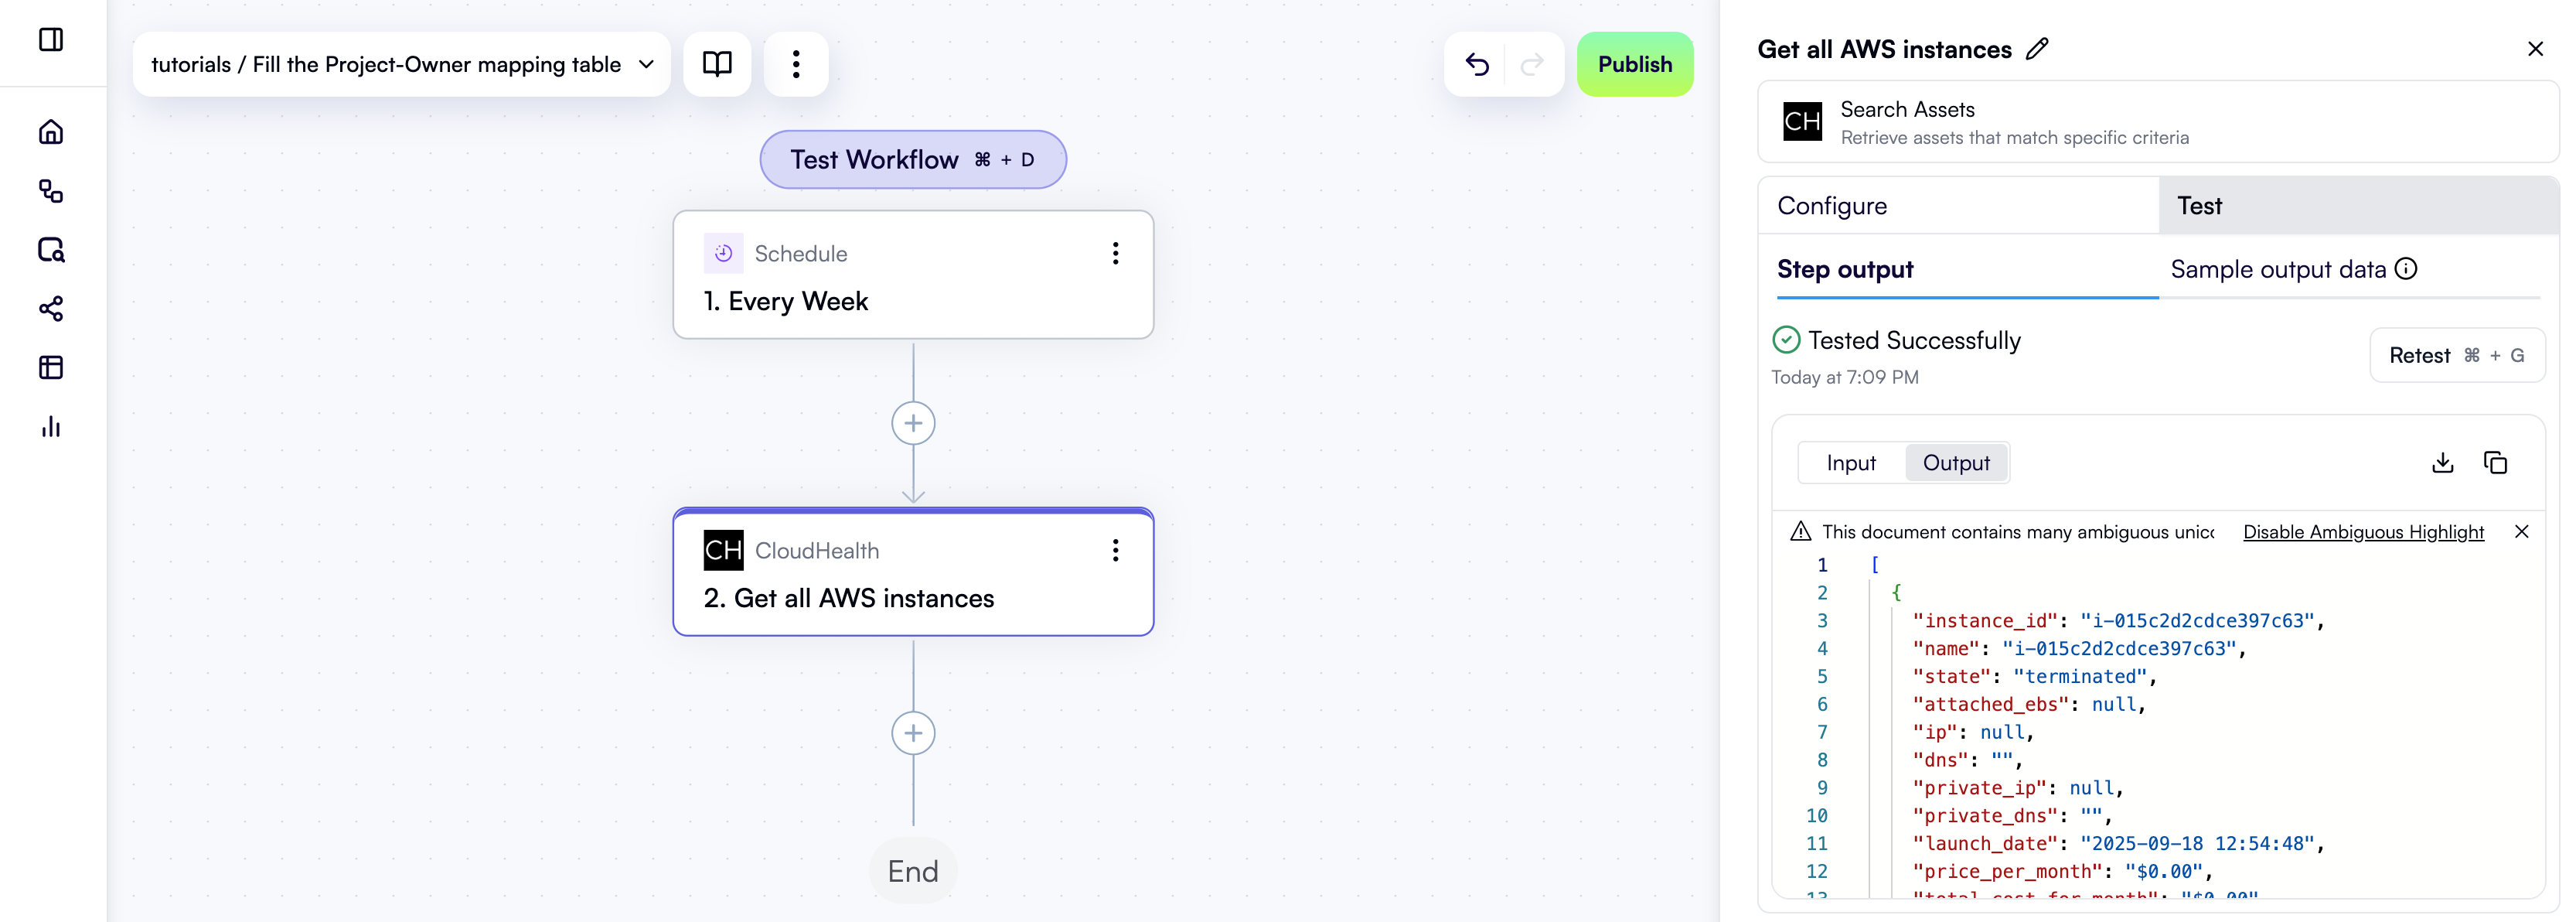
Extract distinct project names
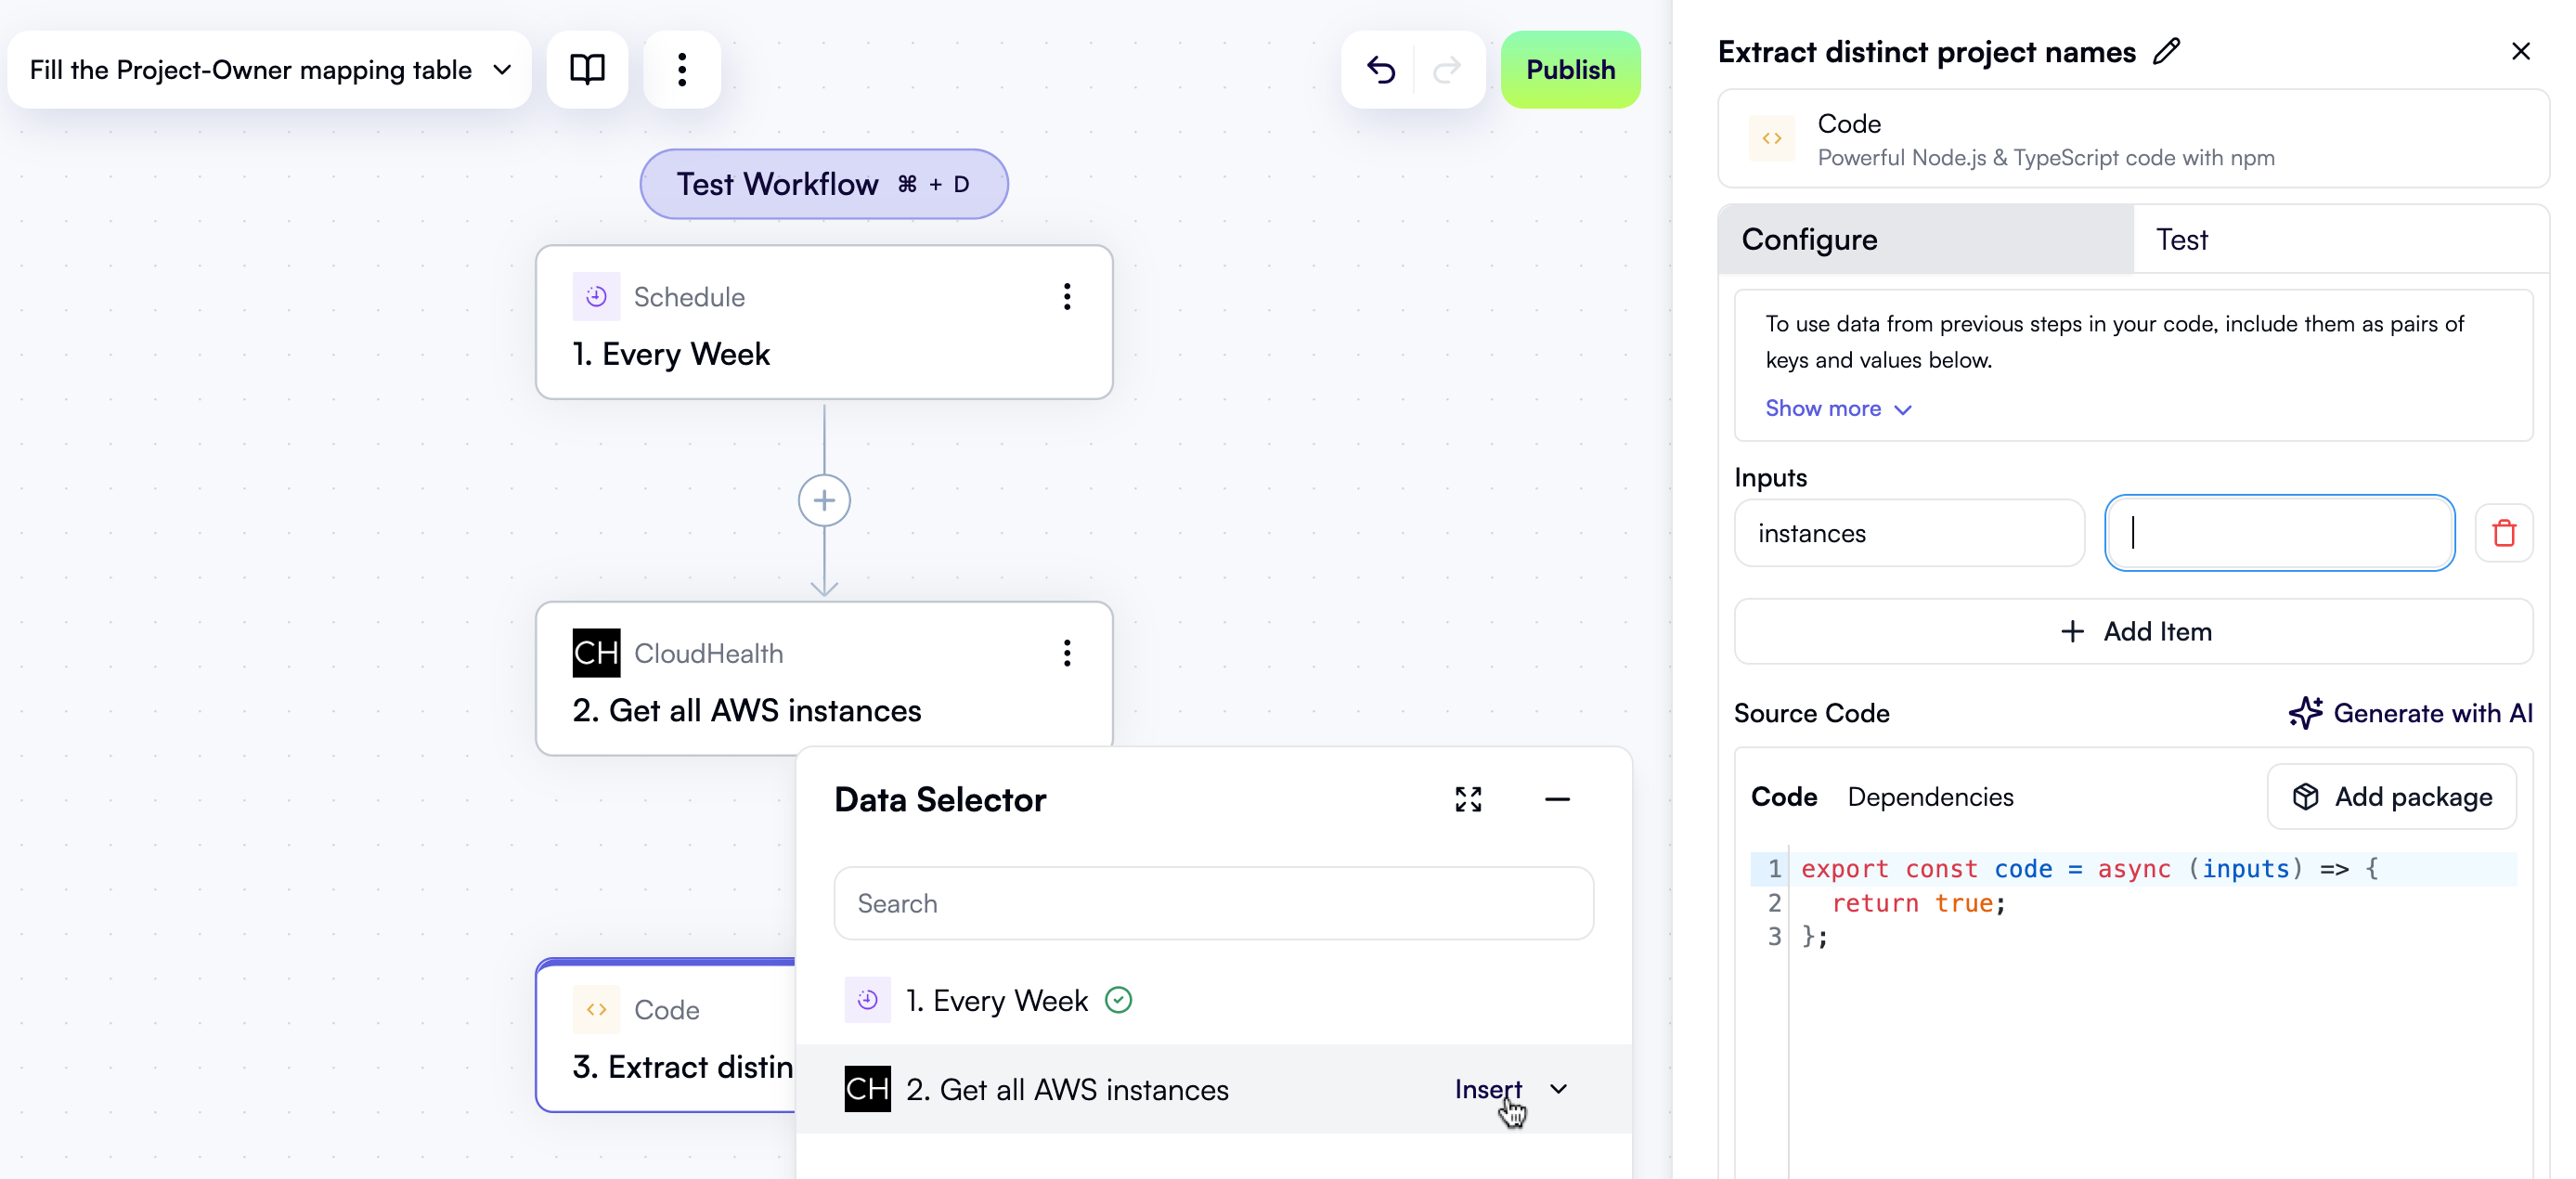
Now that you have a list of all AWS instances, you need to know which projects they belong to. For this, let’s create a JavaScript code block that goes through the metadata of all instances, extracts project names, and returns a list of distinct project names. In the workflow graph, click + to add a new step. In the pop-up menu, select Code in the left pane, then click Custom TypeScript Code in the right pane. This adds a new step to the workflow graph and displays the code block’s properties pane on the right. At the top of the properties pane, click Edit Step Name and rename the step Extract distinct project names. Next, you need to let the custom code action know exactly what data it should process. Under Inputs in the properties pane, click Add Item, which will display two new fields. Enterinstances in the left field. When you click in the right field, the Data Selector view opens. Inside that view, click Insert alongside the Get all AWS instances entry:

Iterate over project names
Now that you have a list of all project names, create a loop to go through each of them and decide what to do with them. First, click + in the workflow editor to add a new step. In the pop-up menu, select Loop on Items in the left pane, then click Loop on Items in the right pane. At the top of the properties pane, click Edit Step Name and rename the step For each project name. Click in the Items field. In the Data Selector view that opens, click Insert alongside the 3. Extract distinct project names entry. This passes the list of project names obtained in the previous step as the input for the loop to iterate over. This is what the Configure tab in the properties pane should now look like: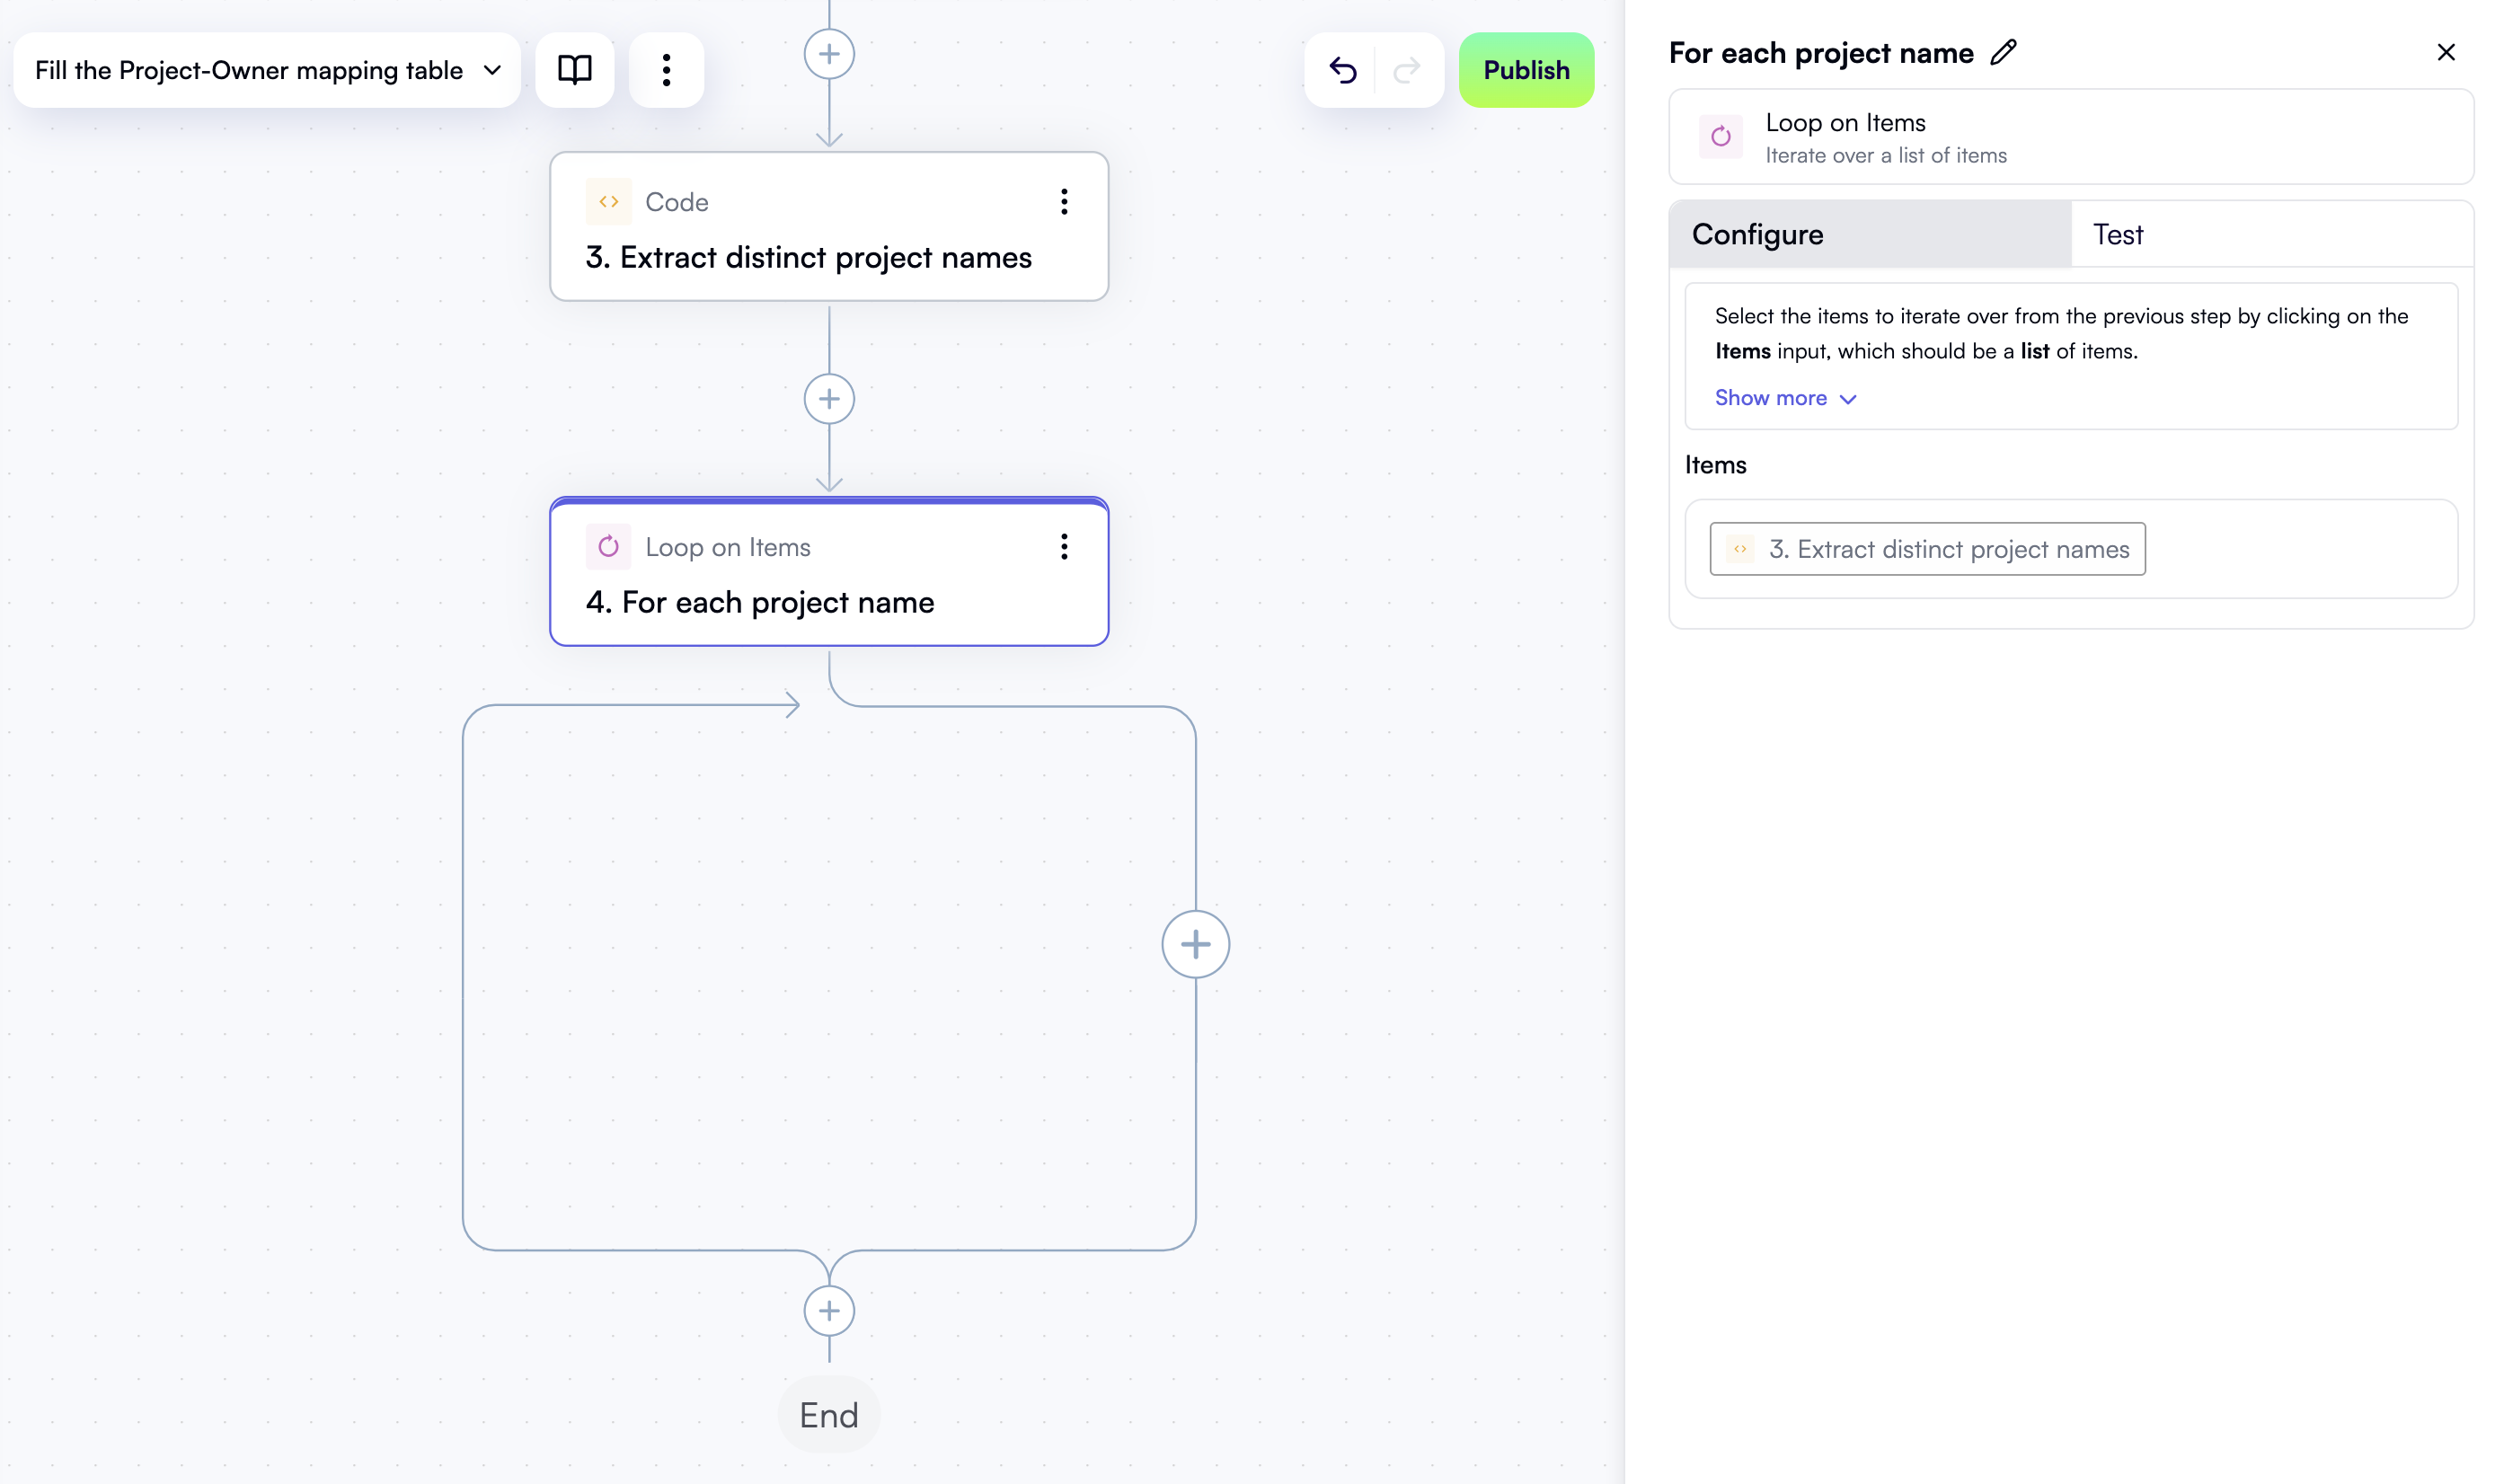
Check if the project name is already in the table
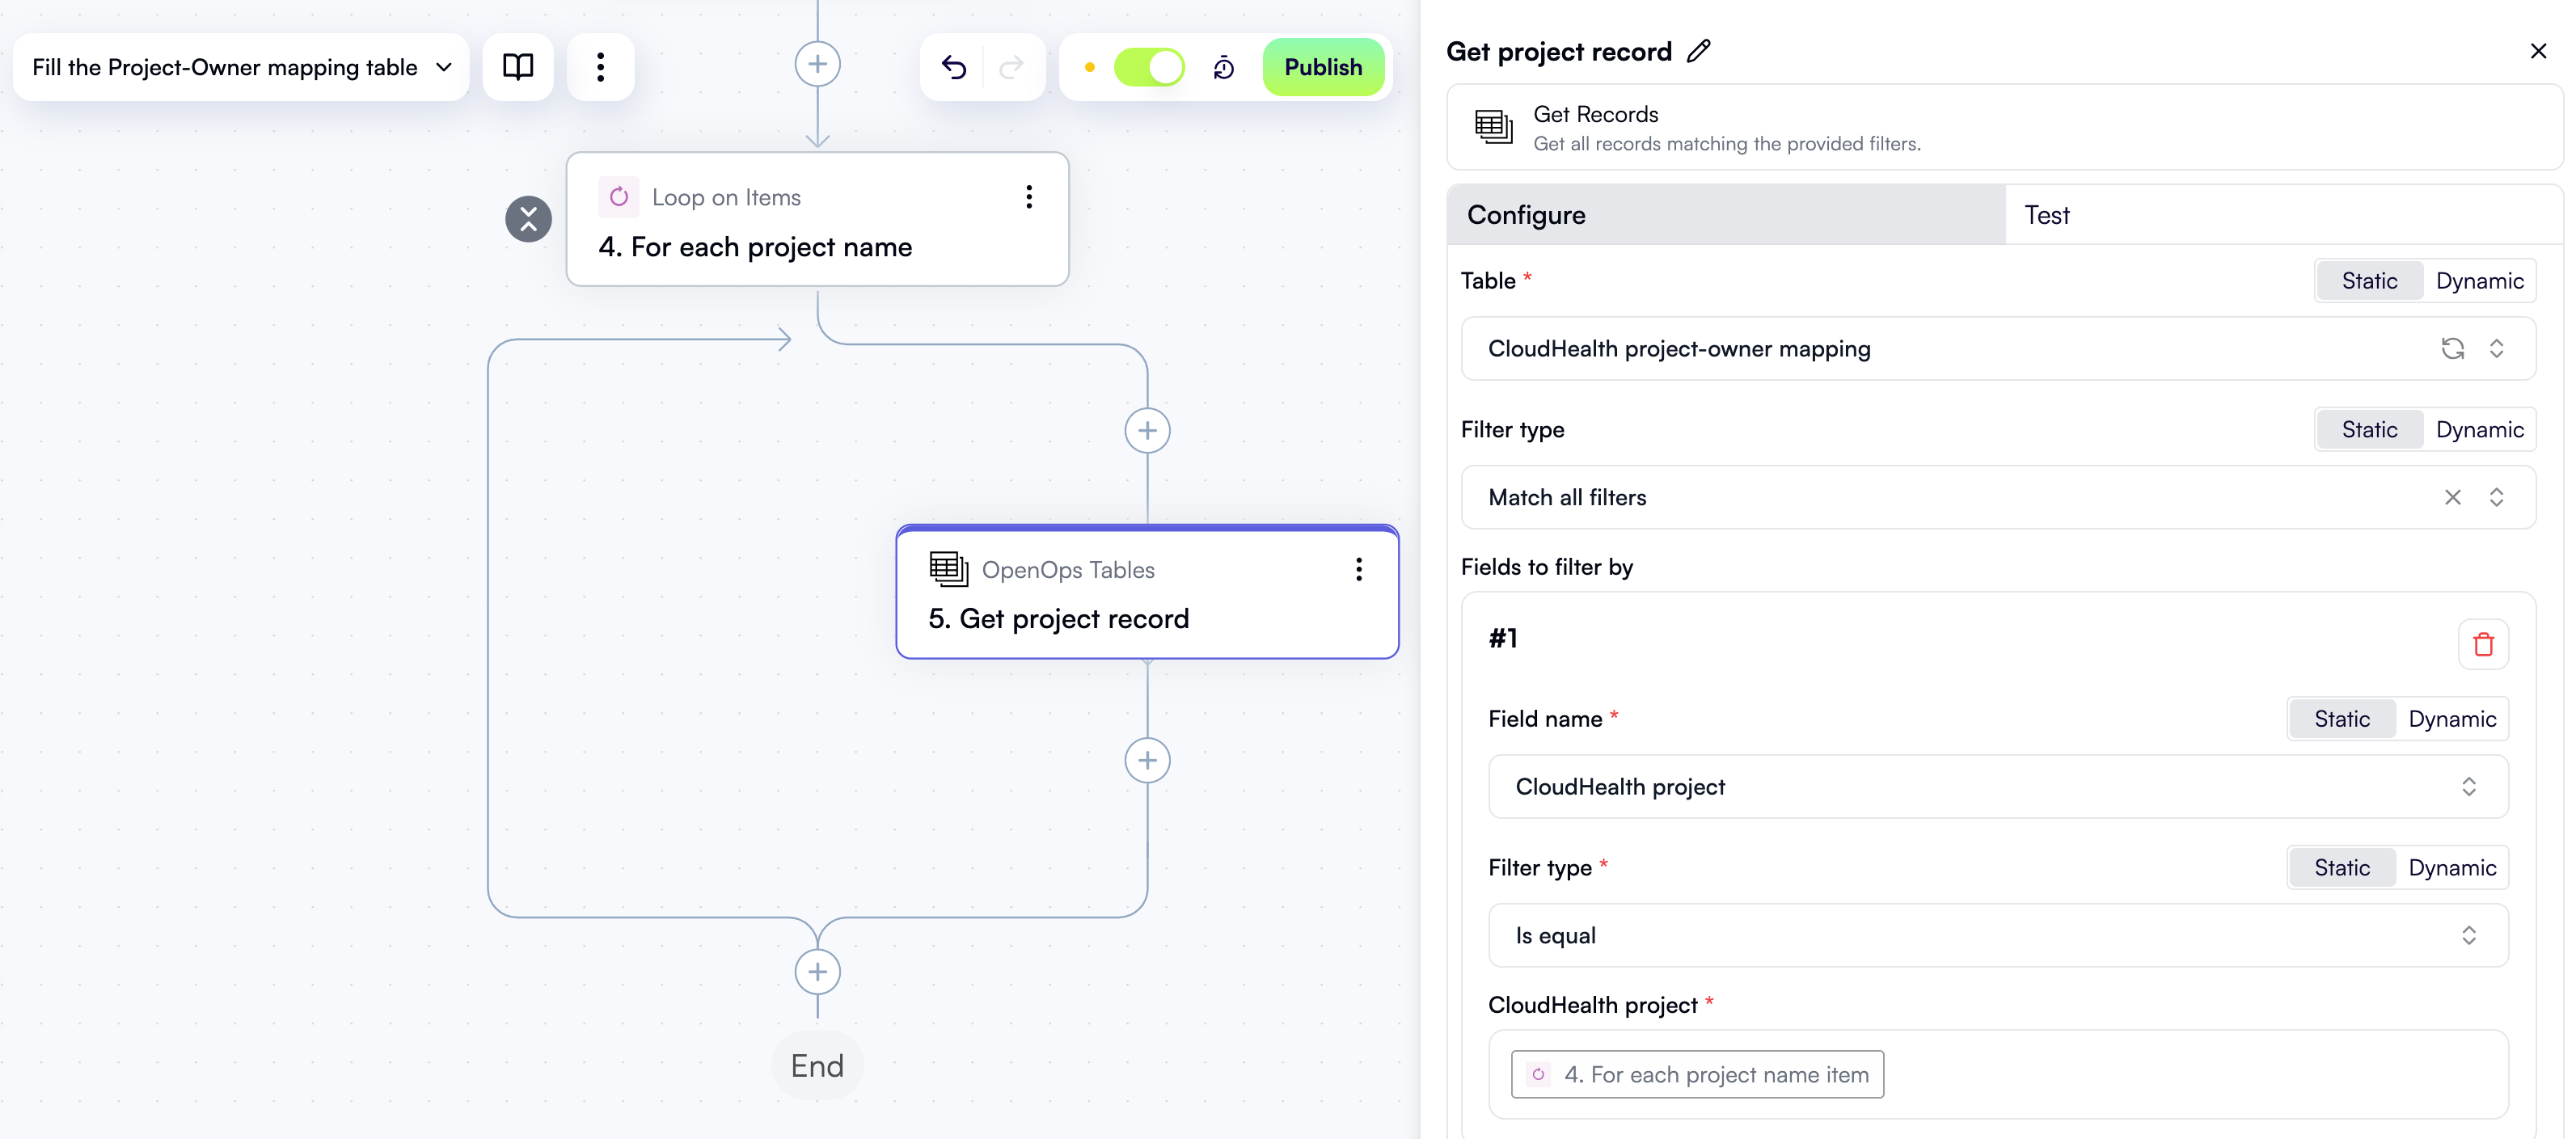
If a project is already listed in the table and a project owner email is already defined for it, you don’t need to update the existing record. This avoids overwriting project emails that were added earlier. First, let’s see if the project name is already in the table. In the workflow editor, click the + button inside the loop: In the pop-up menu, select OpenOps Tables in the left pane, then click Get Records in the right pane. At the top of the properties pane, click Edit Step Name and rename the step Get project record. For the Table field, select CloudHealth project-owner mapping — that’s the table you created manually earlier. Under Fields to filter by, click Add Item. This will open a new area to define a search filter. Inside the area:- In the Field name dropdown, select CloudHealth project.
- In the Filter type dropdown, select Is equal.
- In the CloudHealth project field, use Data Selector to expand the 4. For each project name entry from the previous step, then click Insert alongside the item entry:
Check if a project owner email is already defined
Now, if the project name is already in the table, you need to check whether a project owner email is defined for it. If it is, you don’t need to update the existing record. In the workflow editor, click + to add a new step. In the pop-up menu, select Condition in the left pane, then click Condition in the right pane. At the top of the properties pane, click Edit Step Name and rename the step Is email already defined?. Under Continue If, click the left field with the placeholder text First value. In Data Selector, expand 5. Get project record, then items, then items[1]. Click Insert alongside the Owner email entry: In the dropdown between the two fields, select Exists. Here’s what the new step in the workflow graph and the Configure tab in its properties pane should now look like: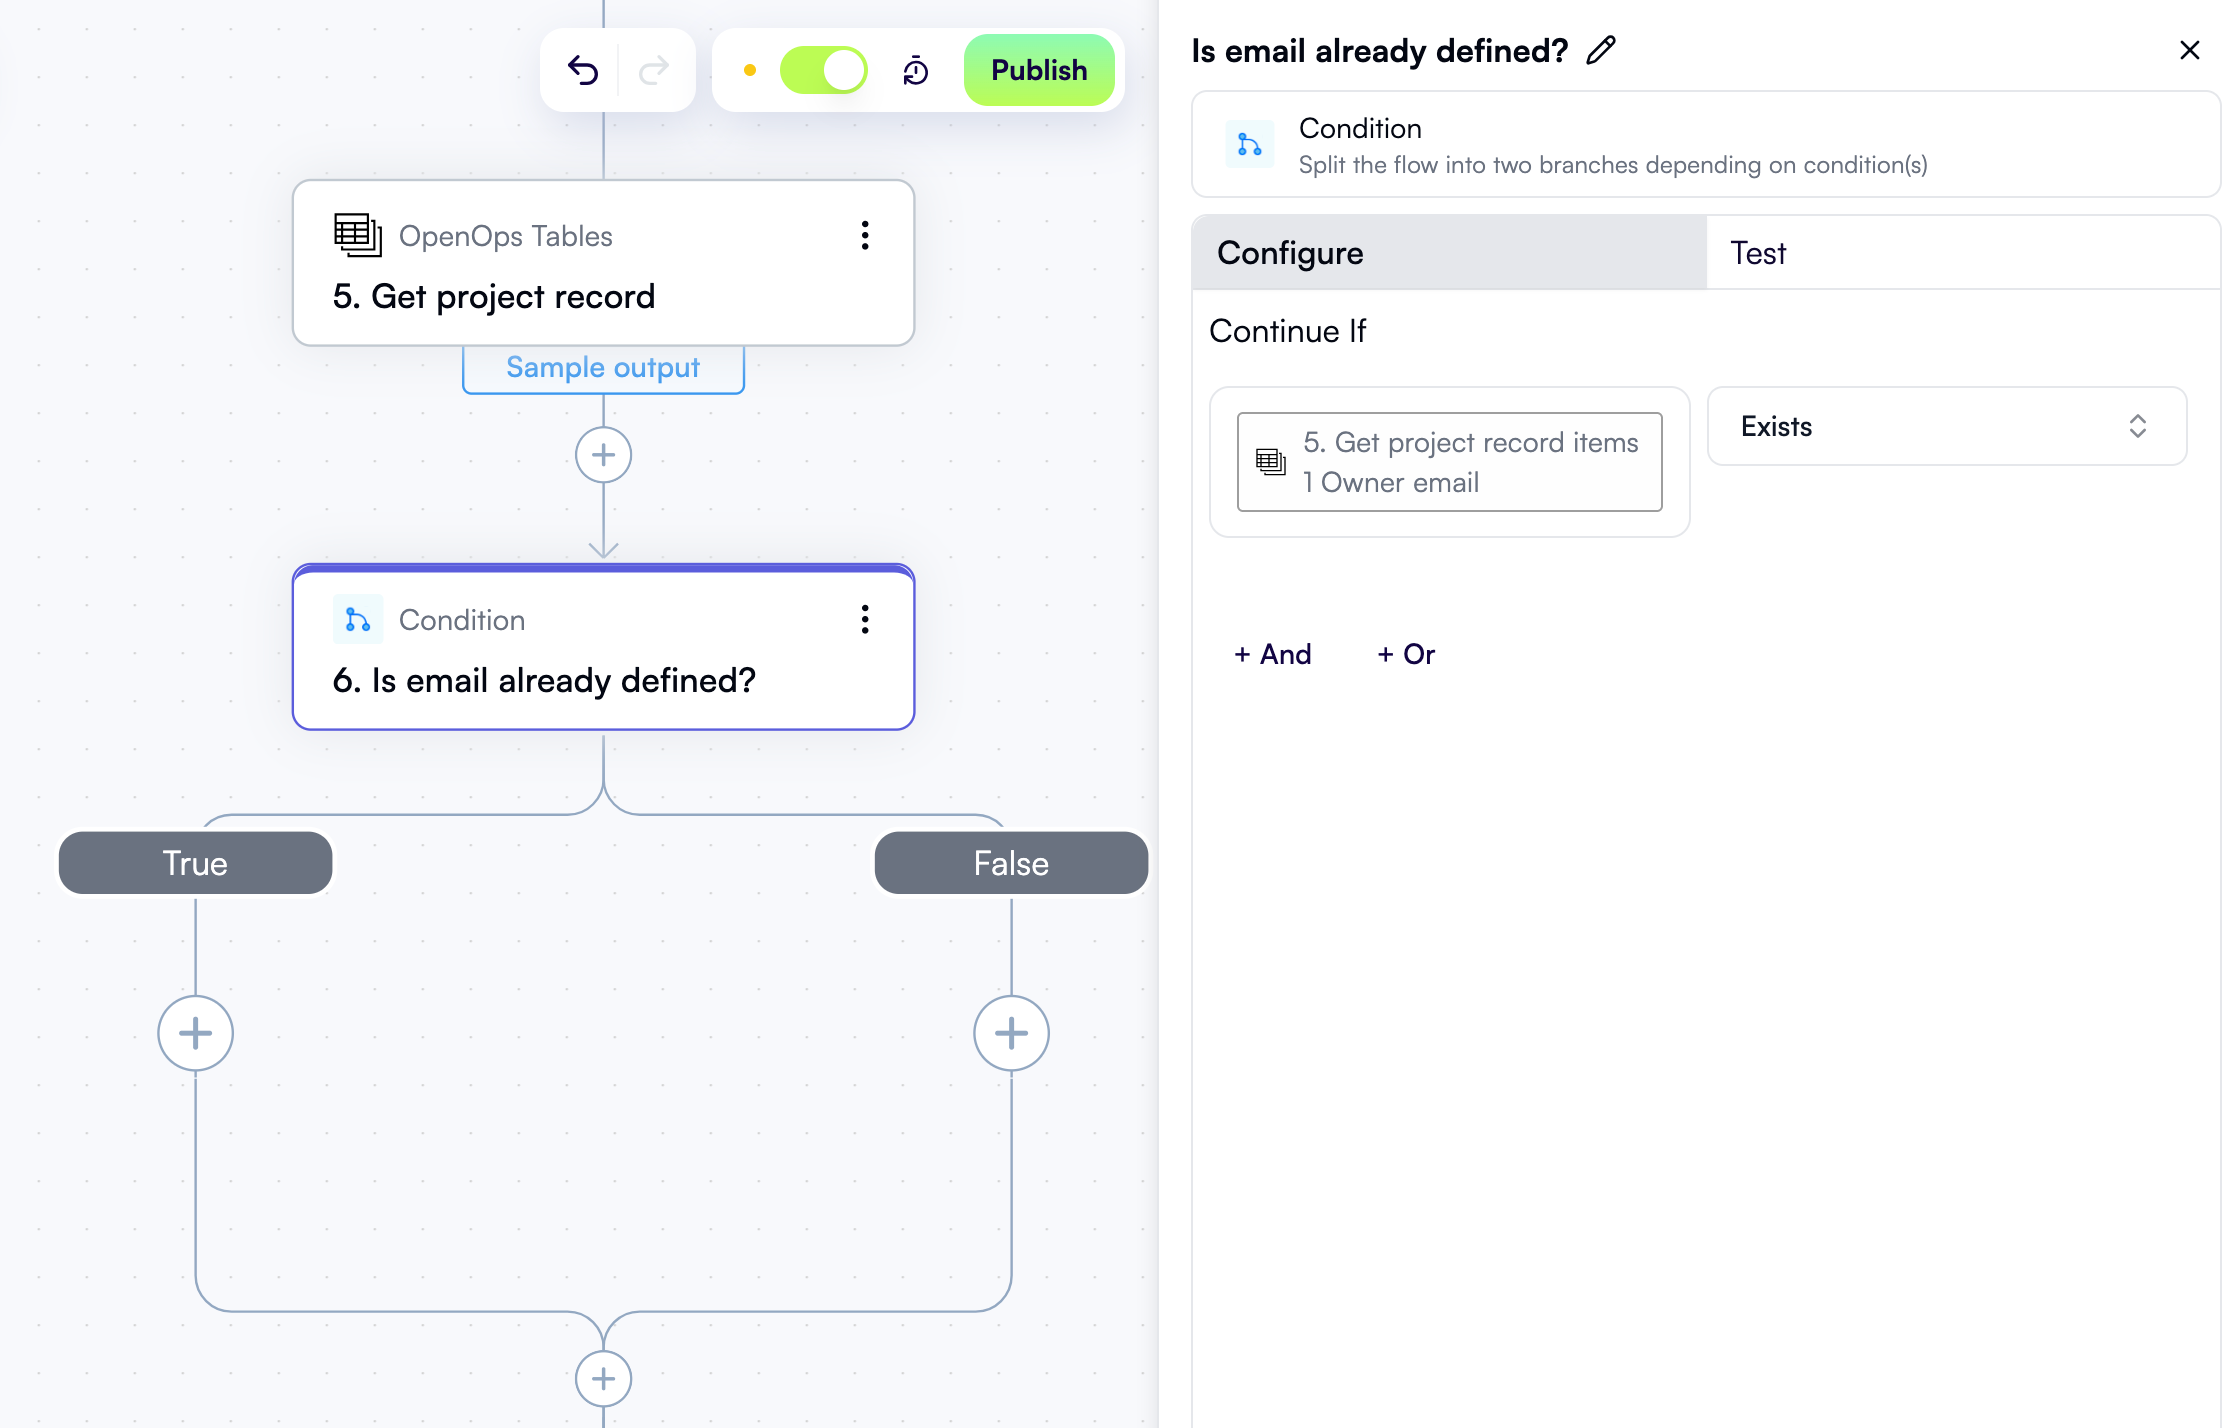
Add project name to the OpenOps table
Now you need to add a record with the project name to the OpenOps table, unless it’s already there and the owner email is defined. To do this, click + in the workflow editor under the False branch of the Is email already defined? condition. In the pop-up menu, select OpenOps Tables in the left pane, then click Add or Update Record in the right pane. In the properties pane of the new step, rename the step Add project to mapping table. For the Table field, select CloudHealth project-owner mapping. Click the Primary Key Value field to open the Data Selector view. In this view, expand the 4. For each project name entry, then click Insert alongside the item entry. Under Fields to update, click Add Item. This opens a new area where you specify what to add in the Owner email field of your OpenOps table. Inside this area:- In the Field name dropdown, select Owner email.
- In the Owner email field, enter your own email address. You’ll use this to test the EC2 rightsizing workflow described next. Your account in your organization’s Slack workspace should be registered to this email. Once both workflows described in this tutorial are complete, replace your email with the actual project owners’ emails.

Test and publish the workflow
You now have all the steps needed to populate the project-owner mapping table. The final task is to test and publish the workflow. To test the workflow, scroll to the top of the workflow graph and click the Test Workflow button above the trigger: Although this is called “testing”, OpenOps will actually run the entire workflow, performing all actions as if it were running on its defined schedule. Once the run completes, you should see green checkmarks next to each step in the Run Details pane on the right, along with a Run Succeeded status message at the bottom: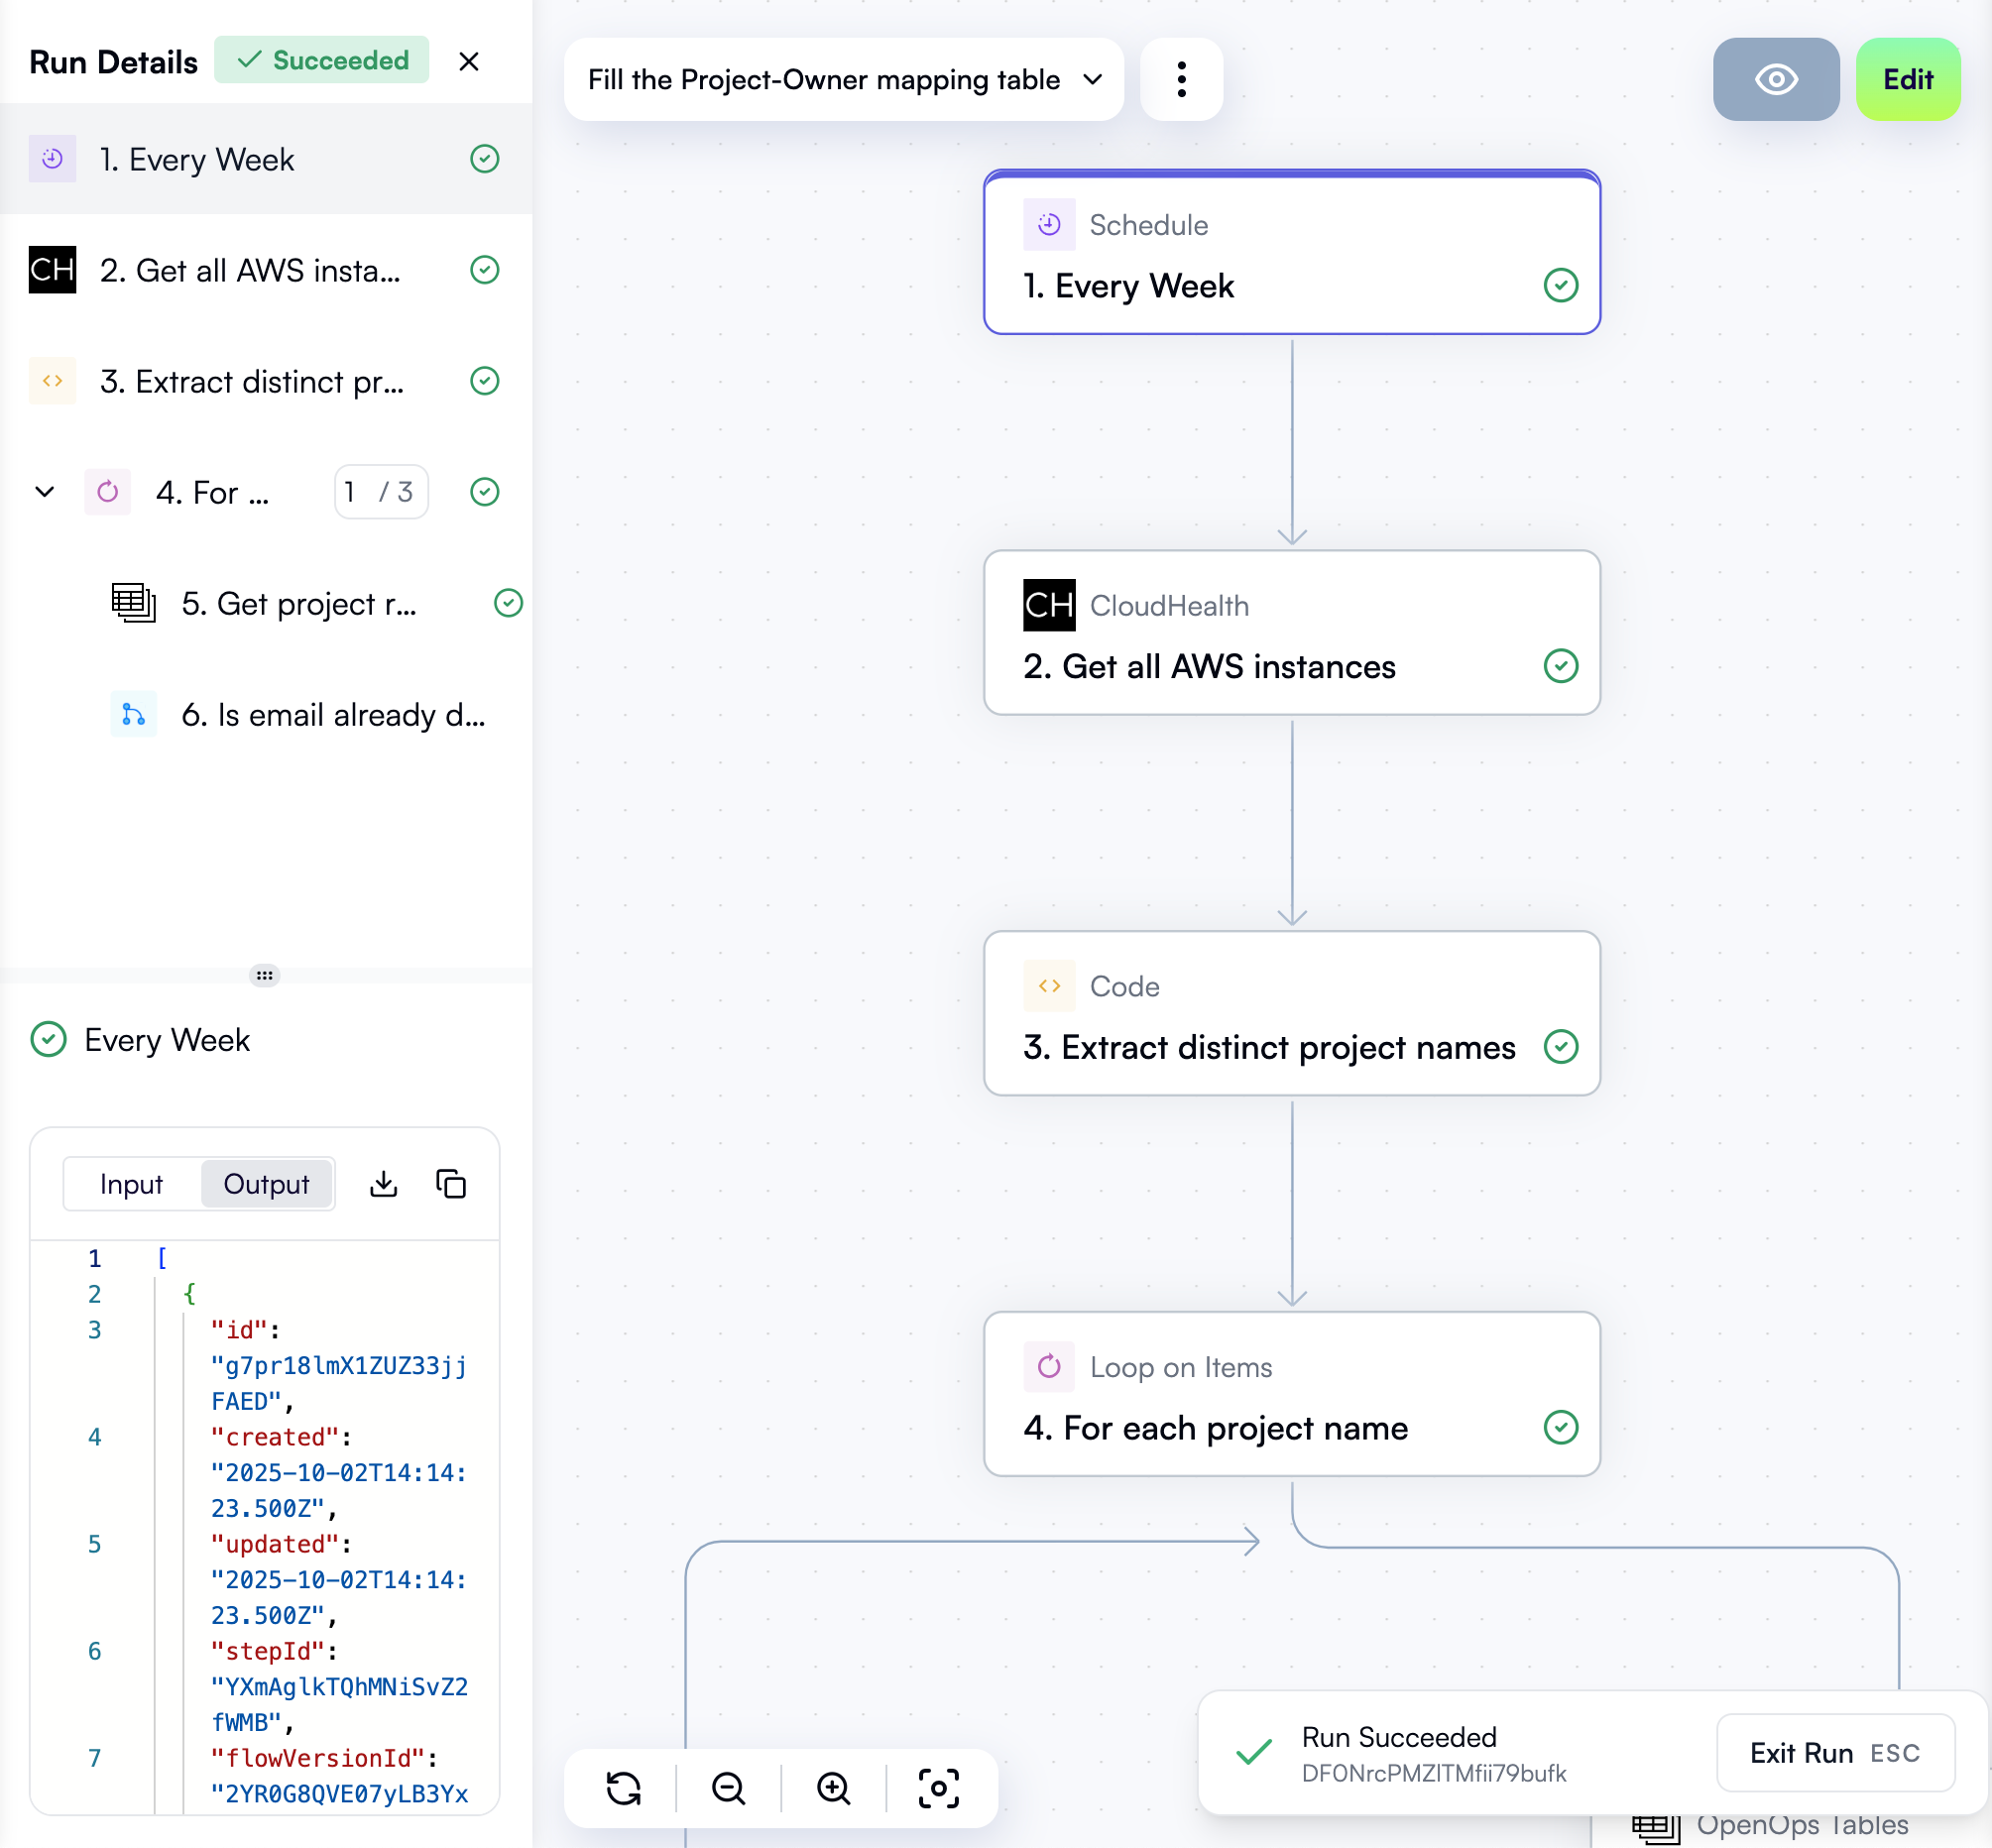
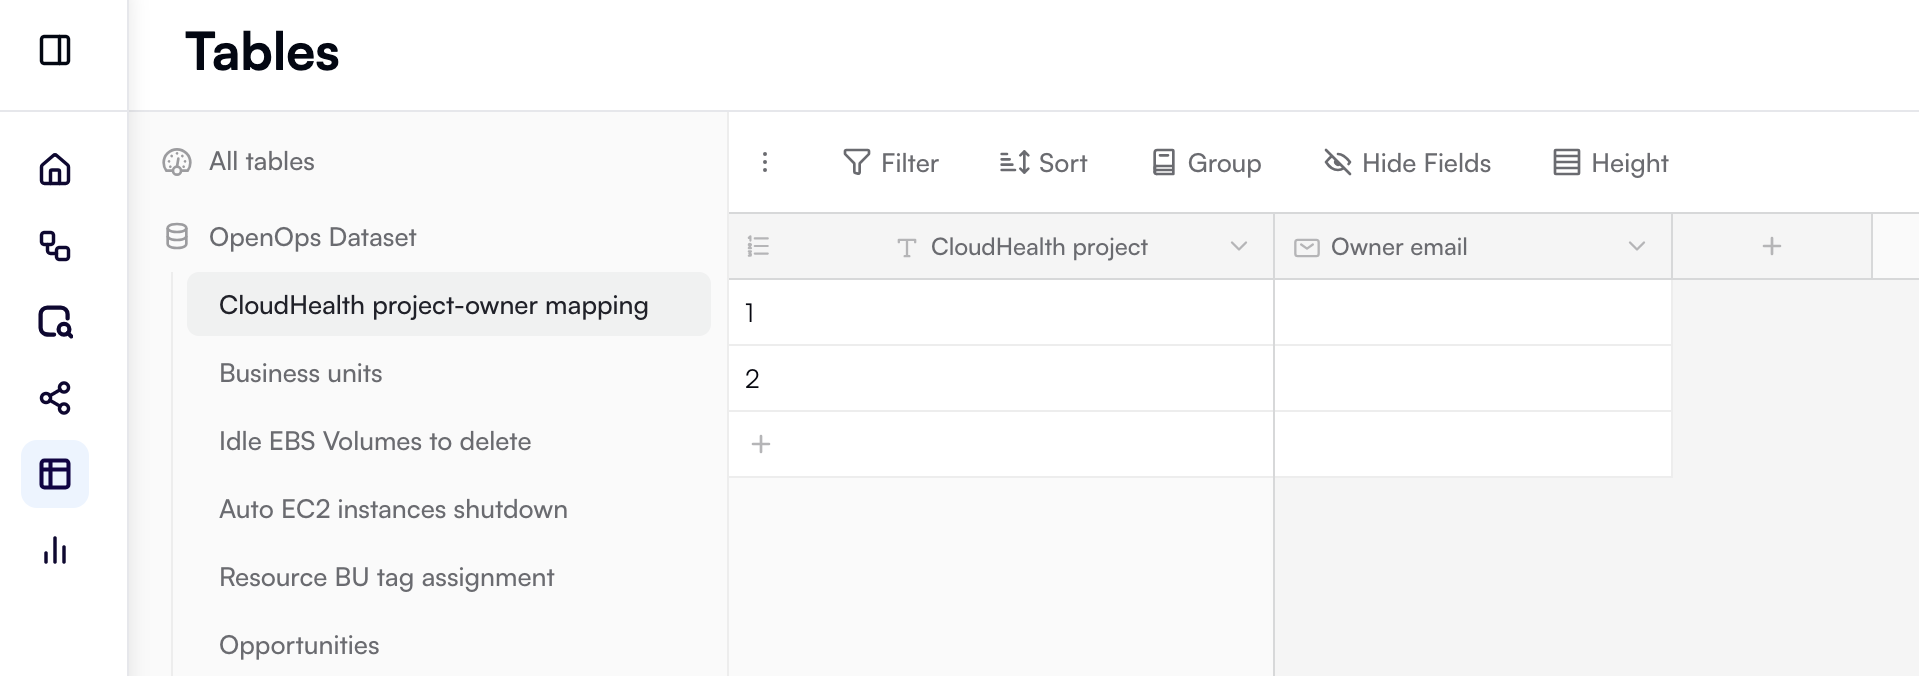
Review the project-owner mapping table
Click Tables in the left-side menu. Under OpenOps Dataset, click CloudHealth project-owner mapping. After running the workflow, the table should look something like this: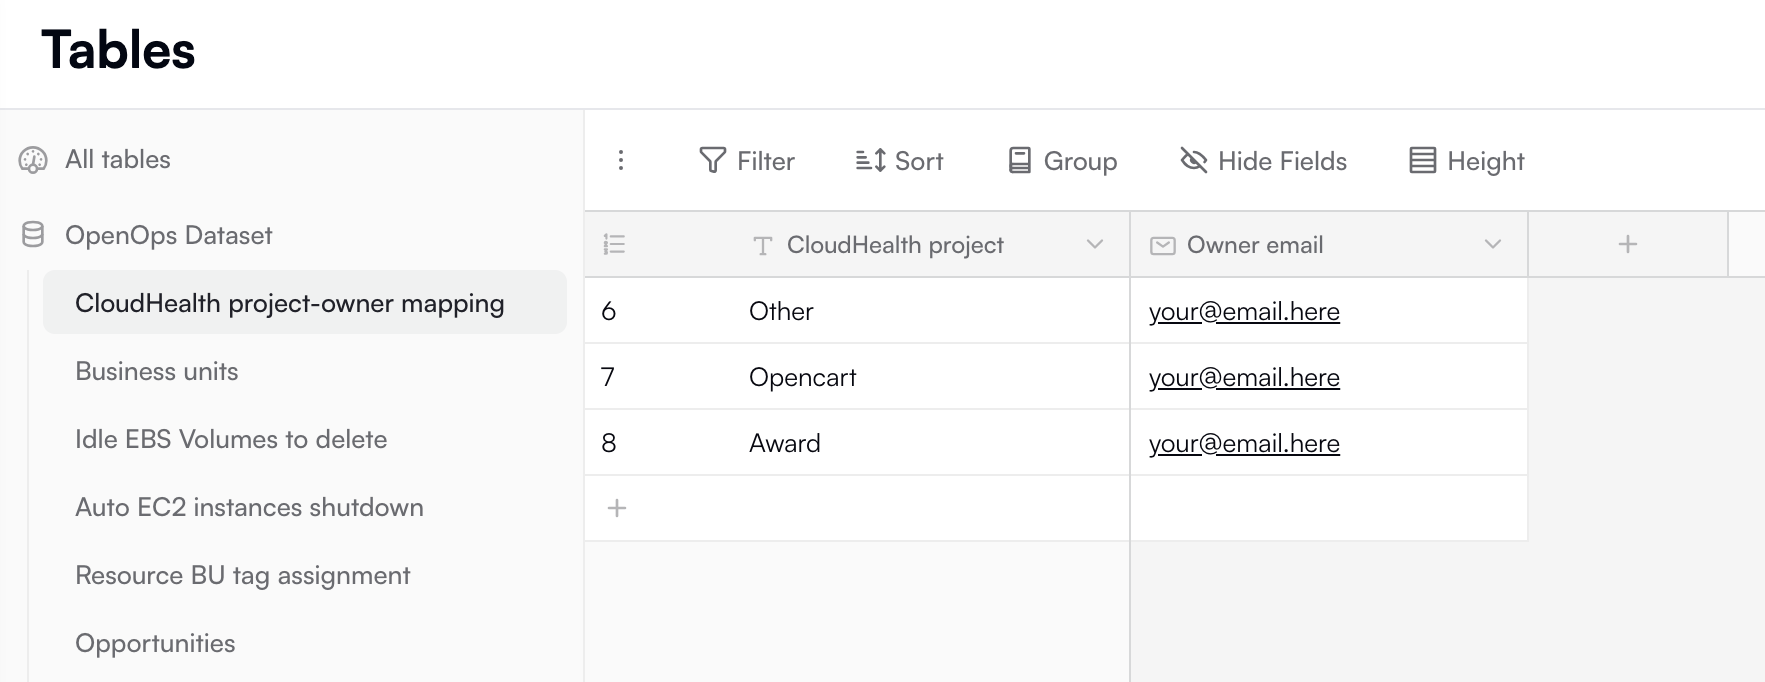
Creating a workflow to process CloudHealth rightsizing recommendations
Now let’s create another workflow — this one will process CloudHealth EC2 rightsizing recommendations.If you don’t want to follow this section step by step, you can download the finished workflow and import it.
Create a new workflow
In the Overview or Workflows view in OpenOps, click the + New Workflow button in the top right. When the OpenOps workflow editor opens with a blank workflow, click the down arrow next to the workflow name in the top left, then click Rename, and change the name to CloudHealth Rightsizing Recommendations.Configure the trigger to run every working day
Click the trigger step in the workflow editor. In the trigger type dropdown, select Schedule, then choose Every Day. In the trigger step’s properties pane on the right, under the Configure tab, keep the default settings. With these defaults, the workflow will run every day (excluding weekends) at midnight UTC: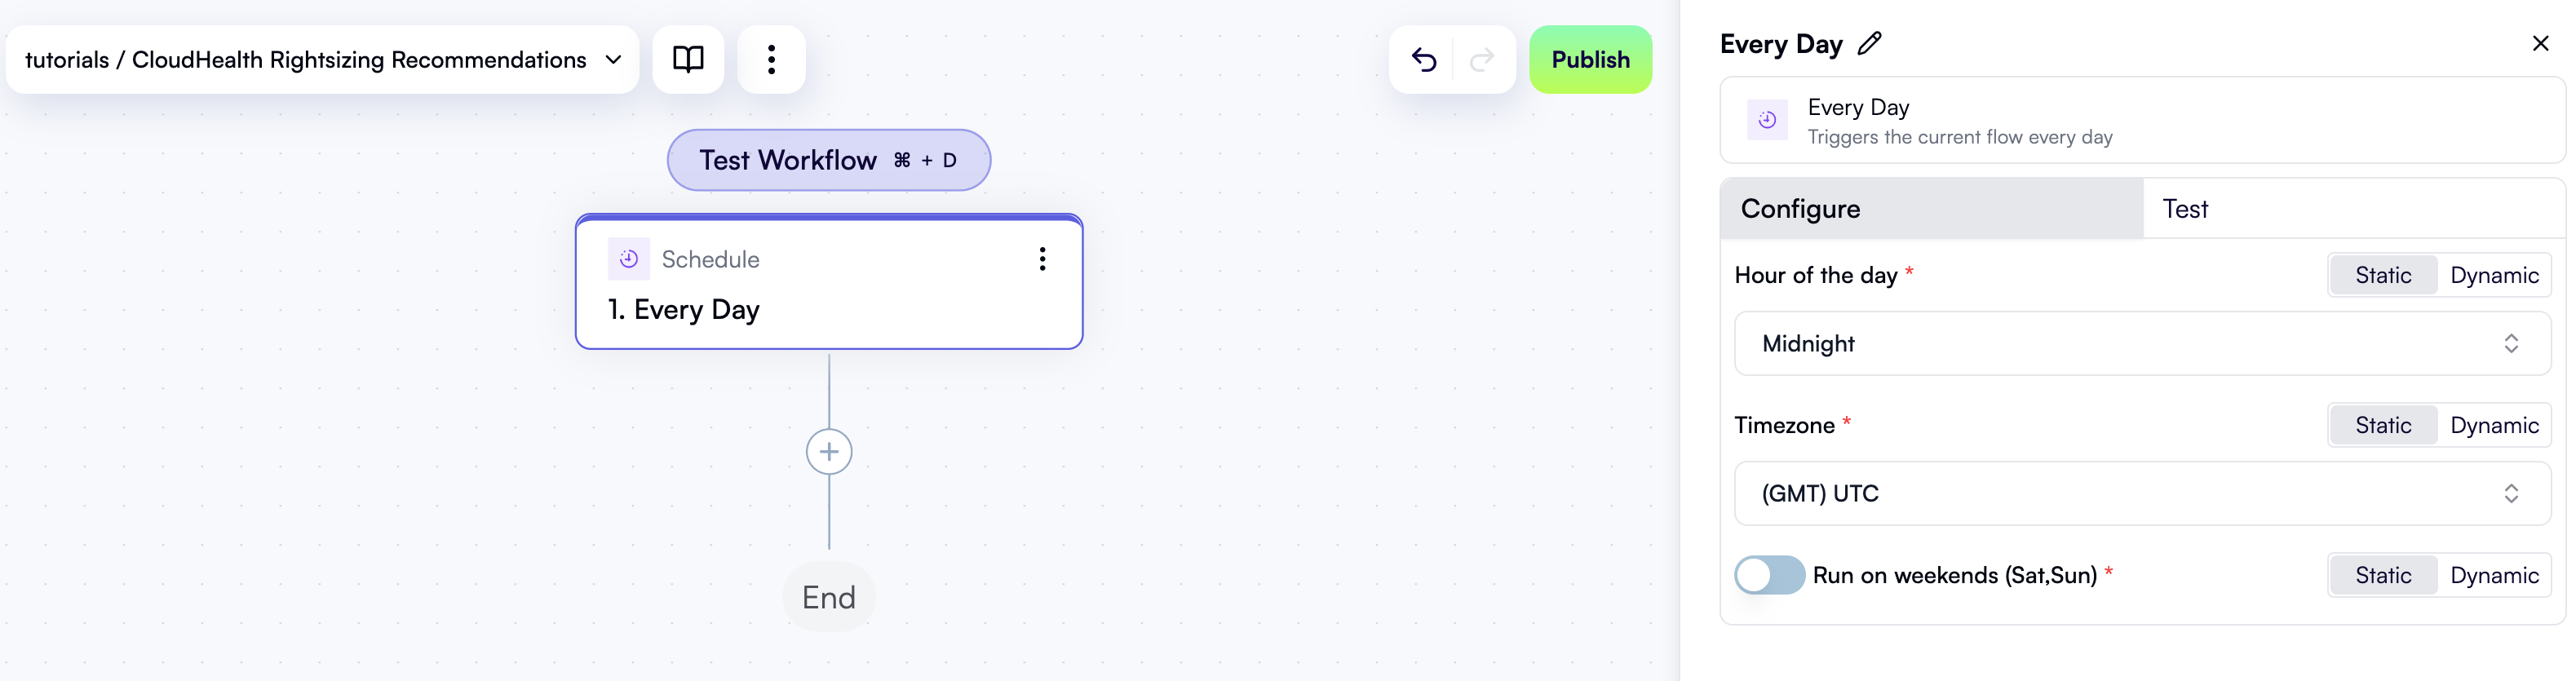
Fetch rightsizing recommendations from CloudHealth
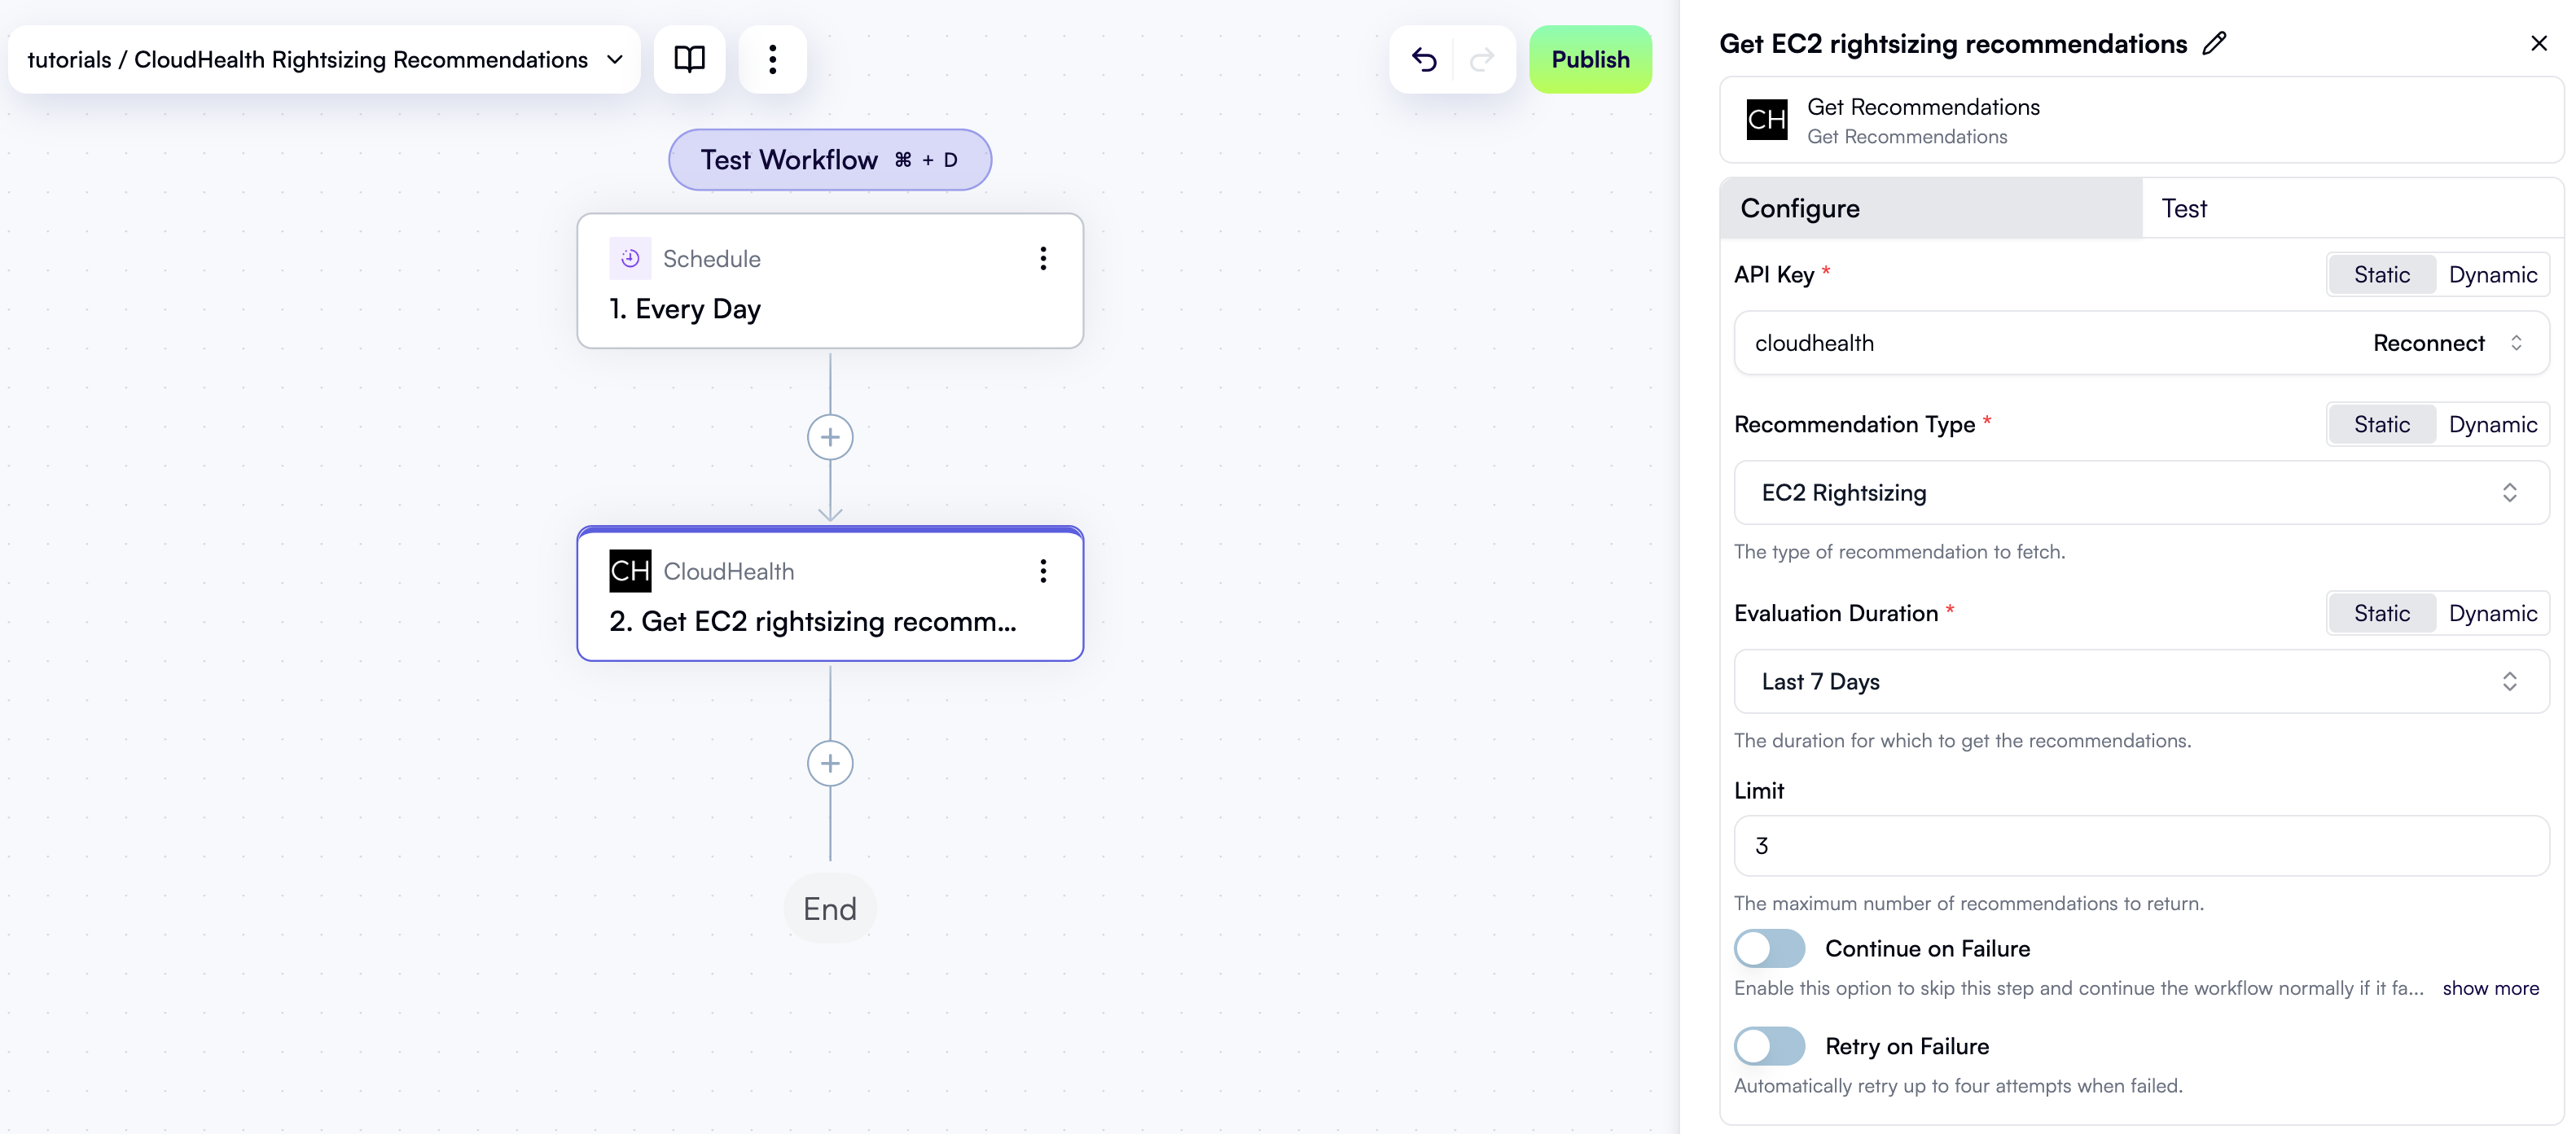
Now it’s time to add the first action step. Since this workflow is built around processing CloudHealth recommendations, let’s start there. In the workflow graph, under the trigger, click the + button to add a new step. In the pop-up menu, scroll down and click CloudHealth. From the list of available CloudHealth actions, select Get Recommendations: At the top of the new step’s properties pane, click Edit Step Name and rename the step Get EC2 rightsizing recommendations. Under API Key, select the CloudHealth connection you created earlier. Then, configure the remaining action properties like this:- Under Recommendation Type, select EC2 Rightsizing.
- Under Evaluation Duration, select Last 7 Days.
- Under Limit, set the value to
3to retrieve the top 3 recommendations. This should be enough for testing purposes. Later on, when you’ve completed this tutorial, feel free to increase this value or set this field empty to fetch all available recommendations.
Loop over recommendations
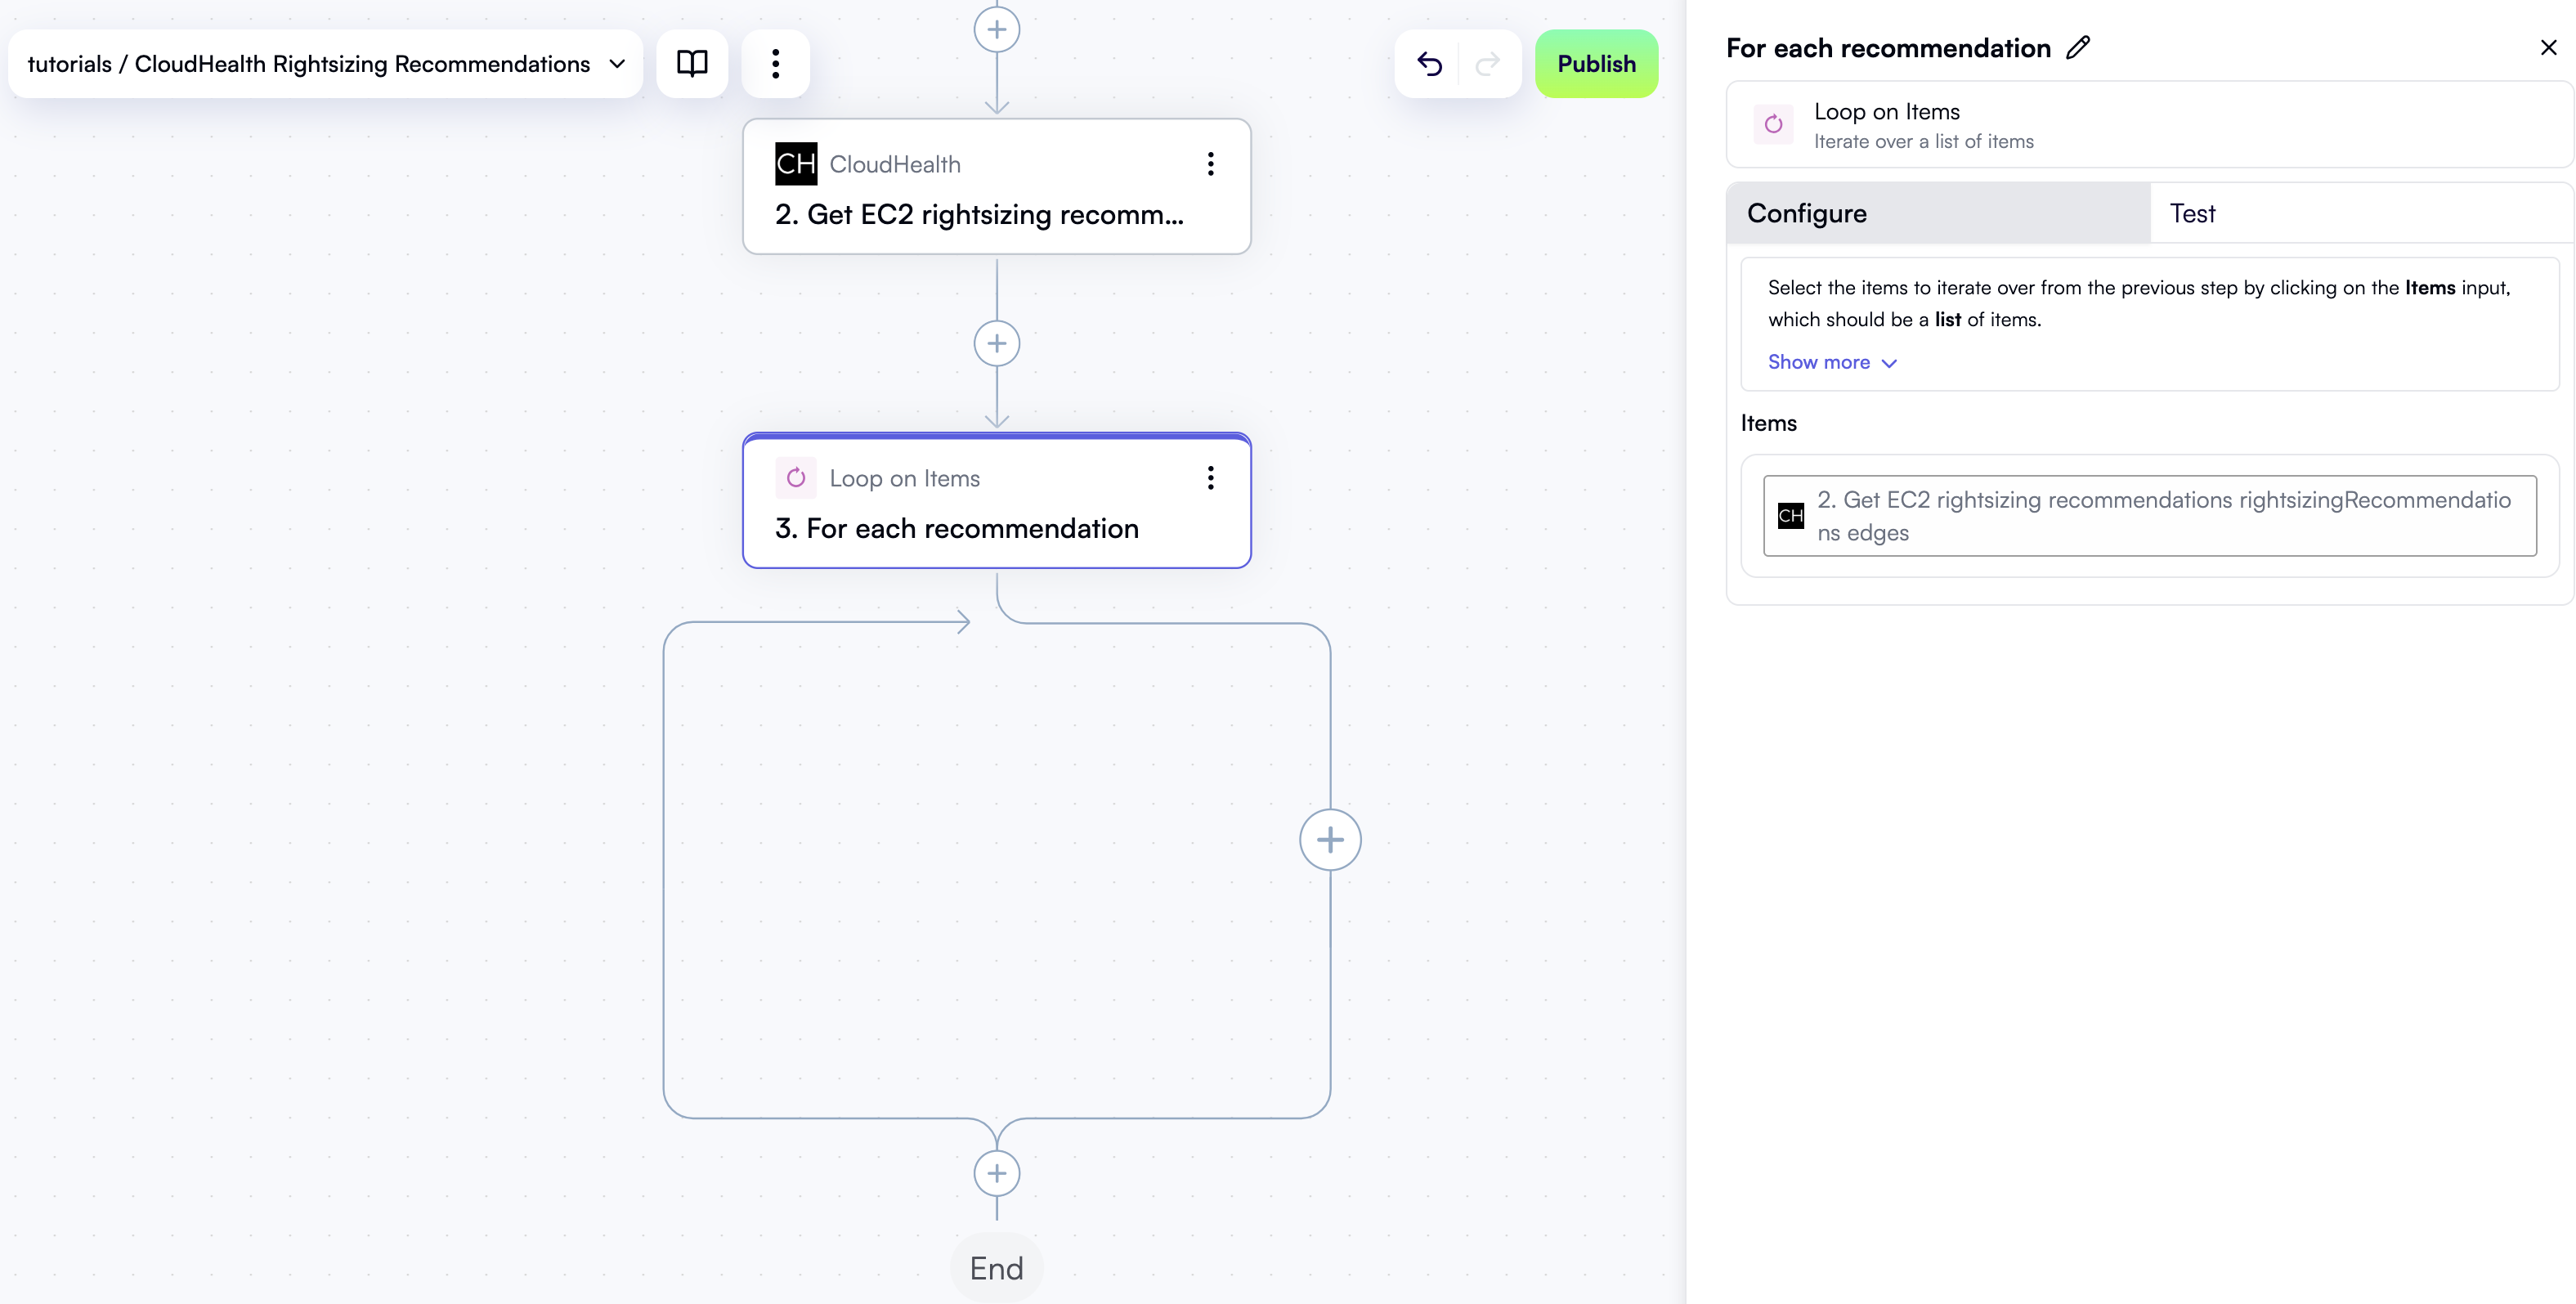
CloudHealth returns a list of recommendations, but you’ll want to process them one at a time. To do this, let’s use a Loop on Items action. In the workflow graph, click the + button to add a new step. In the pop-up menu, select Loop on Items in the left pane, then click Loop on Items in the right pane. At the top of the new step’s properties pane, click Edit Step Name and rename the step For each recommendation. In the properties pane, click the Items field. In the Data Selector view that opens, expand 2. Get EC2 rightsizing recommendations, then expand rightsizingRecommendations, and click Insert alongside the edges entry: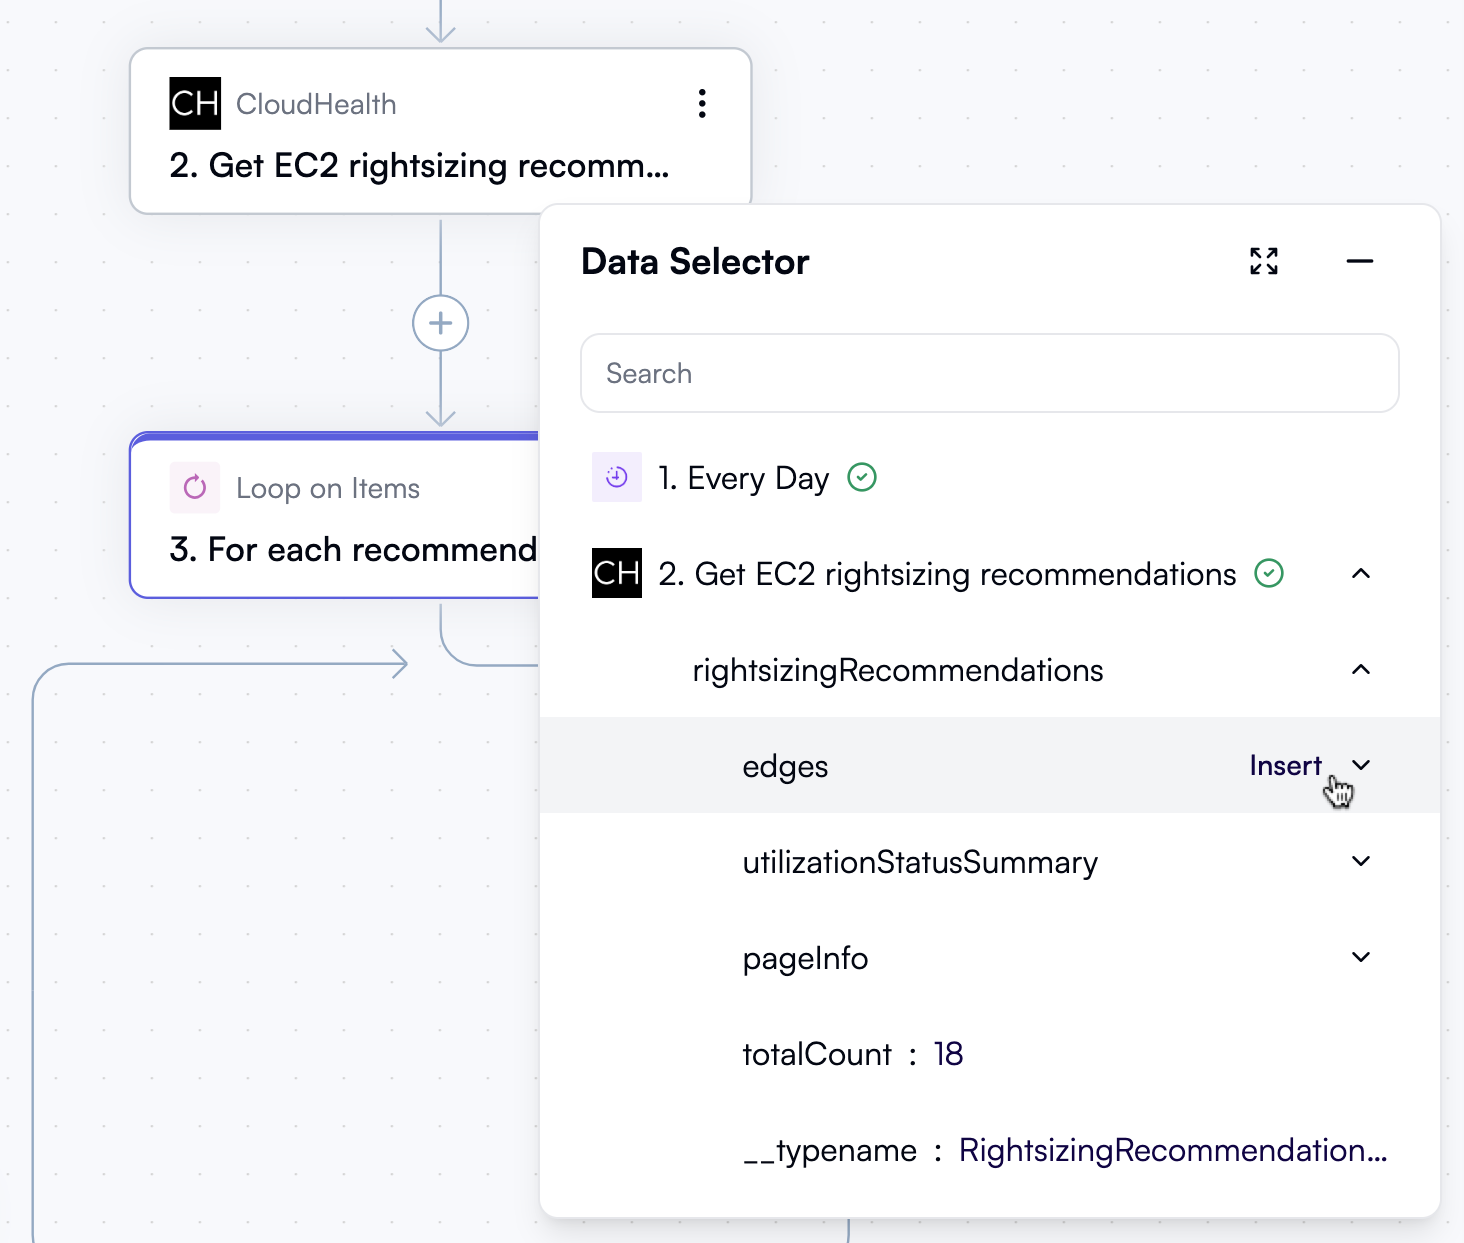
Generate opportunity ID
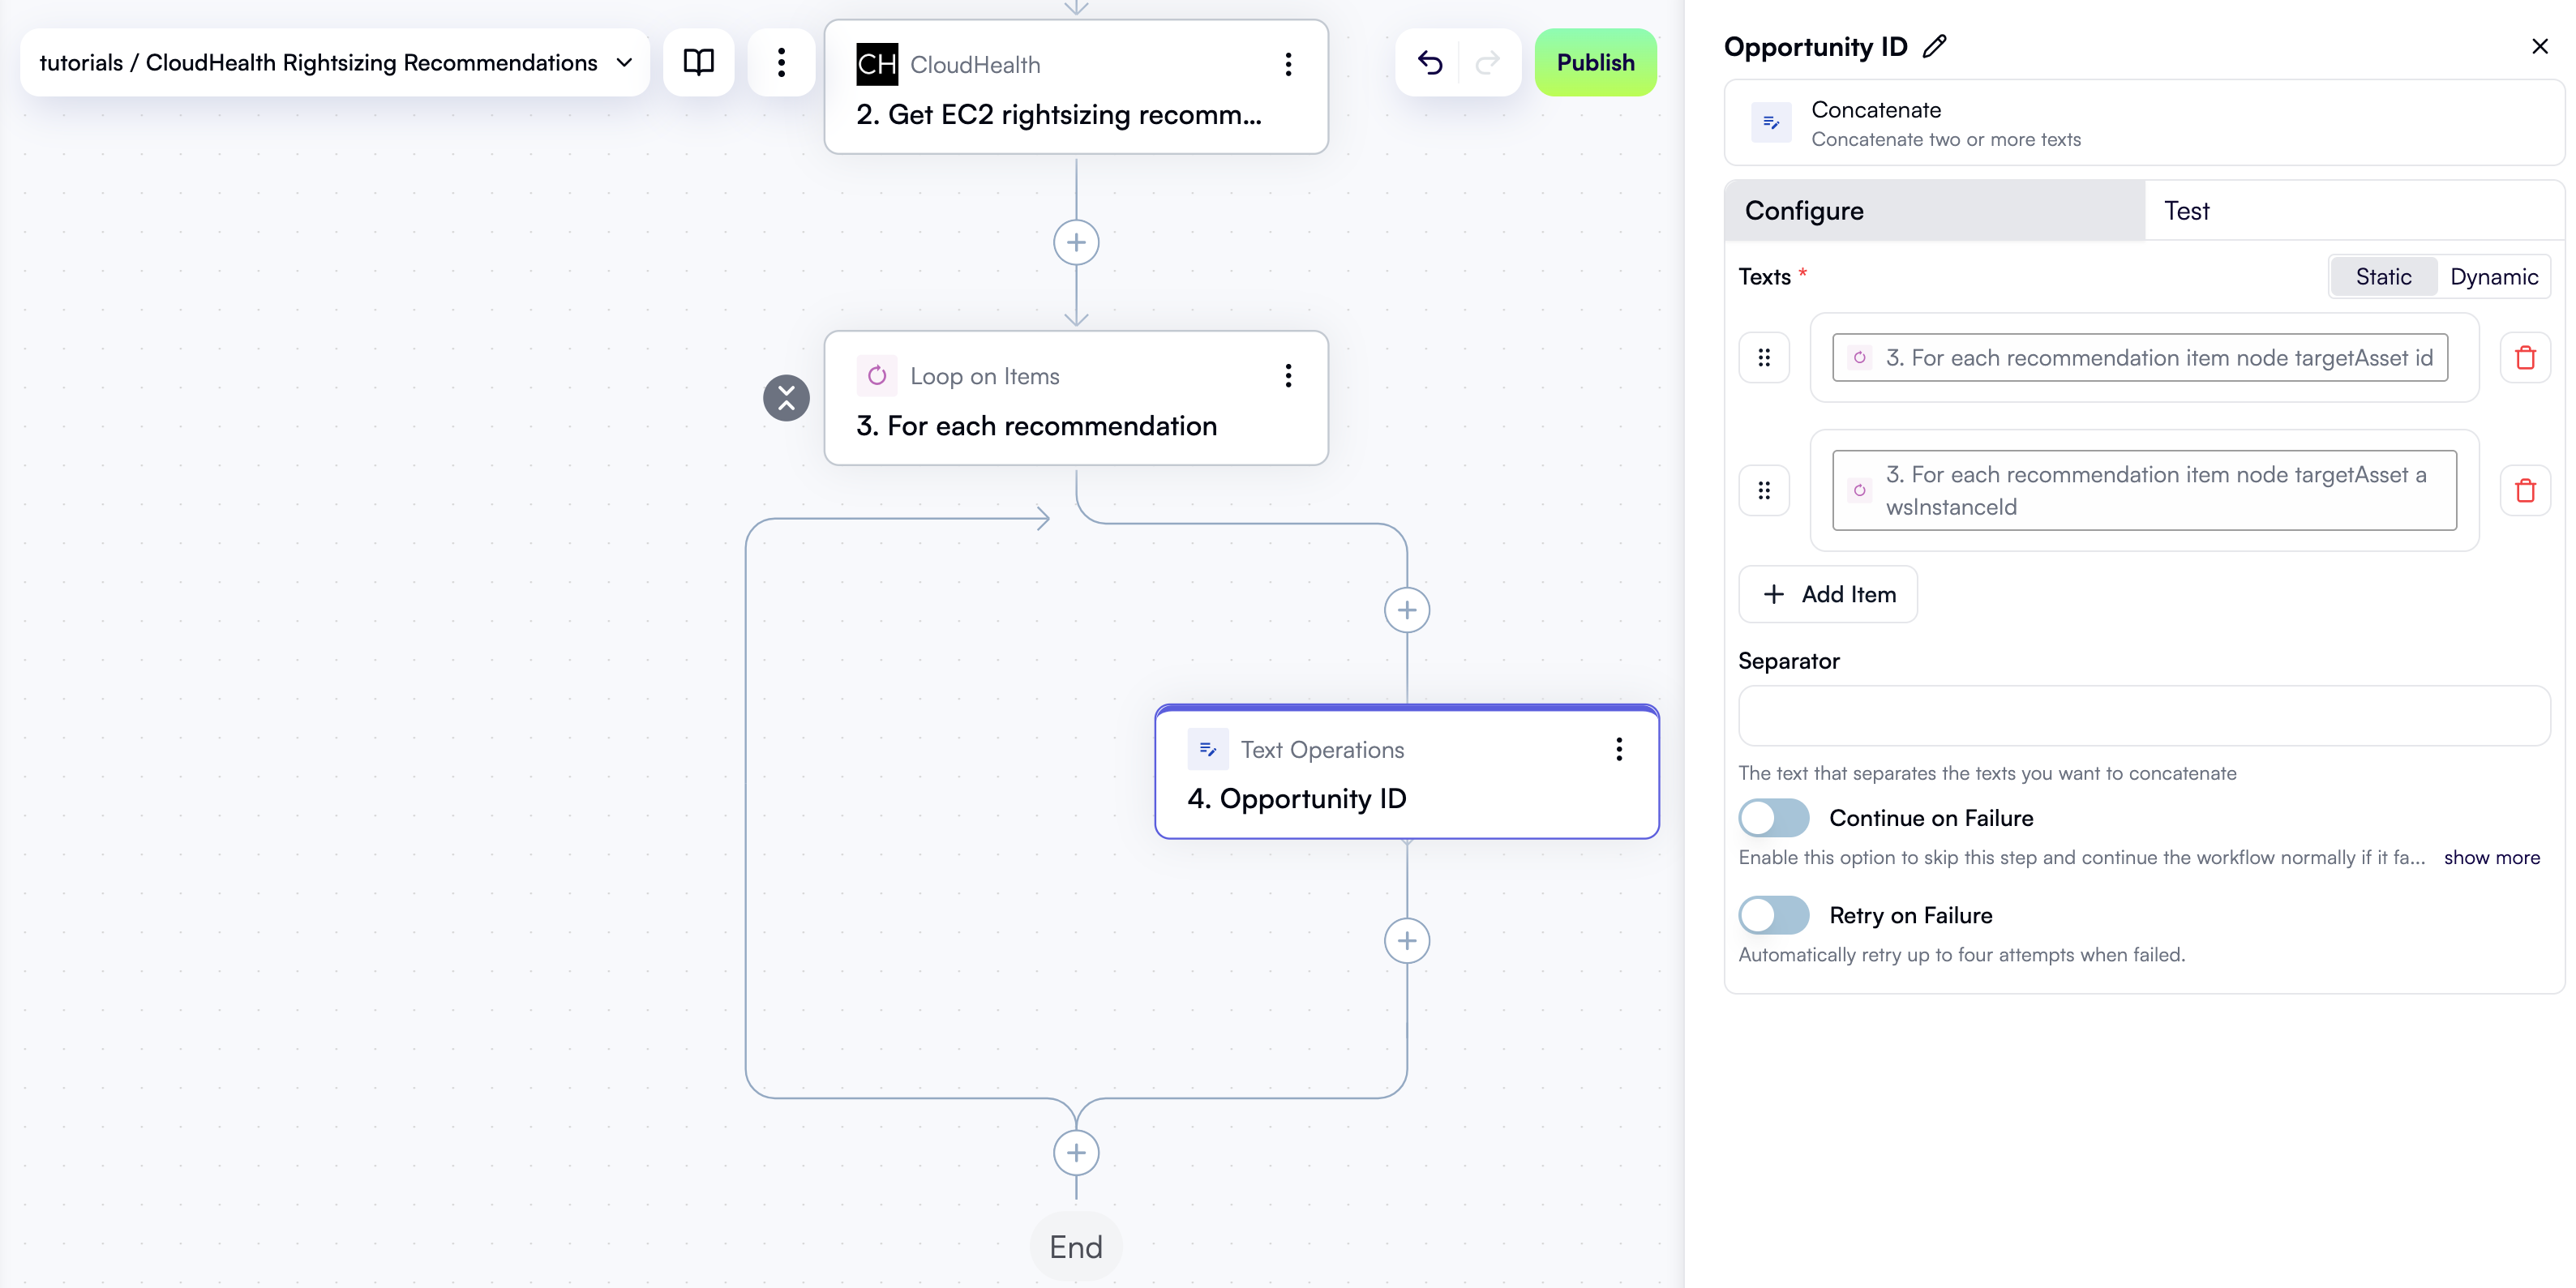
The first step inside the loop will generate an ID for the current recommendation. Since CloudHealth does not provide this ID, you’ll need to create one yourself. The ID will be used to save the recommendation in the preconfigured Opportunities table in OpenOps, track its status, and, most importantly, determine whether to send a Slack notification to the project owner. While you could simplify the workflow greatly without tracking recommendations in an OpenOps table, you then wouldn’t be able to select which notifications to send and which to ignore. As a result, project owners would potentially receive multiple notifications for the same recommendation, which would get frustrating very soon. Inside the loop in the workflow graph, click + to add a new step. In the pop-up menu, select Text Operations in the left pane, then click Concatenate in the right pane. At the top of the new step’s properties pane, click Edit Step Name and rename the step Opportunity ID. In the properties pane, under Texts, click Add Item. Click the new field to open the Data Selector view. From there, expand 3. For each recommendation, then item, then node, then targetAsset, and click Insert alongside the id entry: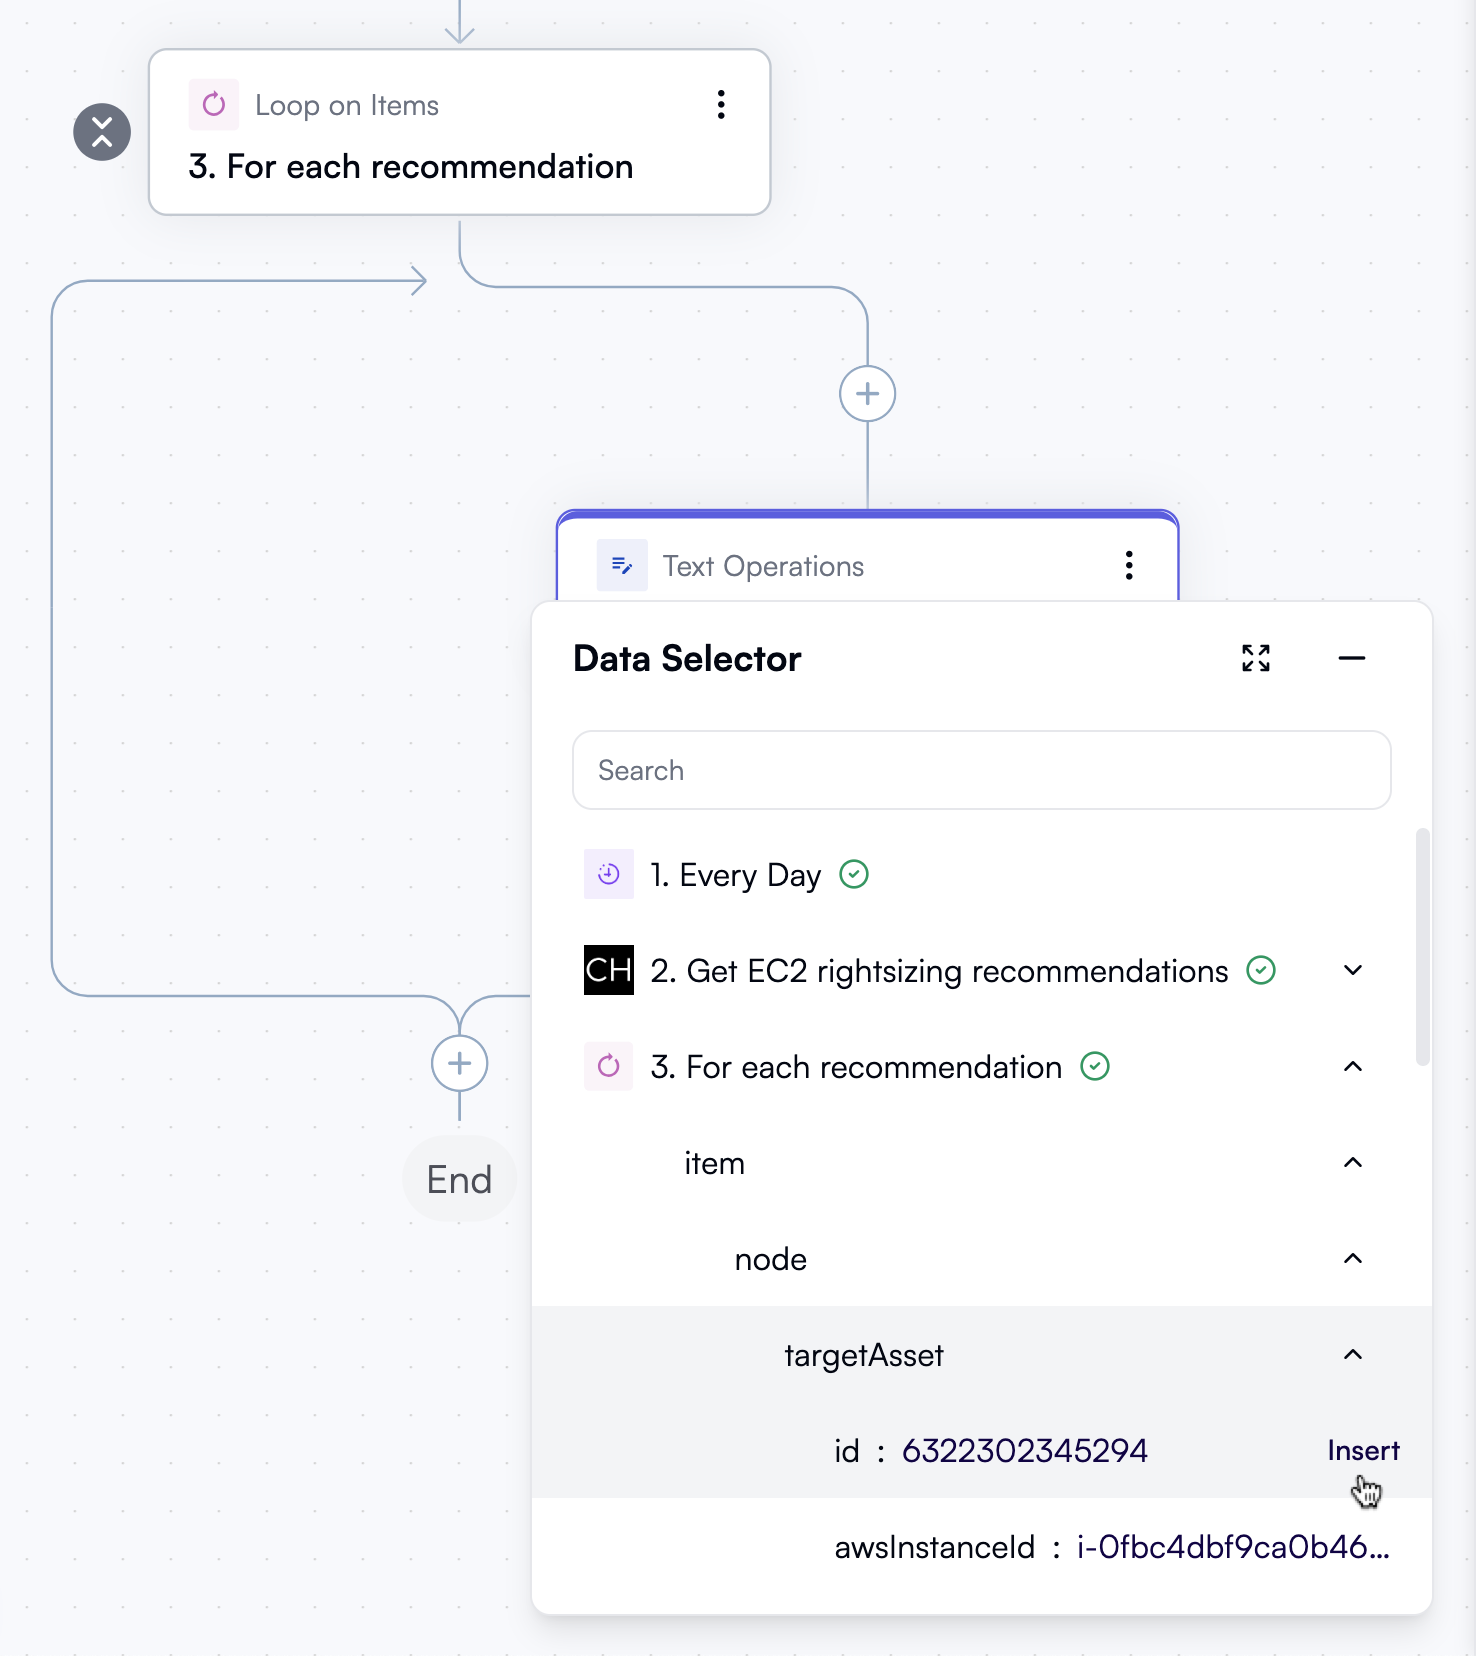
Look up the opportunity in the OpenOps table
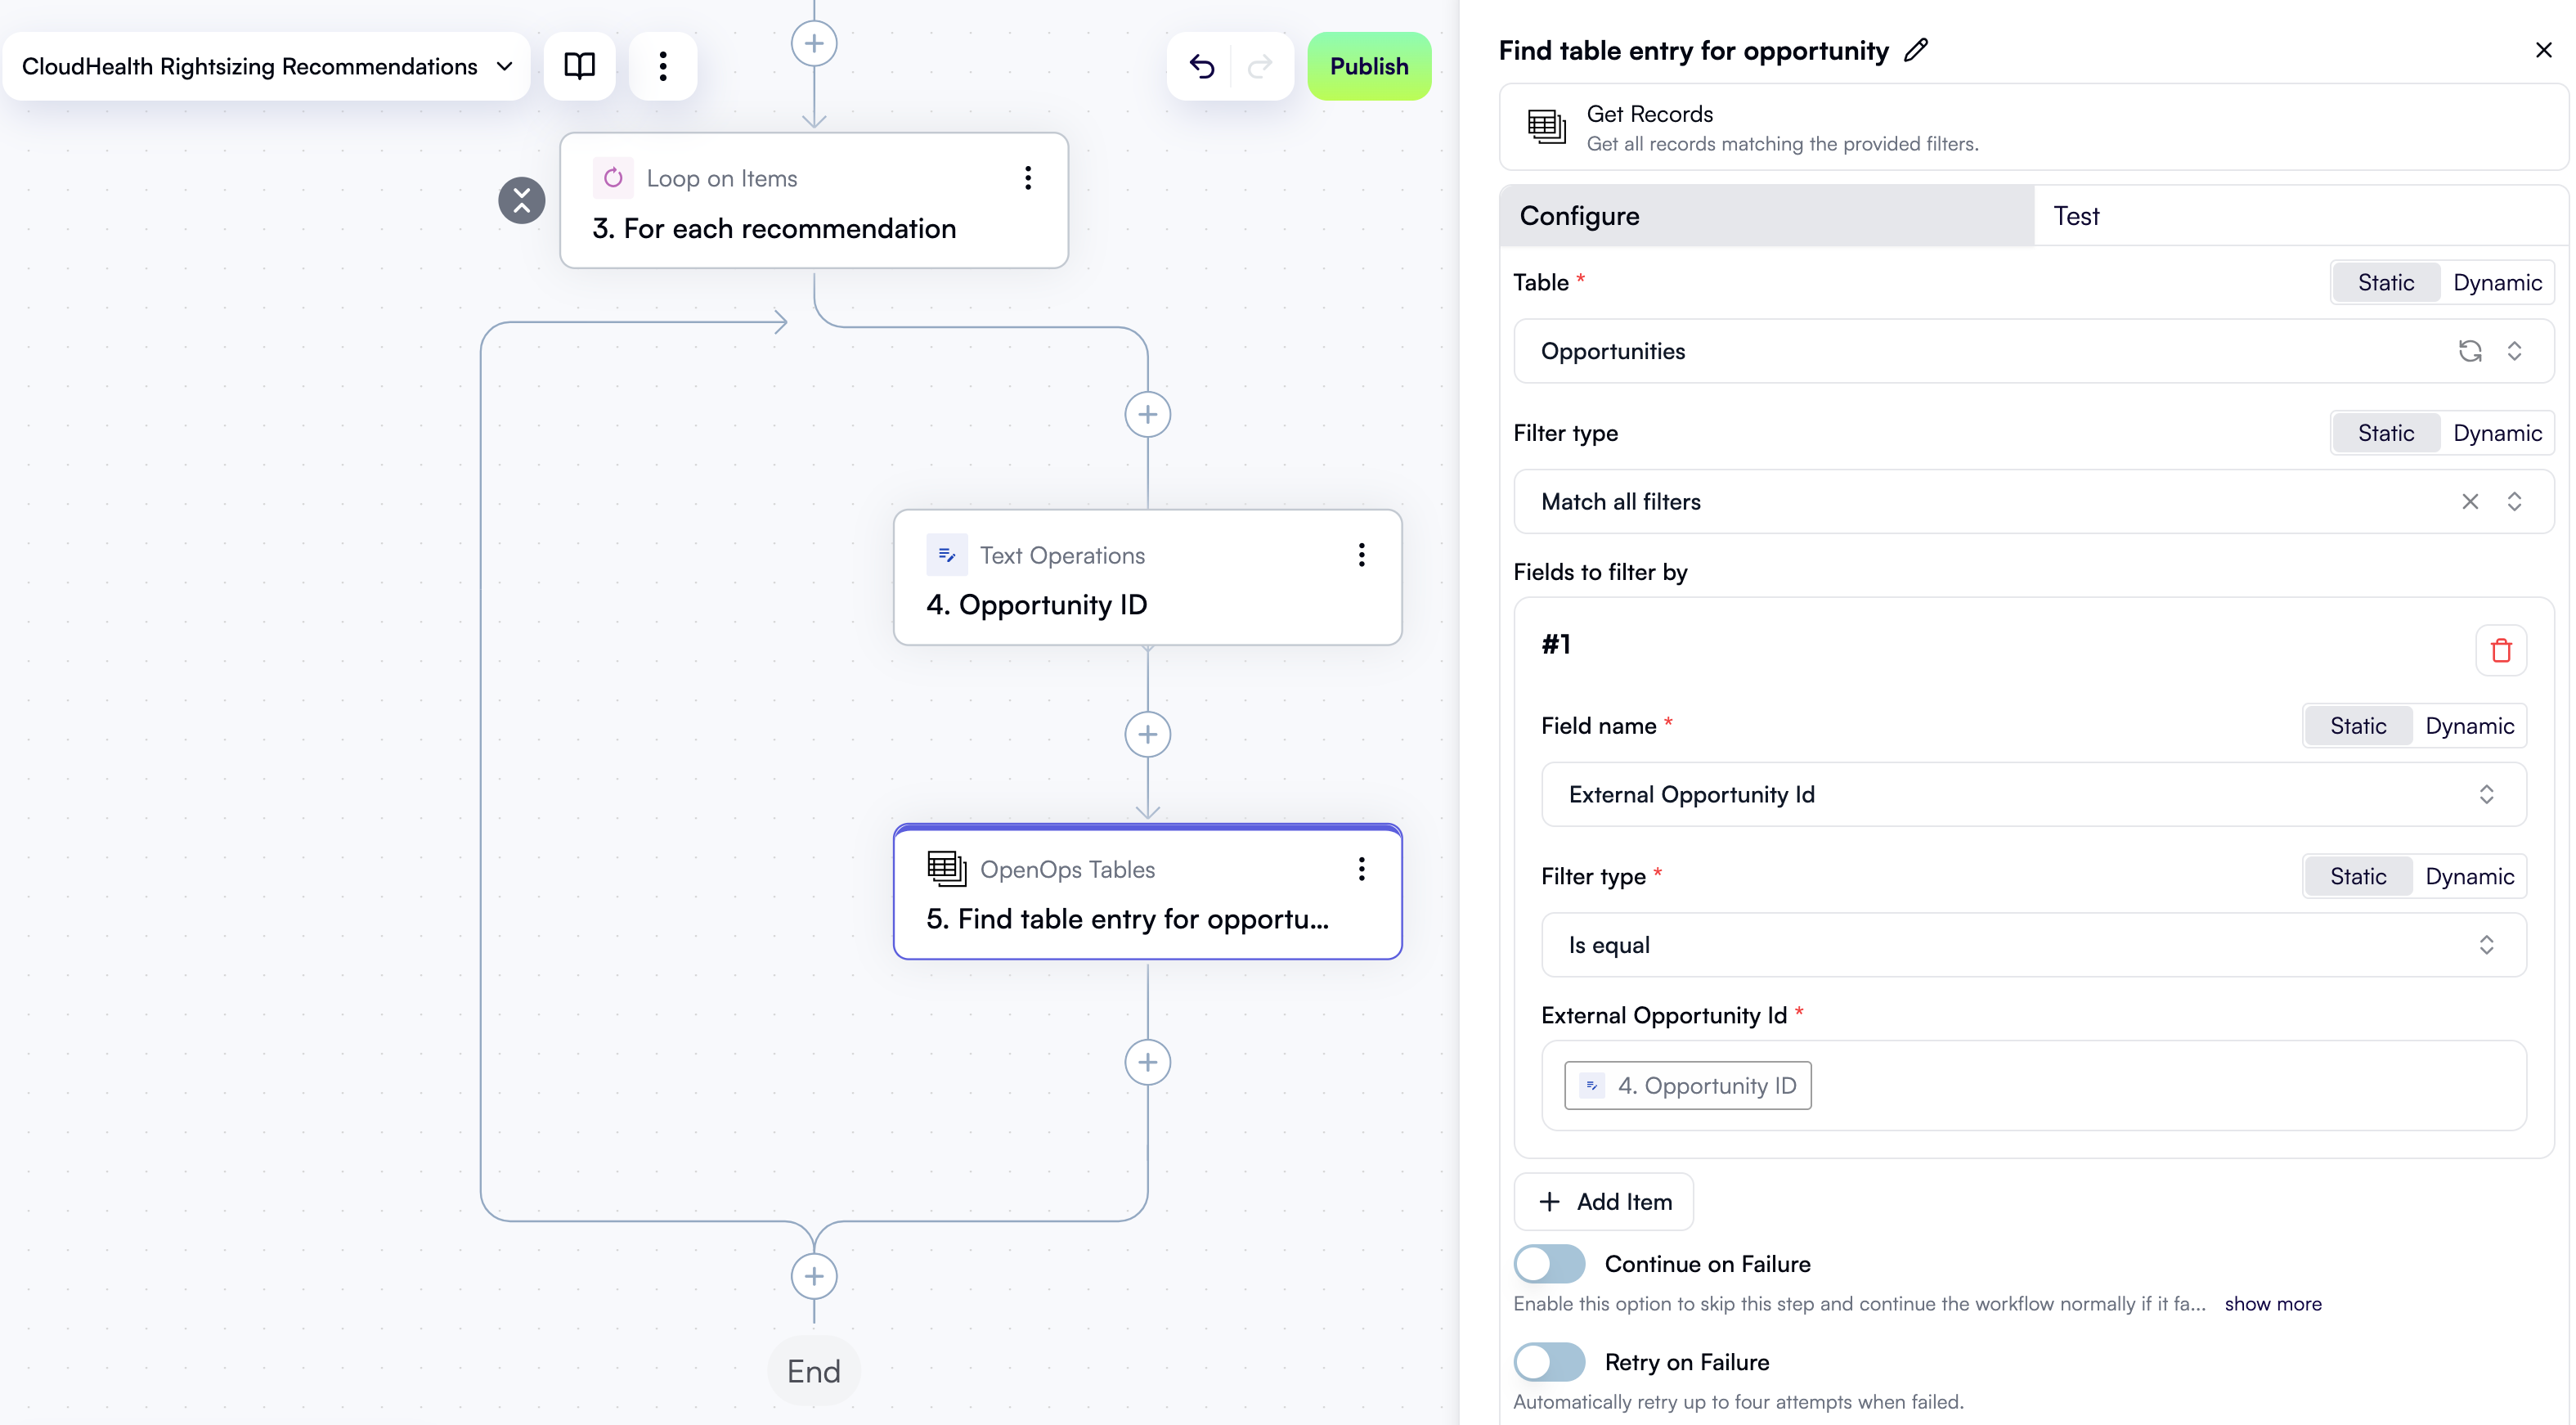
Now that you have an opportunity ID, the next step is to check whether a recommendation with this ID already exists in the Opportunities table in OpenOps. Inside the loop in the workflow graph, click + to add a new step. In the pop-up menu, select OpenOps Tables in the left pane, then click Get Records in the right pane. At the top of the new step’s properties pane, click Edit Step Name and rename the step Find table entry for opportunity. In the Configure tab in the properties pane, under Table, select Opportunities. Under Fields to filter by, click Add Item. In the new filter section:- Under Field name, select External Opportunity Id.
- Under Filter type, select Is equal.
- In the External Opportunity Id field, open the Data Selector view and click Insert alongside the 4. Opportunity ID entry.
Save table entry ID to OpenOps storage
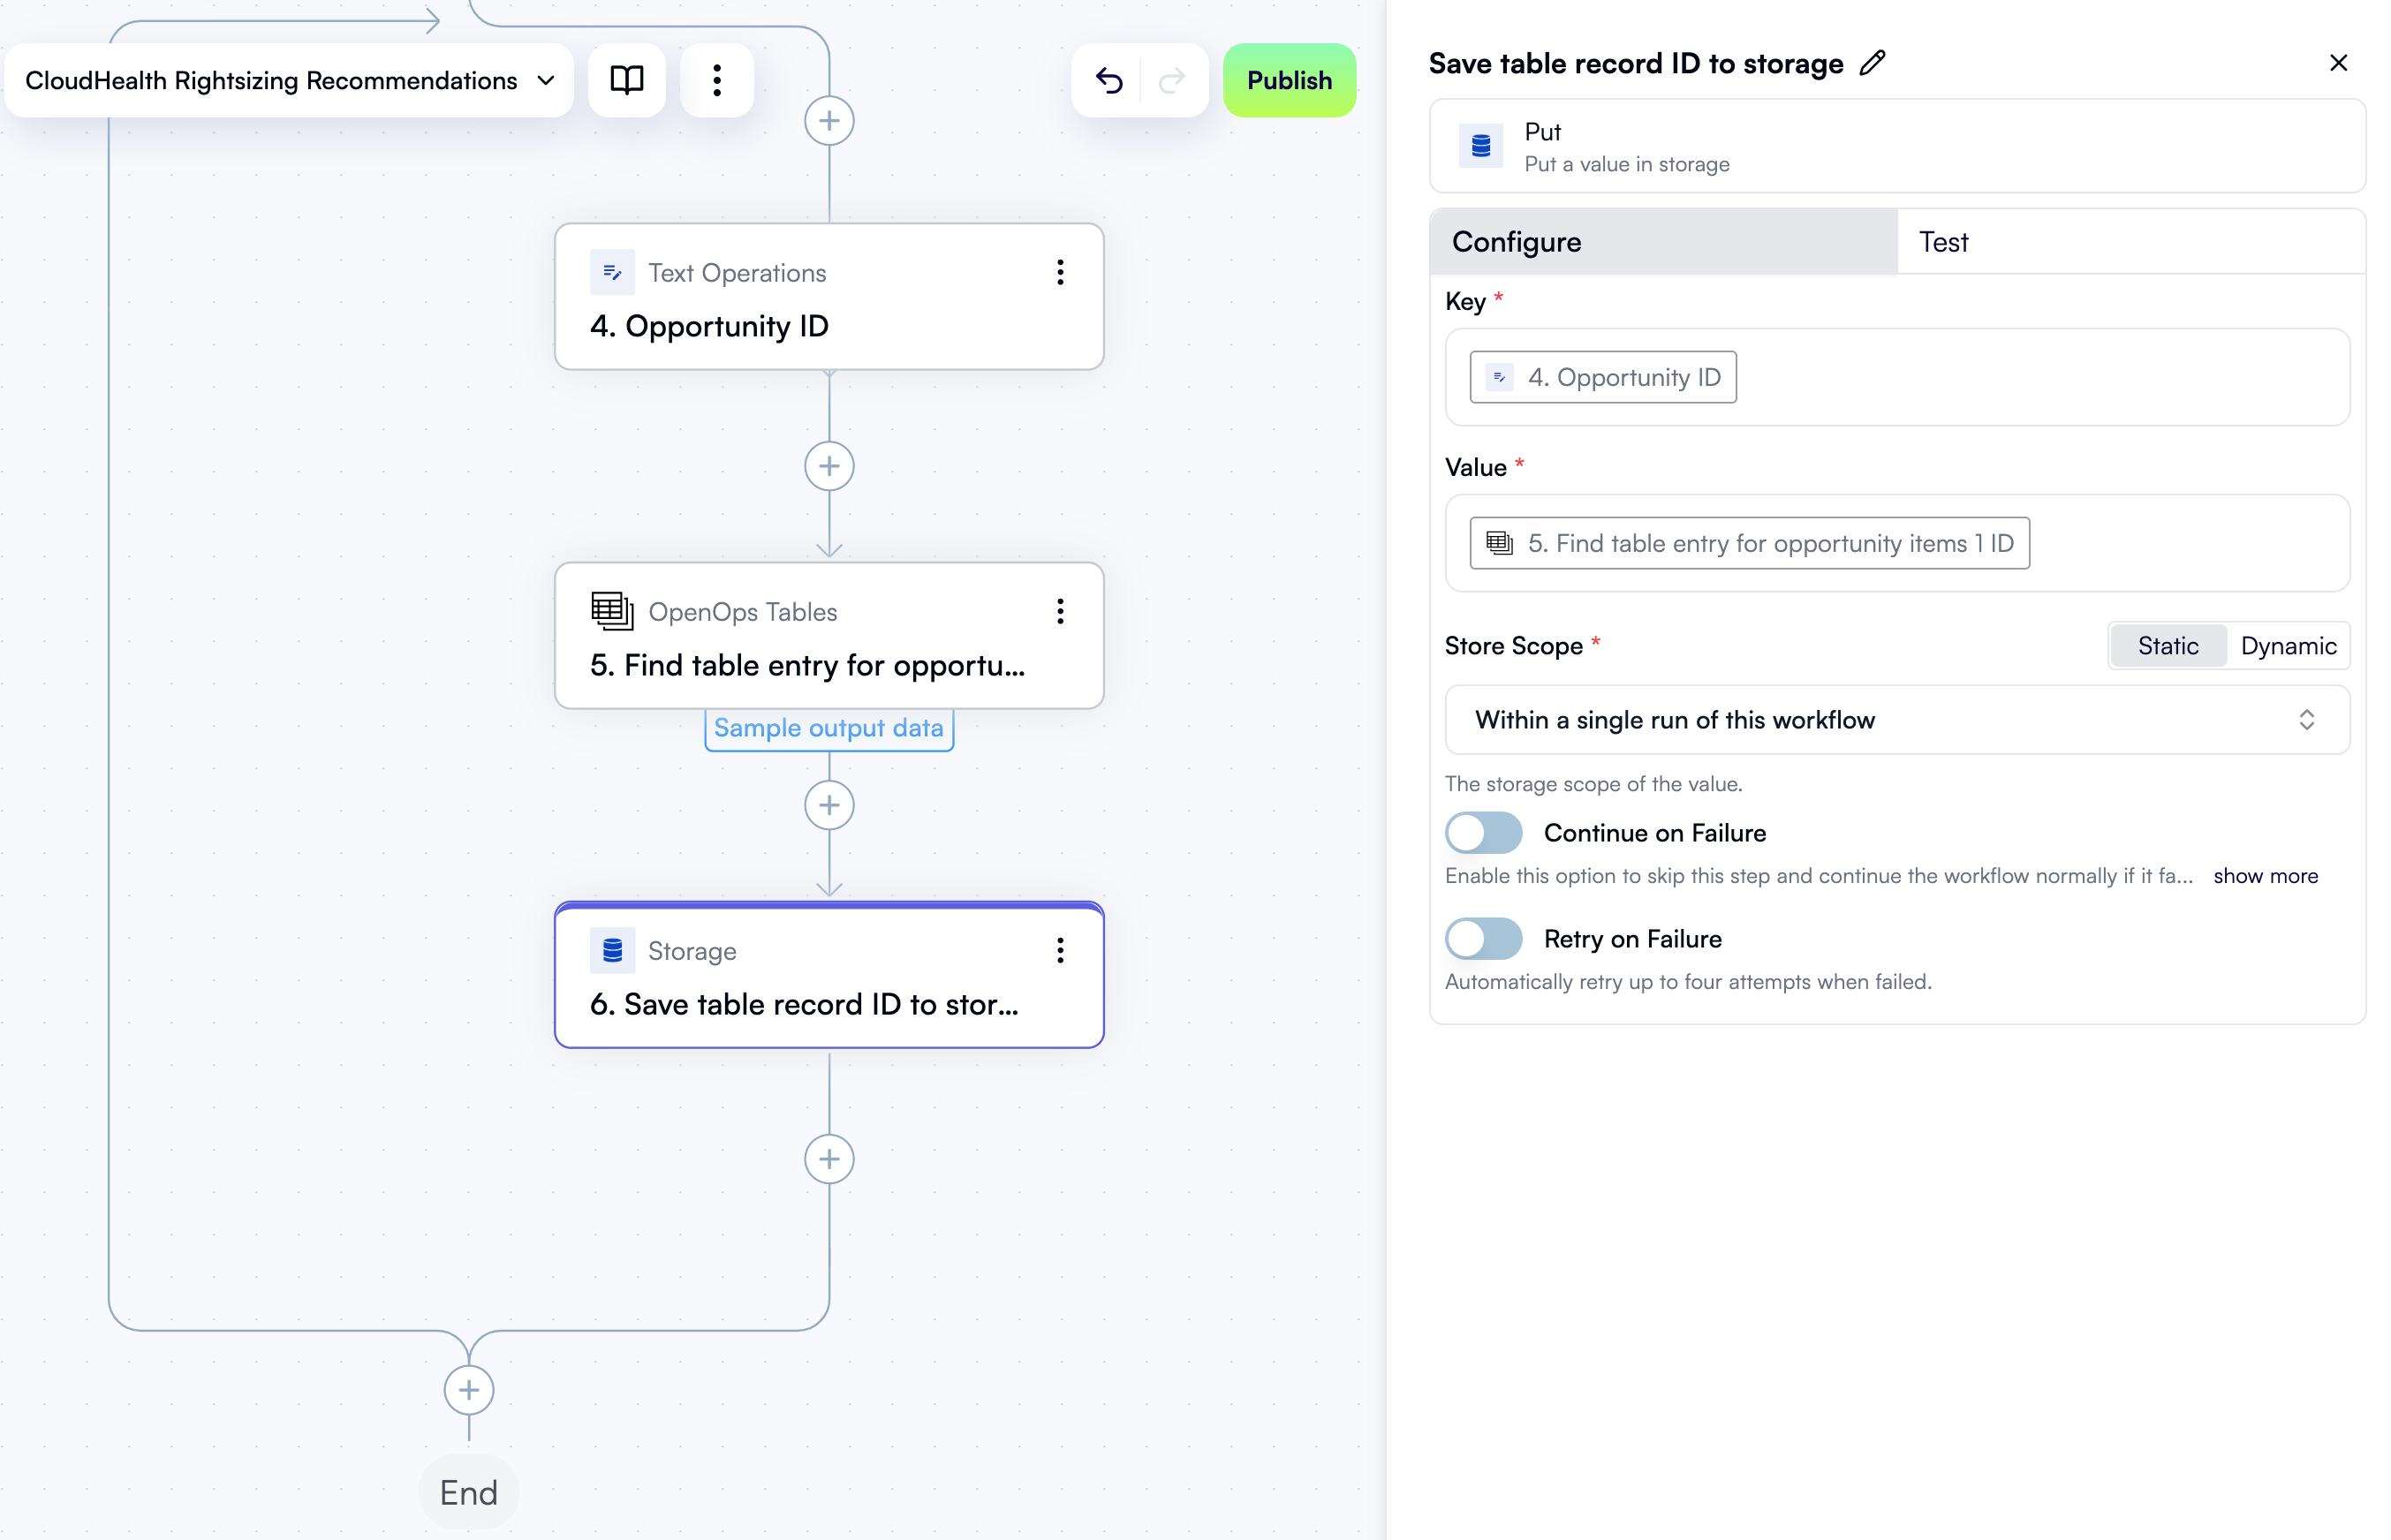
You now need to map the ID of the current recommendation to the ID of its entry in the Opportunities table, and save this mapping to OpenOps’ built-in key-value storage. This will be required later in the workflow when deciding whether to send a notification to the project owner. Inside the loop in the workflow graph, click + to add a new step. In the pop-up menu, select Storage in the left pane, then click Put in the right pane. At the top of the new step’s properties pane, click Edit Step Name and rename the step Save table record ID to storage. In the Key field, use Data Selector to select 4. Opportunity ID. In the Value field, open Data Selector, expand 5. Find table entry for opportunity, then items, then items[1]. Click Insert alongside the uppercase ID entry: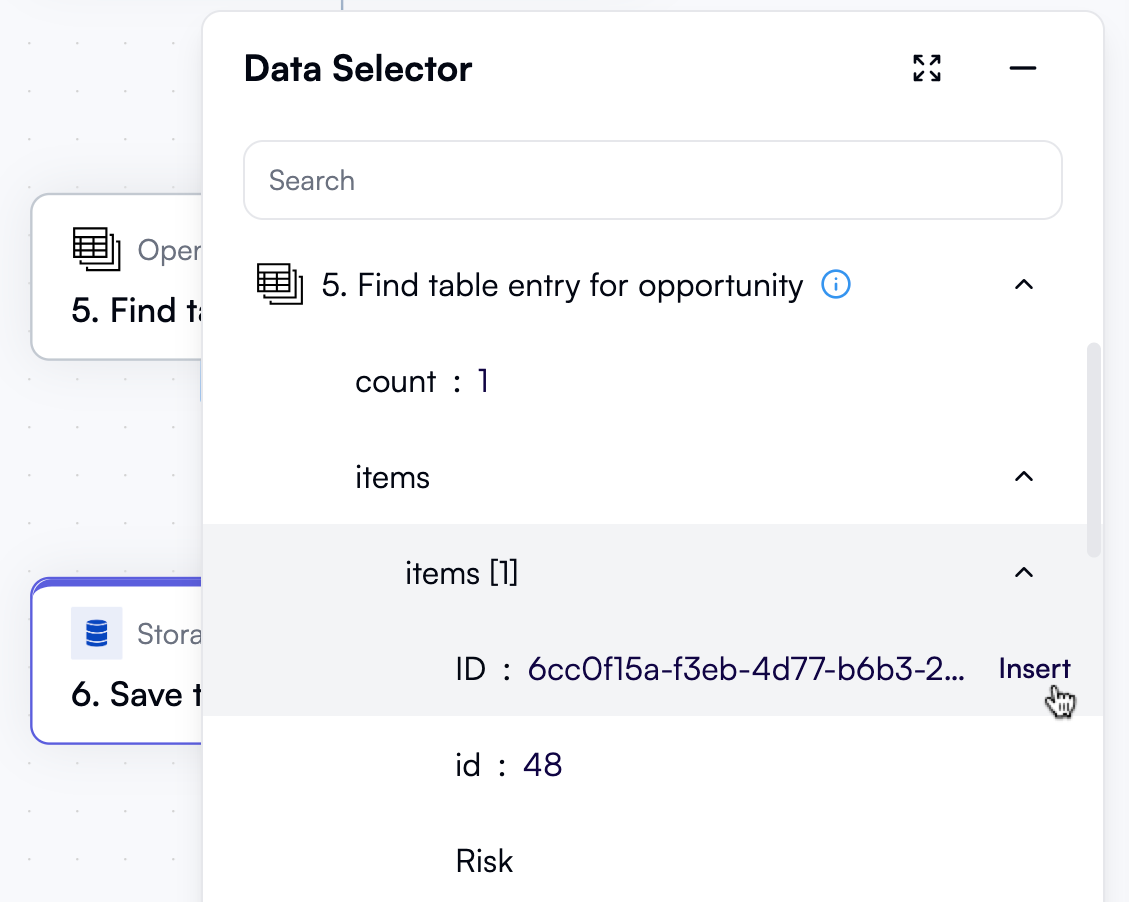
Check if a table entry exists
When you run a published workflow, an entry for a CloudHealth recommendation may or may not already exist in the Opportunities table. What happens next in the workflow depends on whether the entry exists. To check this, you’ll add a condition step. Inside the loop in the workflow graph, click + to add a new step. In the pop-up menu, select Condition in the left pane, then click Condition in the right pane. At the top of the new step’s properties pane, click Edit Step Name and rename the step If no table entry for opportunity. Under Continue If, click the left field with the placeholder First value. In the Data Selector view, expand 5. Find table entry for opportunity and click Insert alongside the count entry. In the dropdown between the two fields, select (Number) Is less than. In the right field, enter1.
The new step in the workflow graph and the Configure tab in its properties pane should now look like this:
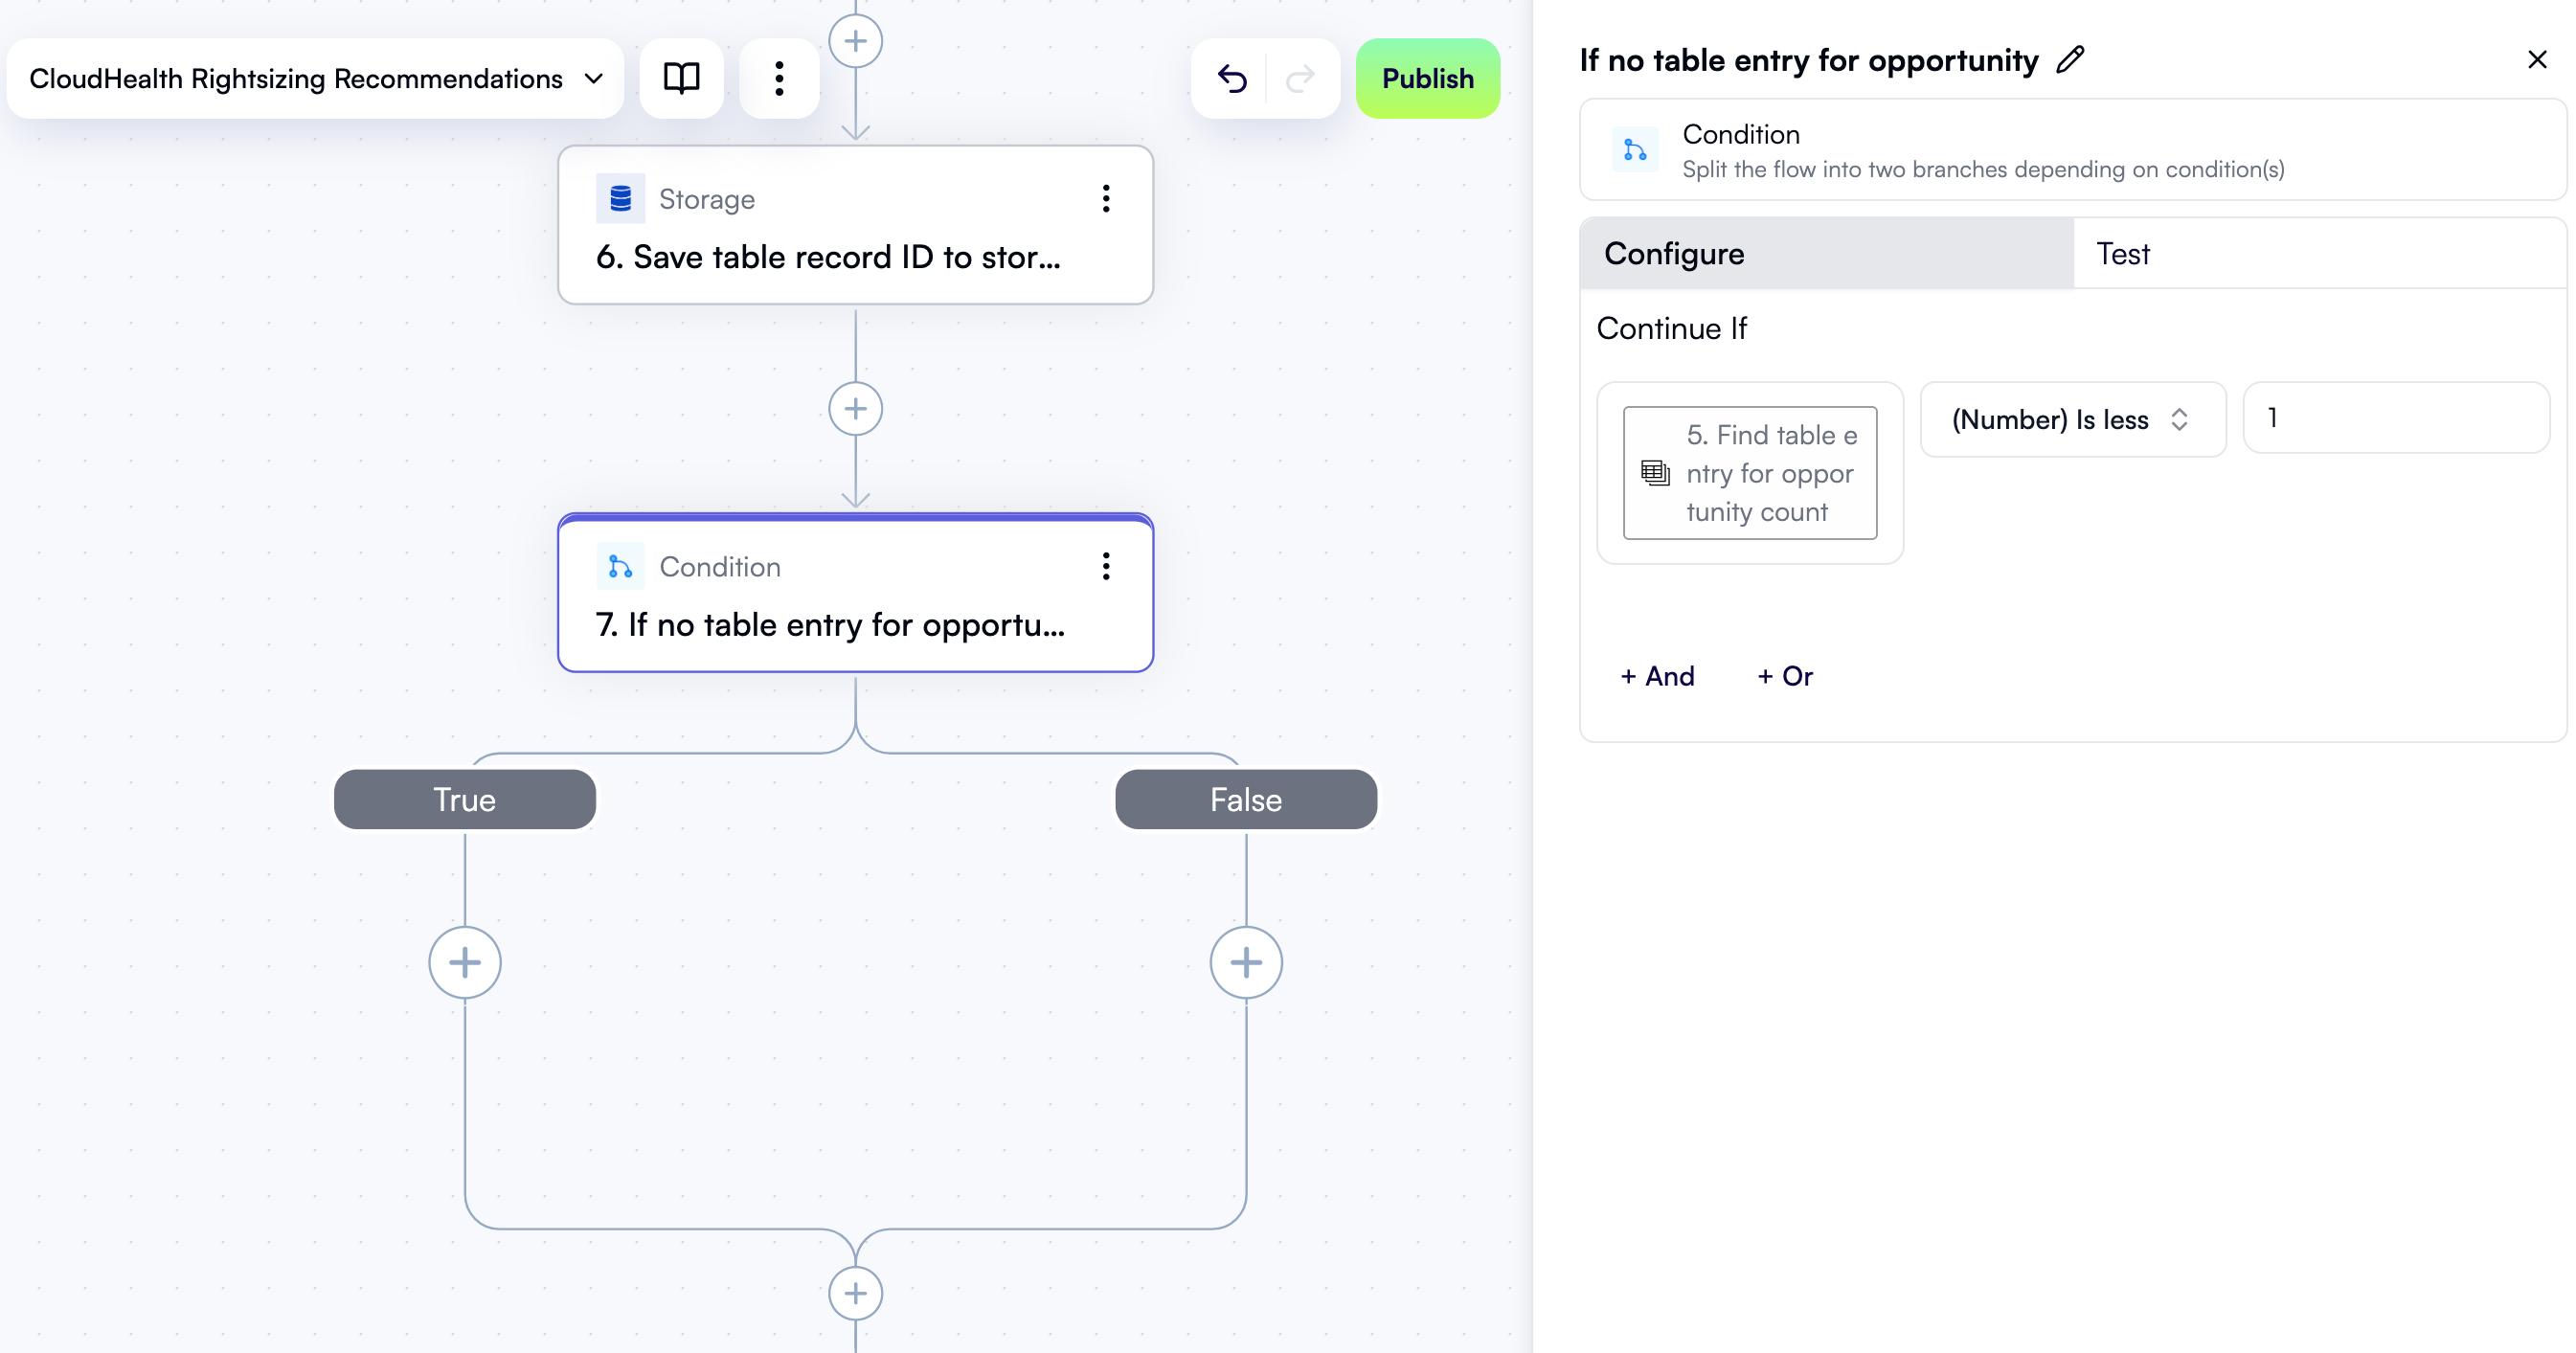
true if there’s no table entry for the current recommendation, and false if one exists.
Click the Test tab in the properties pane, then under Step output, click Test Step. Since you added sample output data for step five that contains a table entry, the test output will be false:
If no table entry, create one
If the condition above evaluates totrue, it means the Opportunities table doesn’t have a record for the recommendation. In this case, you’ll create a new table entry and save its ID to storage for later use.
Create a new table entry
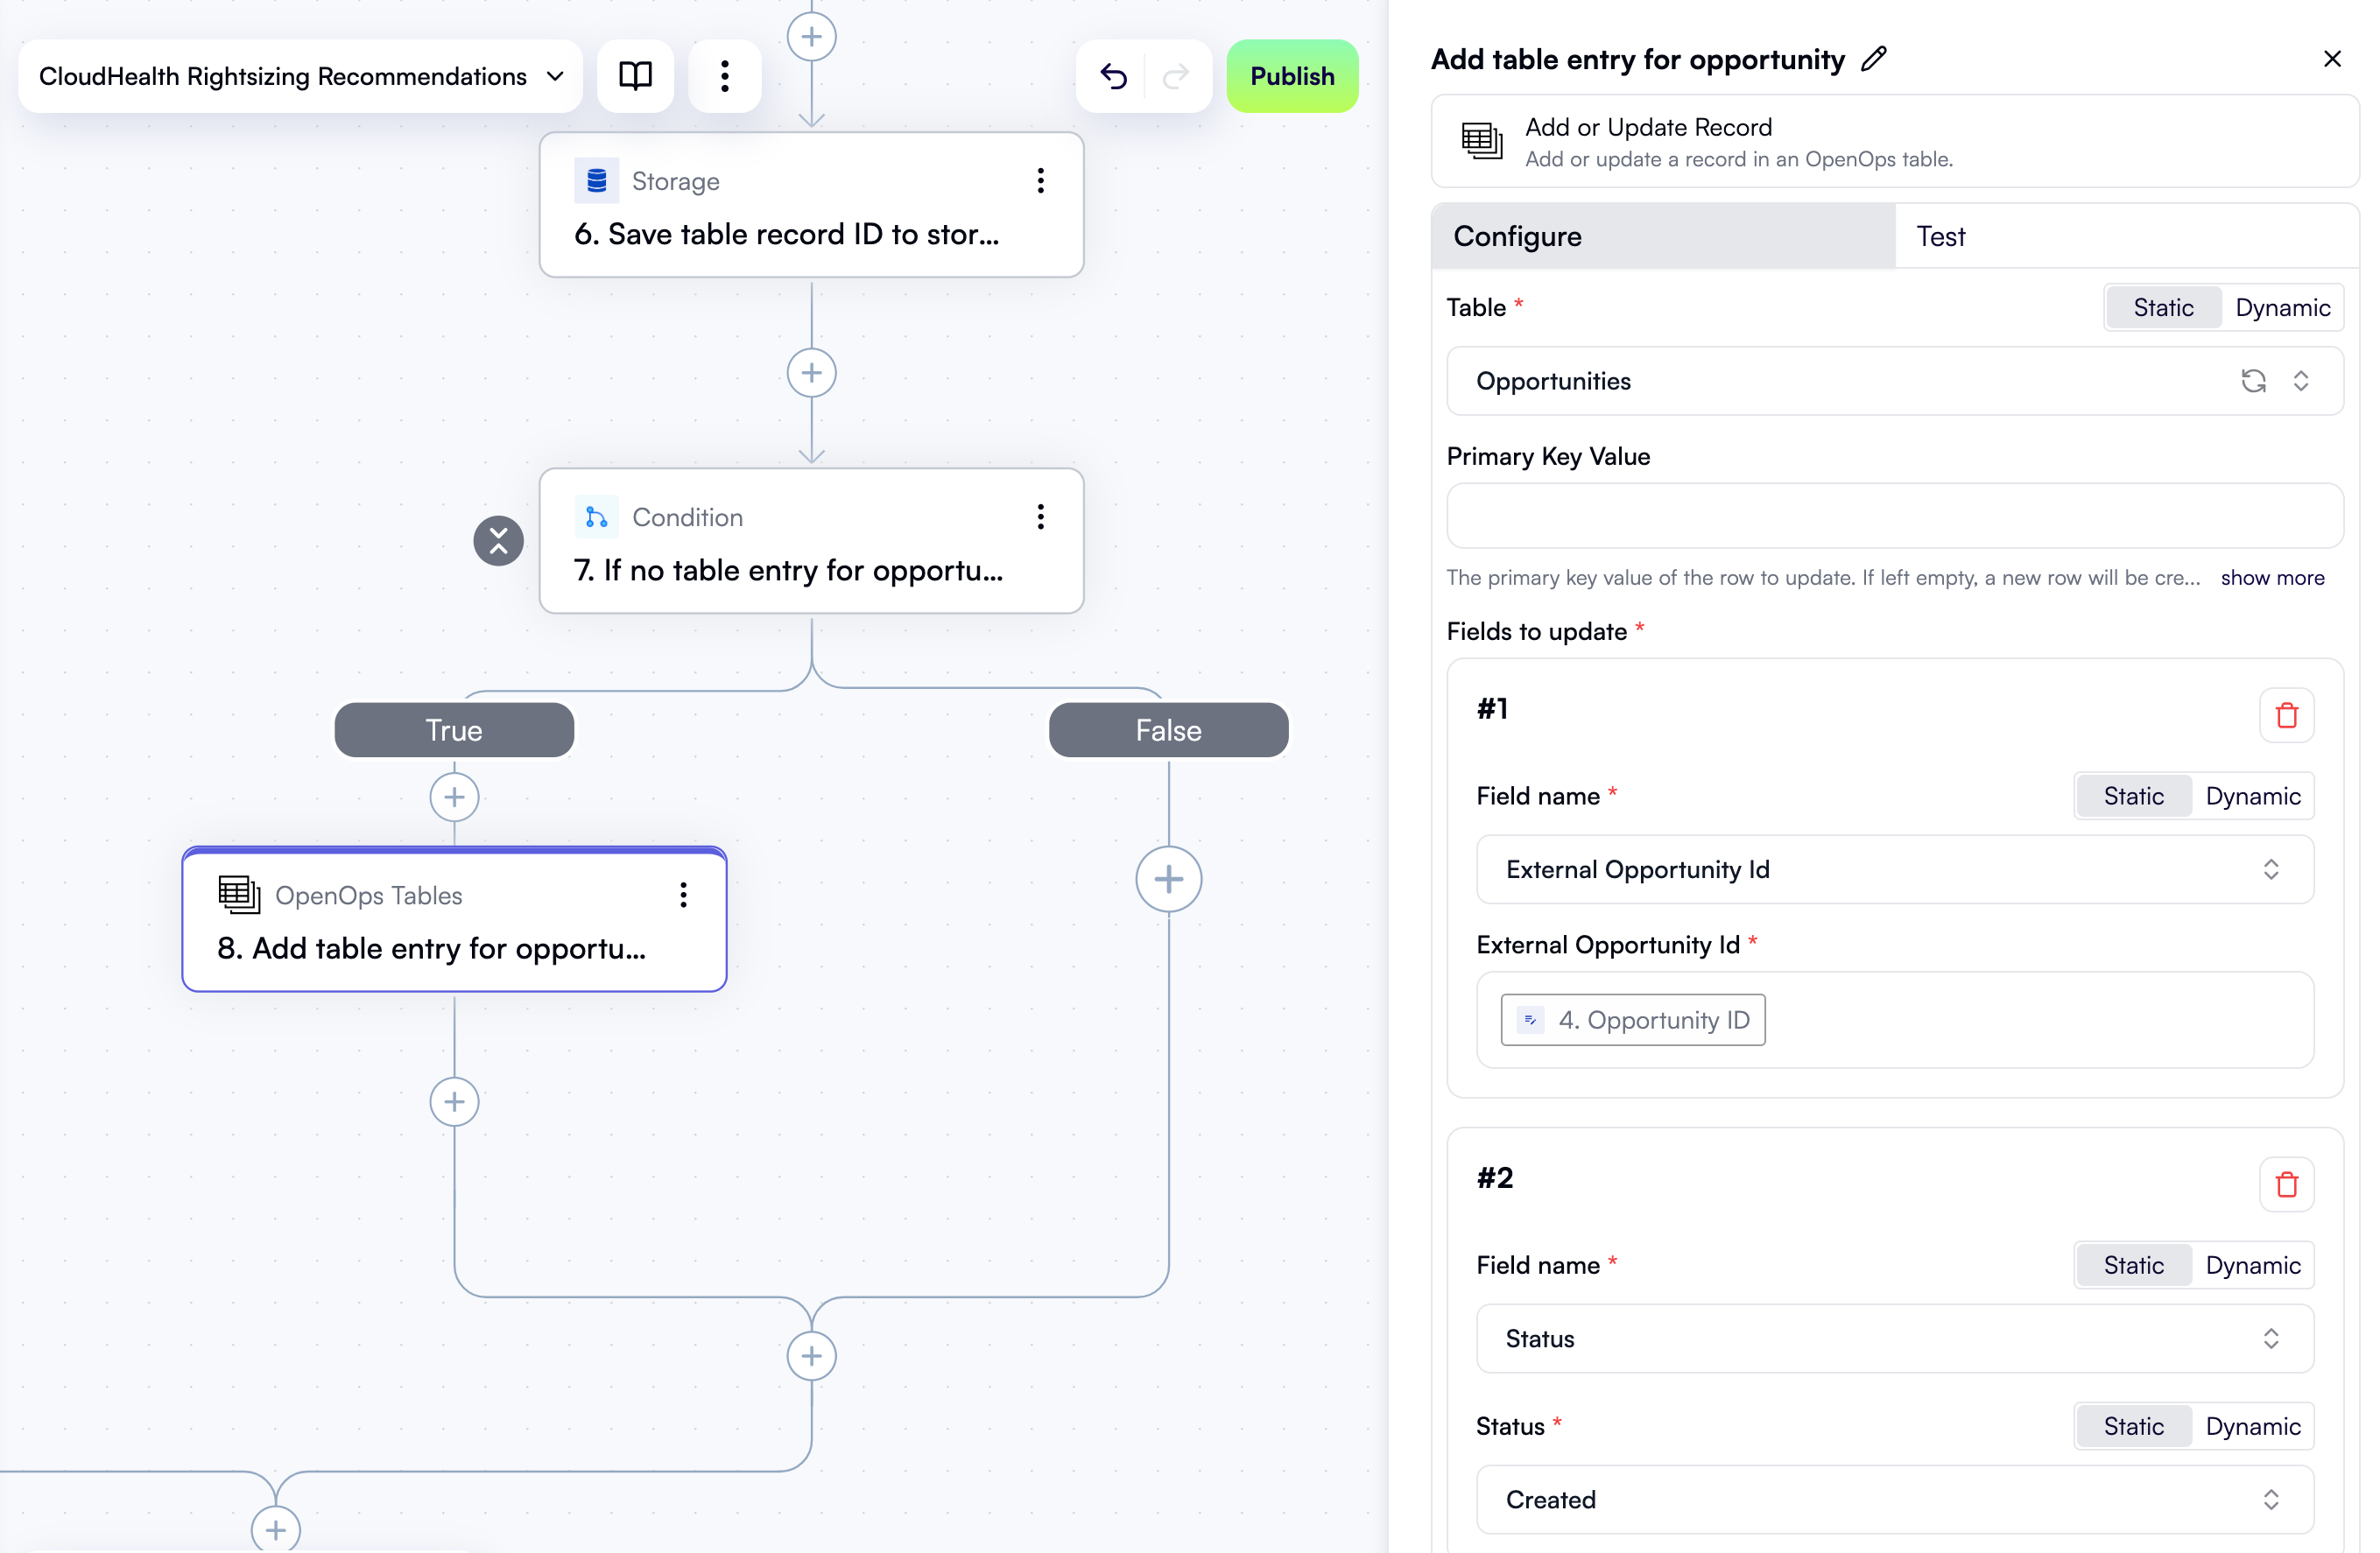
Inside the True branch of the condition, click + to add a new step. In the pop-up menu, select OpenOps Tables in the left pane, then click Add or Update Record in the right pane. At the top of the new step’s properties pane, click Edit Step Name and rename the step Add table entry for opportunity. For the Table field, select Opportunities. Leave the Primary Key Value field empty so that OpenOps generates a unique ID for the new record. Under Fields to update, click Add Item. In the new area:- In the Field name dropdown, select External Opportunity Id.
- In the External Opportunity Id field, open the Data Selector view and click Insert alongside the 4. Opportunity ID entry.
- In the Field name dropdown, select Status.
- In the Status dropdown, select Created.
Save table entry ID to storage
Now that you have a new table entry, save its ID to OpenOps’ built-in key-value storage. Inside the True branch of the condition, click + to add a new step. In the pop-up menu, select Storage in the left pane, then click Put in the right pane. At the top of the new step’s properties pane, click Edit Step Name and rename the step Update table record ID in storage. You use the word “update” here because a key-value pair was already created in a prior step, but since no table record existed, its value was empty. In the Key field, use Data Selector to select 4. Opportunity ID. In the Value field, open Data Selector, expand 8. Add table entry for opportunity, then click Insert alongside the uppercase ID entry: Here’s what the Configure tab in the properties pane should now look like: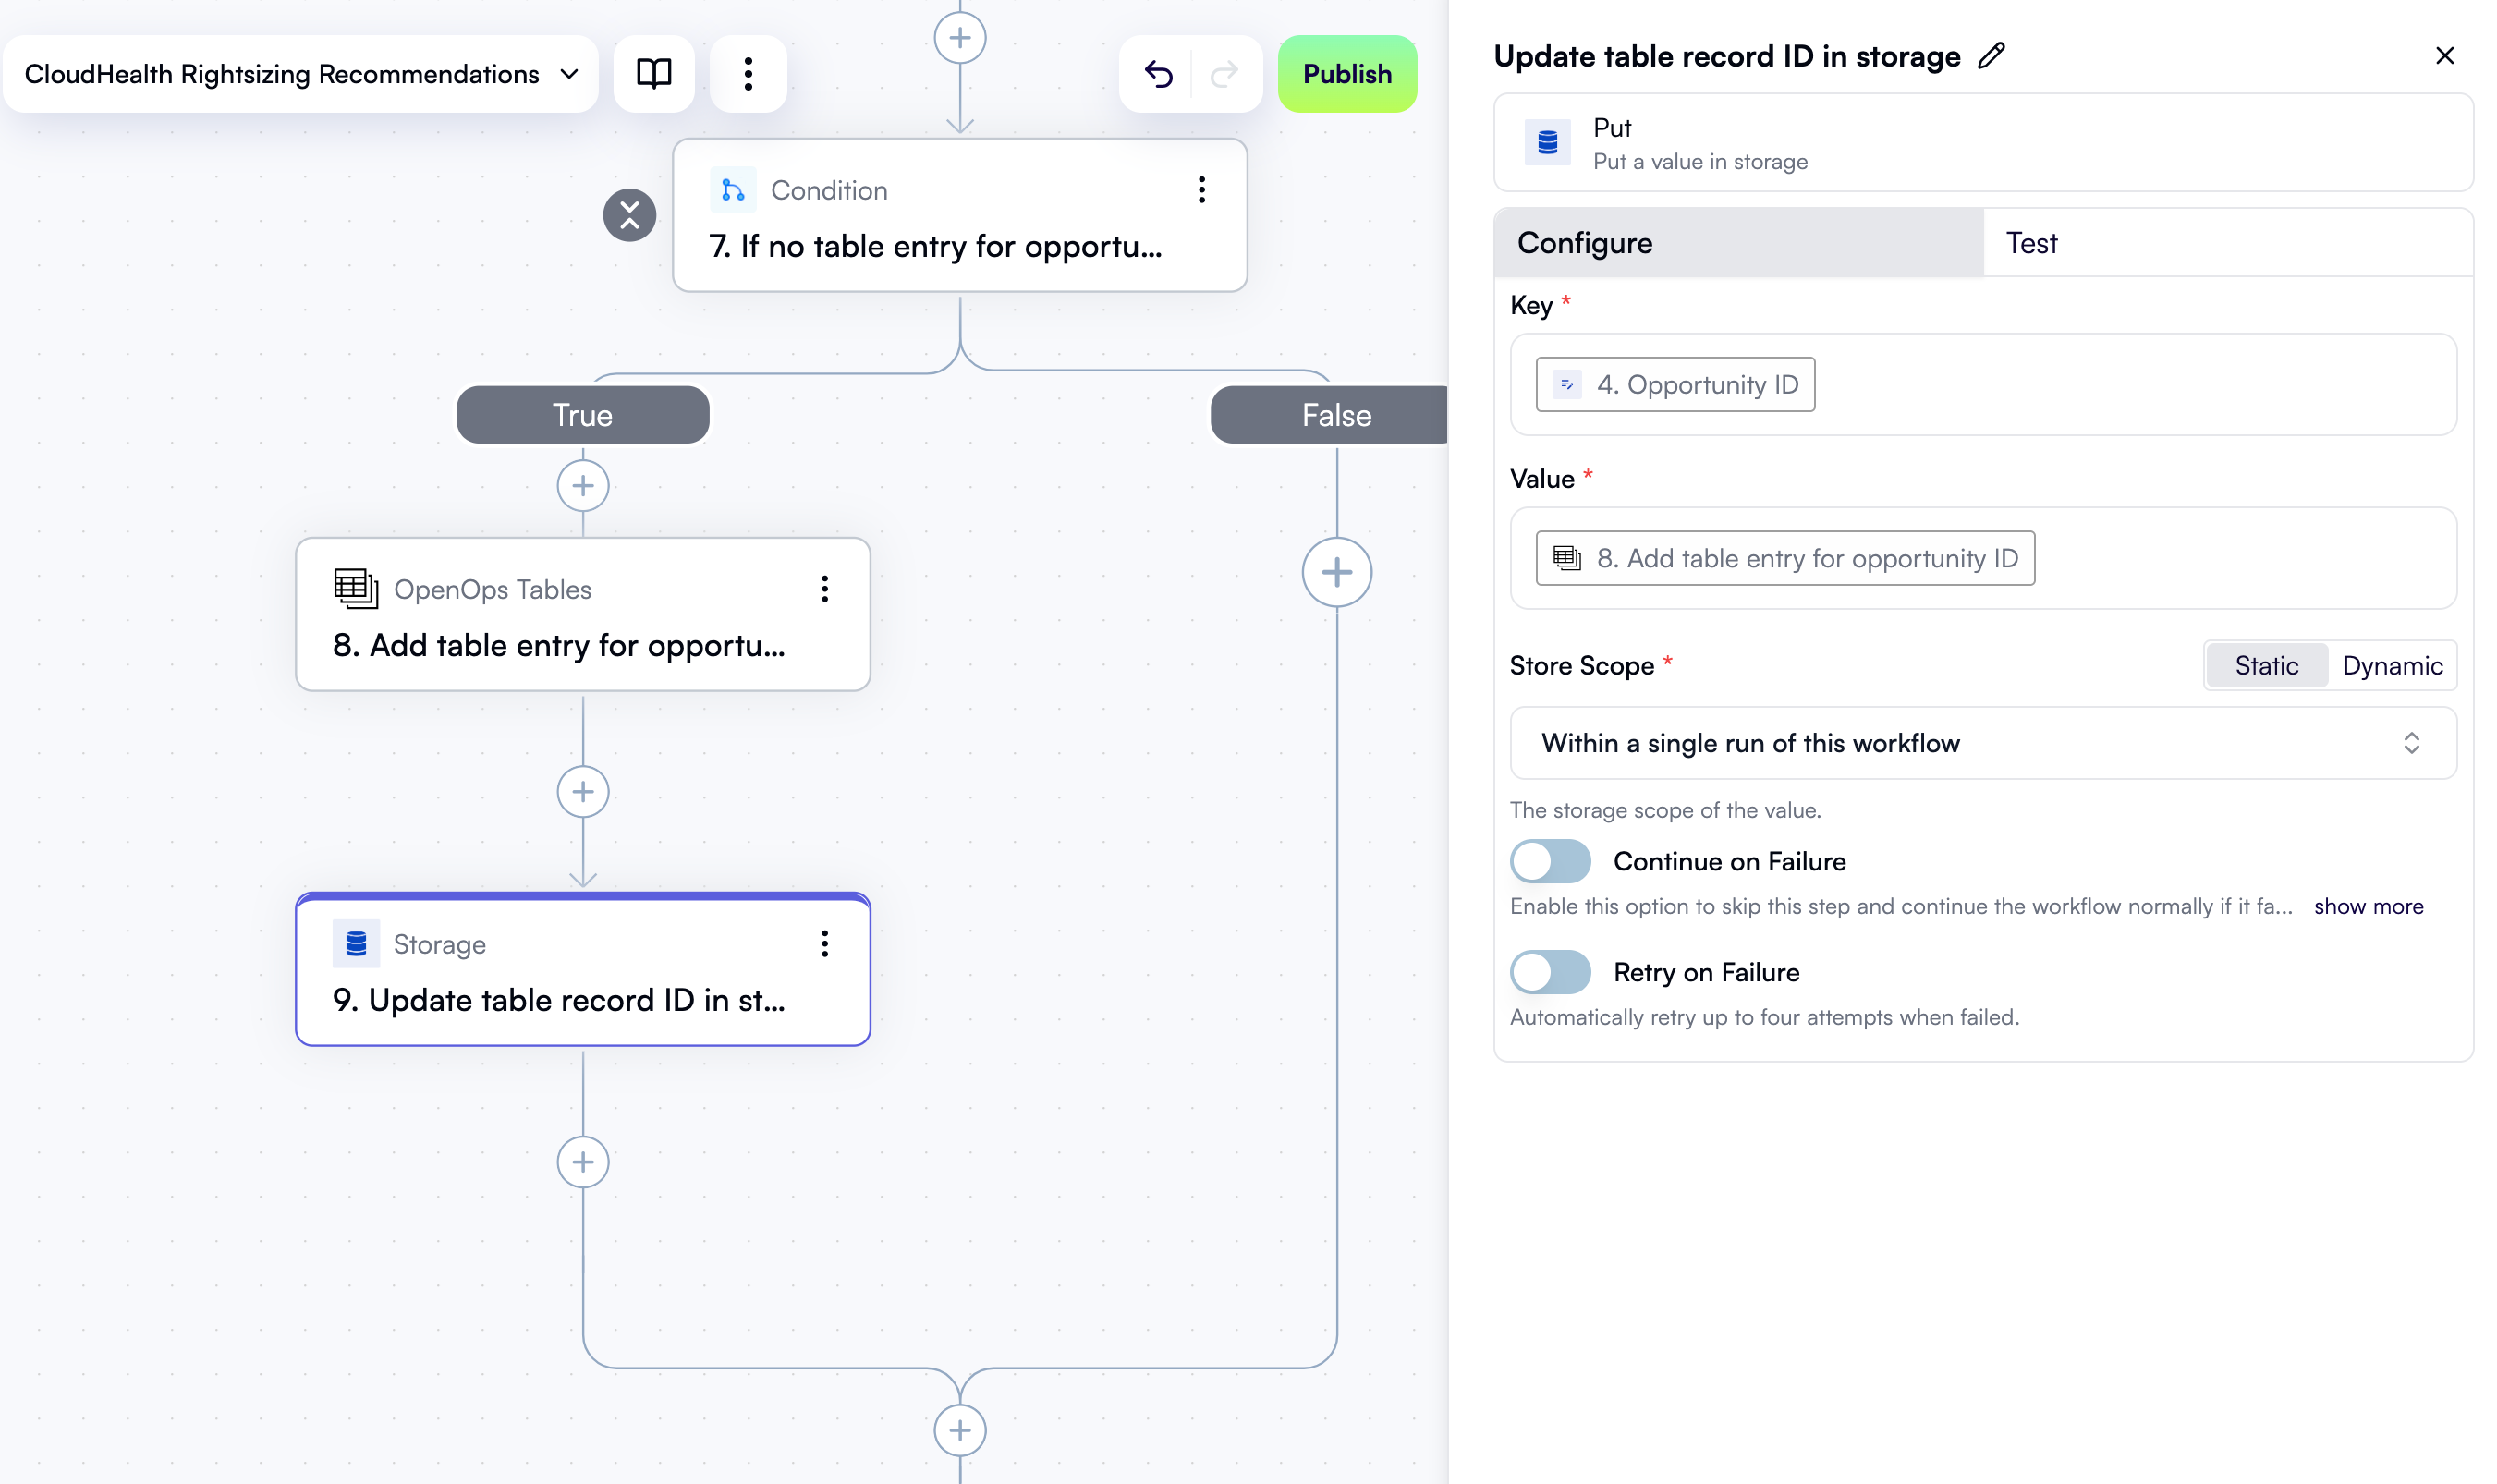
If a table entry exists, check the status
You’ve just handled a case where a new table entry needs to be created, adding steps to the True branch of the condition step that we called If no table entry for opportunity. If a table entry already exists, there’s also something that needs to be done. Let’s now add actions to the False branch of the condition.Check if an existing table entry is in the “Created” state
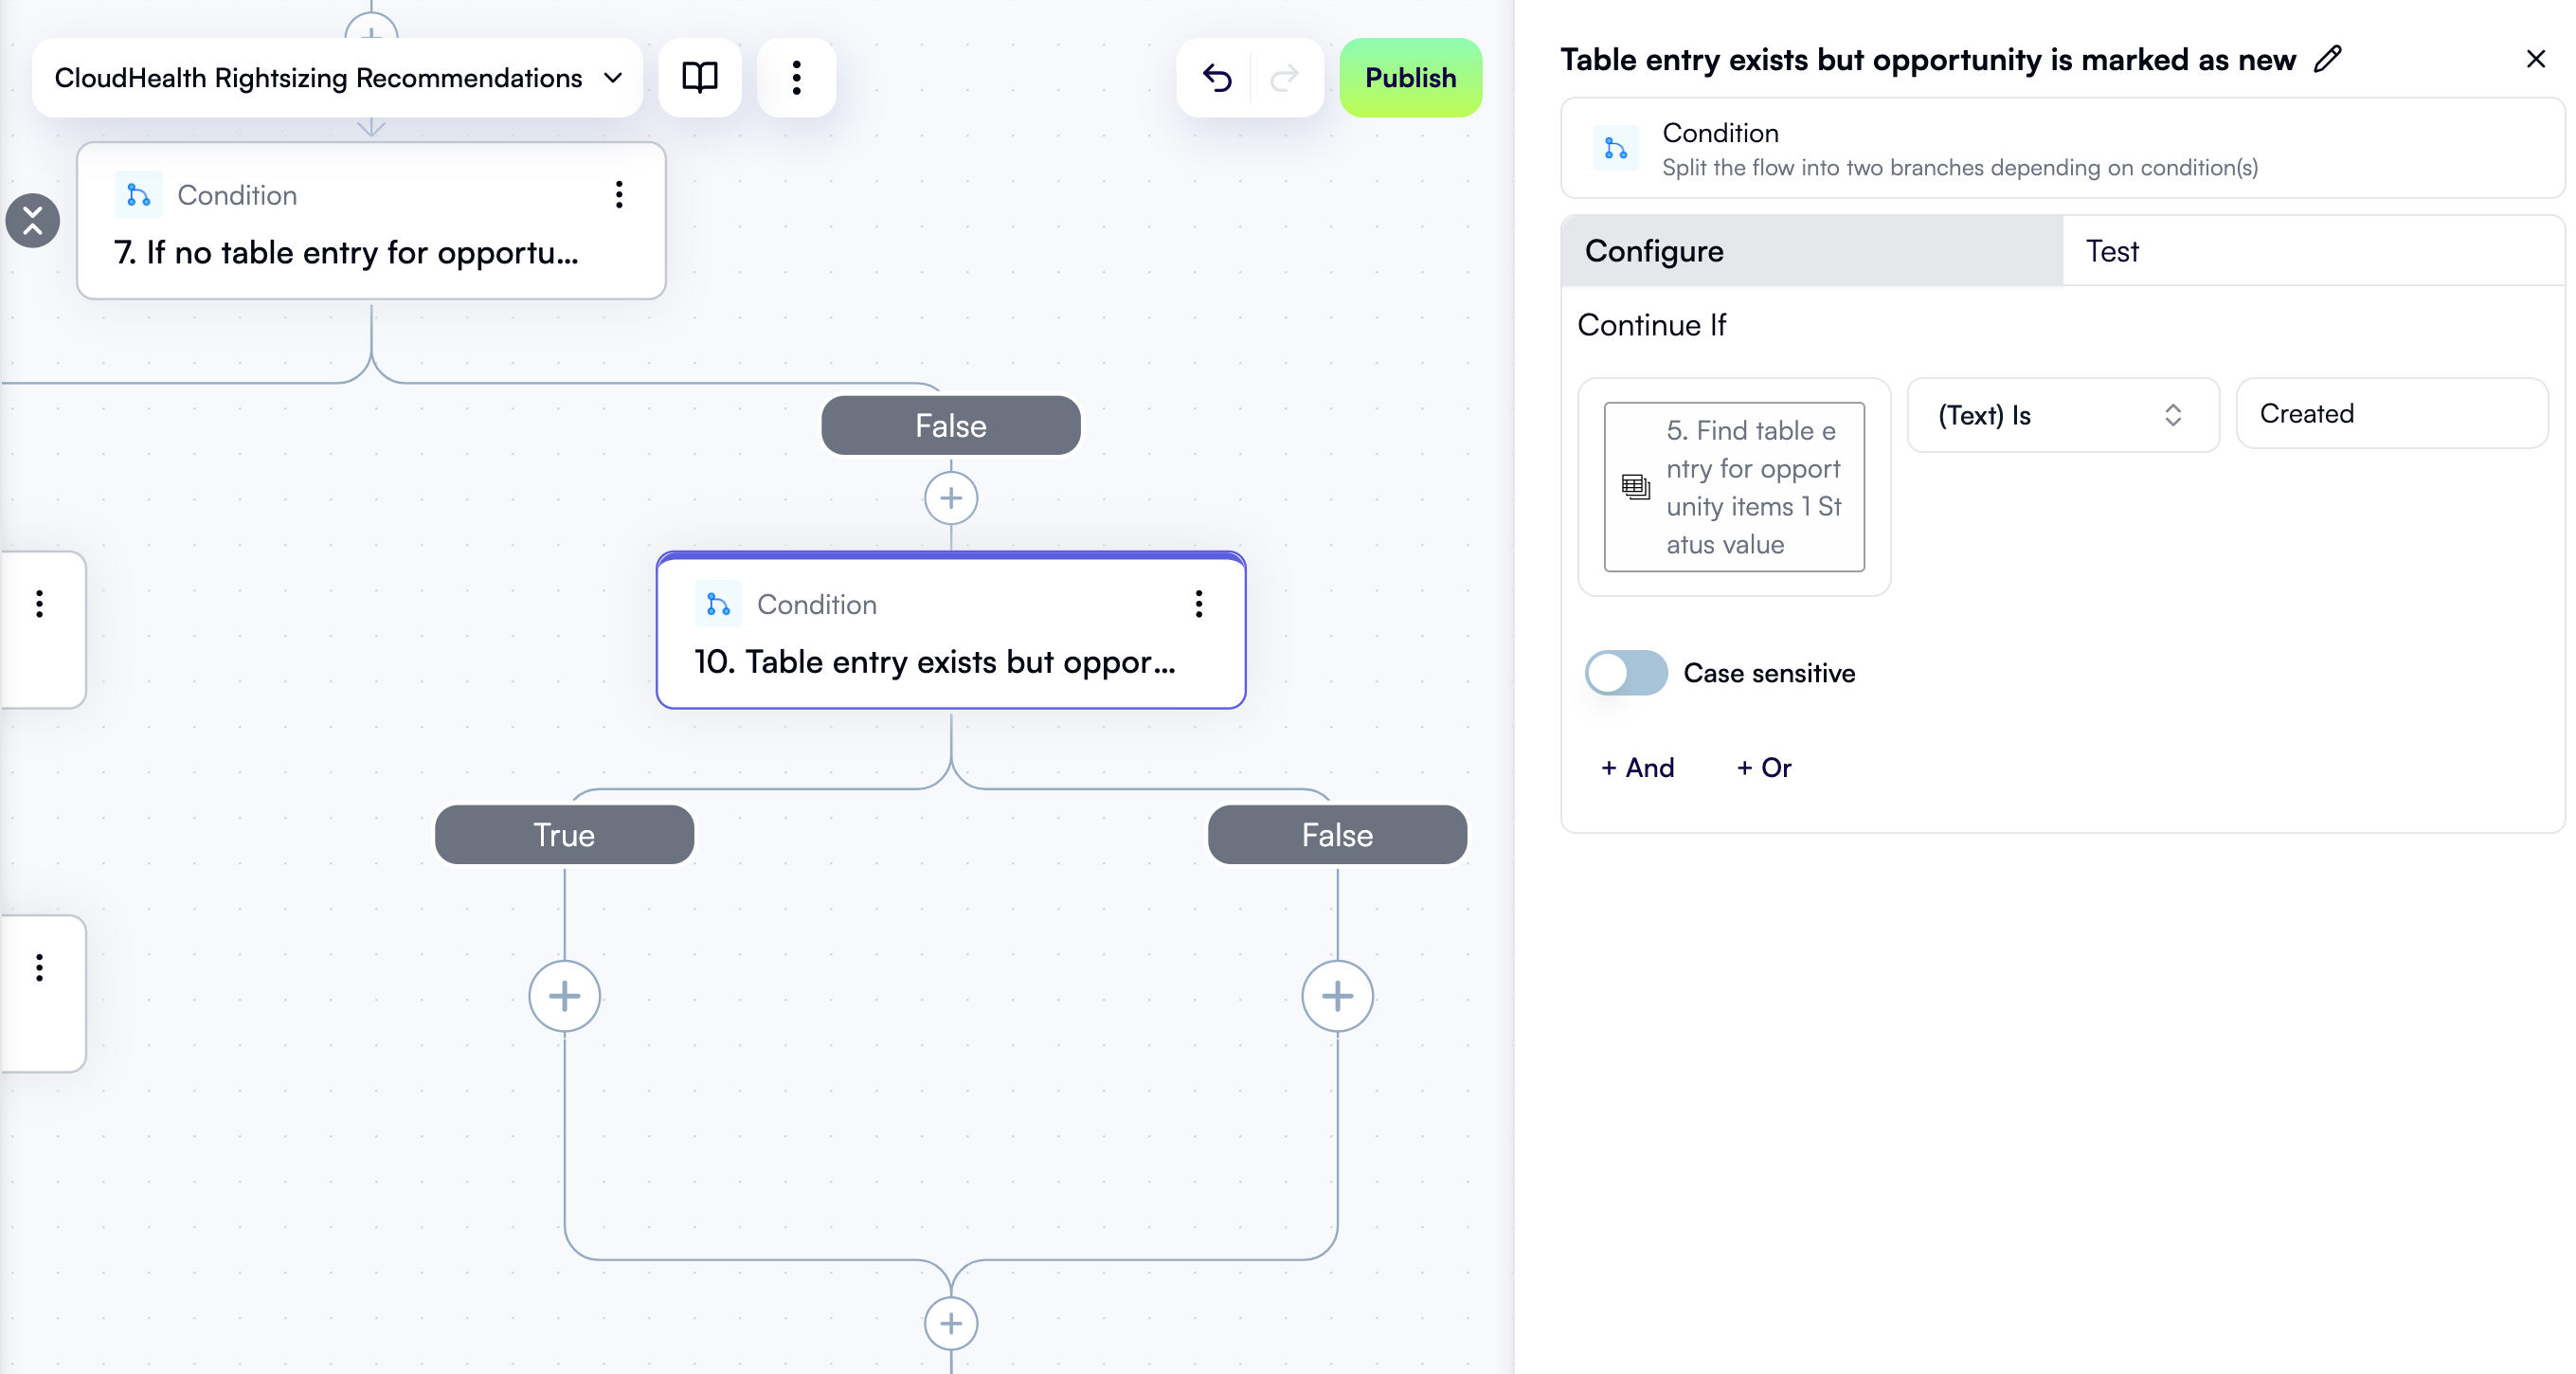
Inside the False branch of the condition, click + to add a new step. In the pop-up menu, select Condition in the left pane, then click Condition in the right pane. At the top of the new step’s properties pane, click Edit Step Name and rename the step Table entry exists but opportunity is marked as new. Under Continue If, click the left field. In the Data Selector view, expand 5. Find table entry for opportunity, then items, then items[1], then Status. Click Insert alongside the value entry: In the dropdown between the two fields, select (Text) Is. In the right field, enterCreated.
The new step in the workflow graph and the Configure tab in its properties pane should now look like this:
If the current status is “Created”, update it
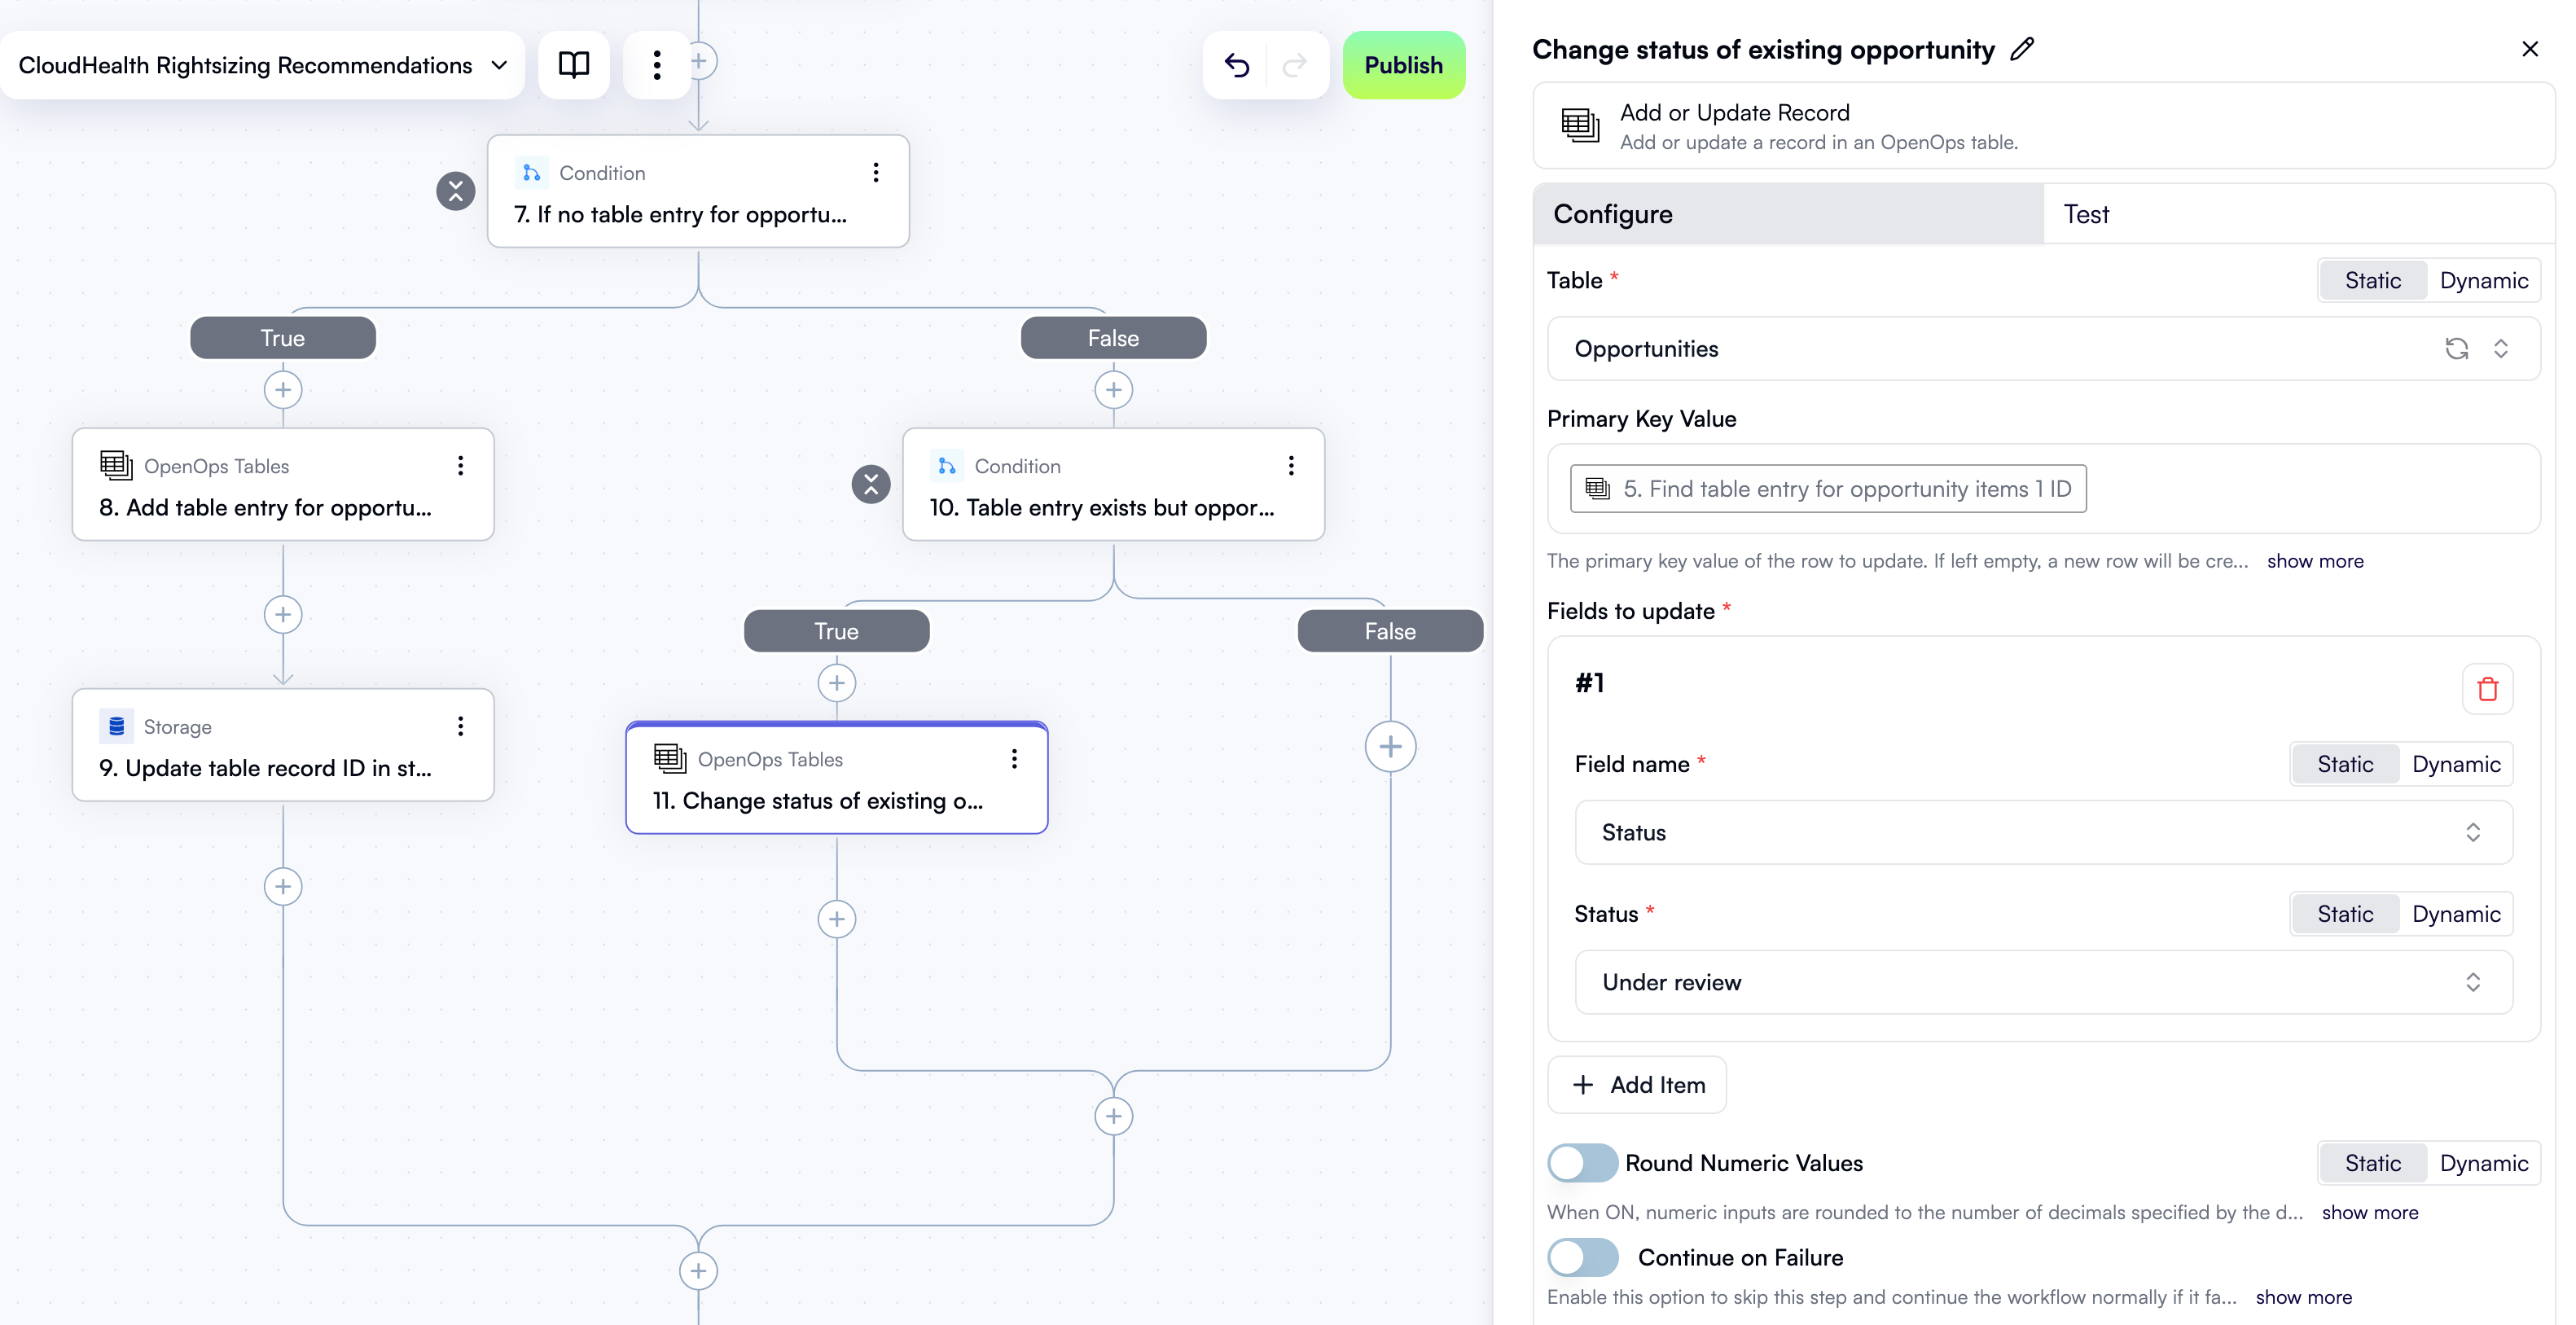
If a table entry for a recommendation already exists, but it’s in the “Created” state, this means a project owner has been notified about this recommendation the last time the workflow was run but has not taken any action yet. In this case, you should change the status to avoid notifying the project owner again. In the True branch of the Table entry exists but opportunity is marked as new condition, click + to add a new step. In the pop-up menu, select OpenOps Tables in the left pane, then click Add or Update Record in the right pane. At the top of the new step’s properties pane, click Edit Step Name and rename the step Change status of existing opportunity. For the Table field, select Opportunities. In the Primary Key Value field, use Data Selector to expand 5. Find table entry for opportunity, then items, then items[1]. Click Insert alongside the uppercase ID entry. Under Fields to update, click Add Item. In the new area:- In the Field name dropdown, select Status.
- In the Status dropdown, select Under review.
Get the current date
You’ve now written all steps inside the outer If no table entry for opportunity condition. To create the next step, click + in the location on the workflow graph right after both branches of the condition merge: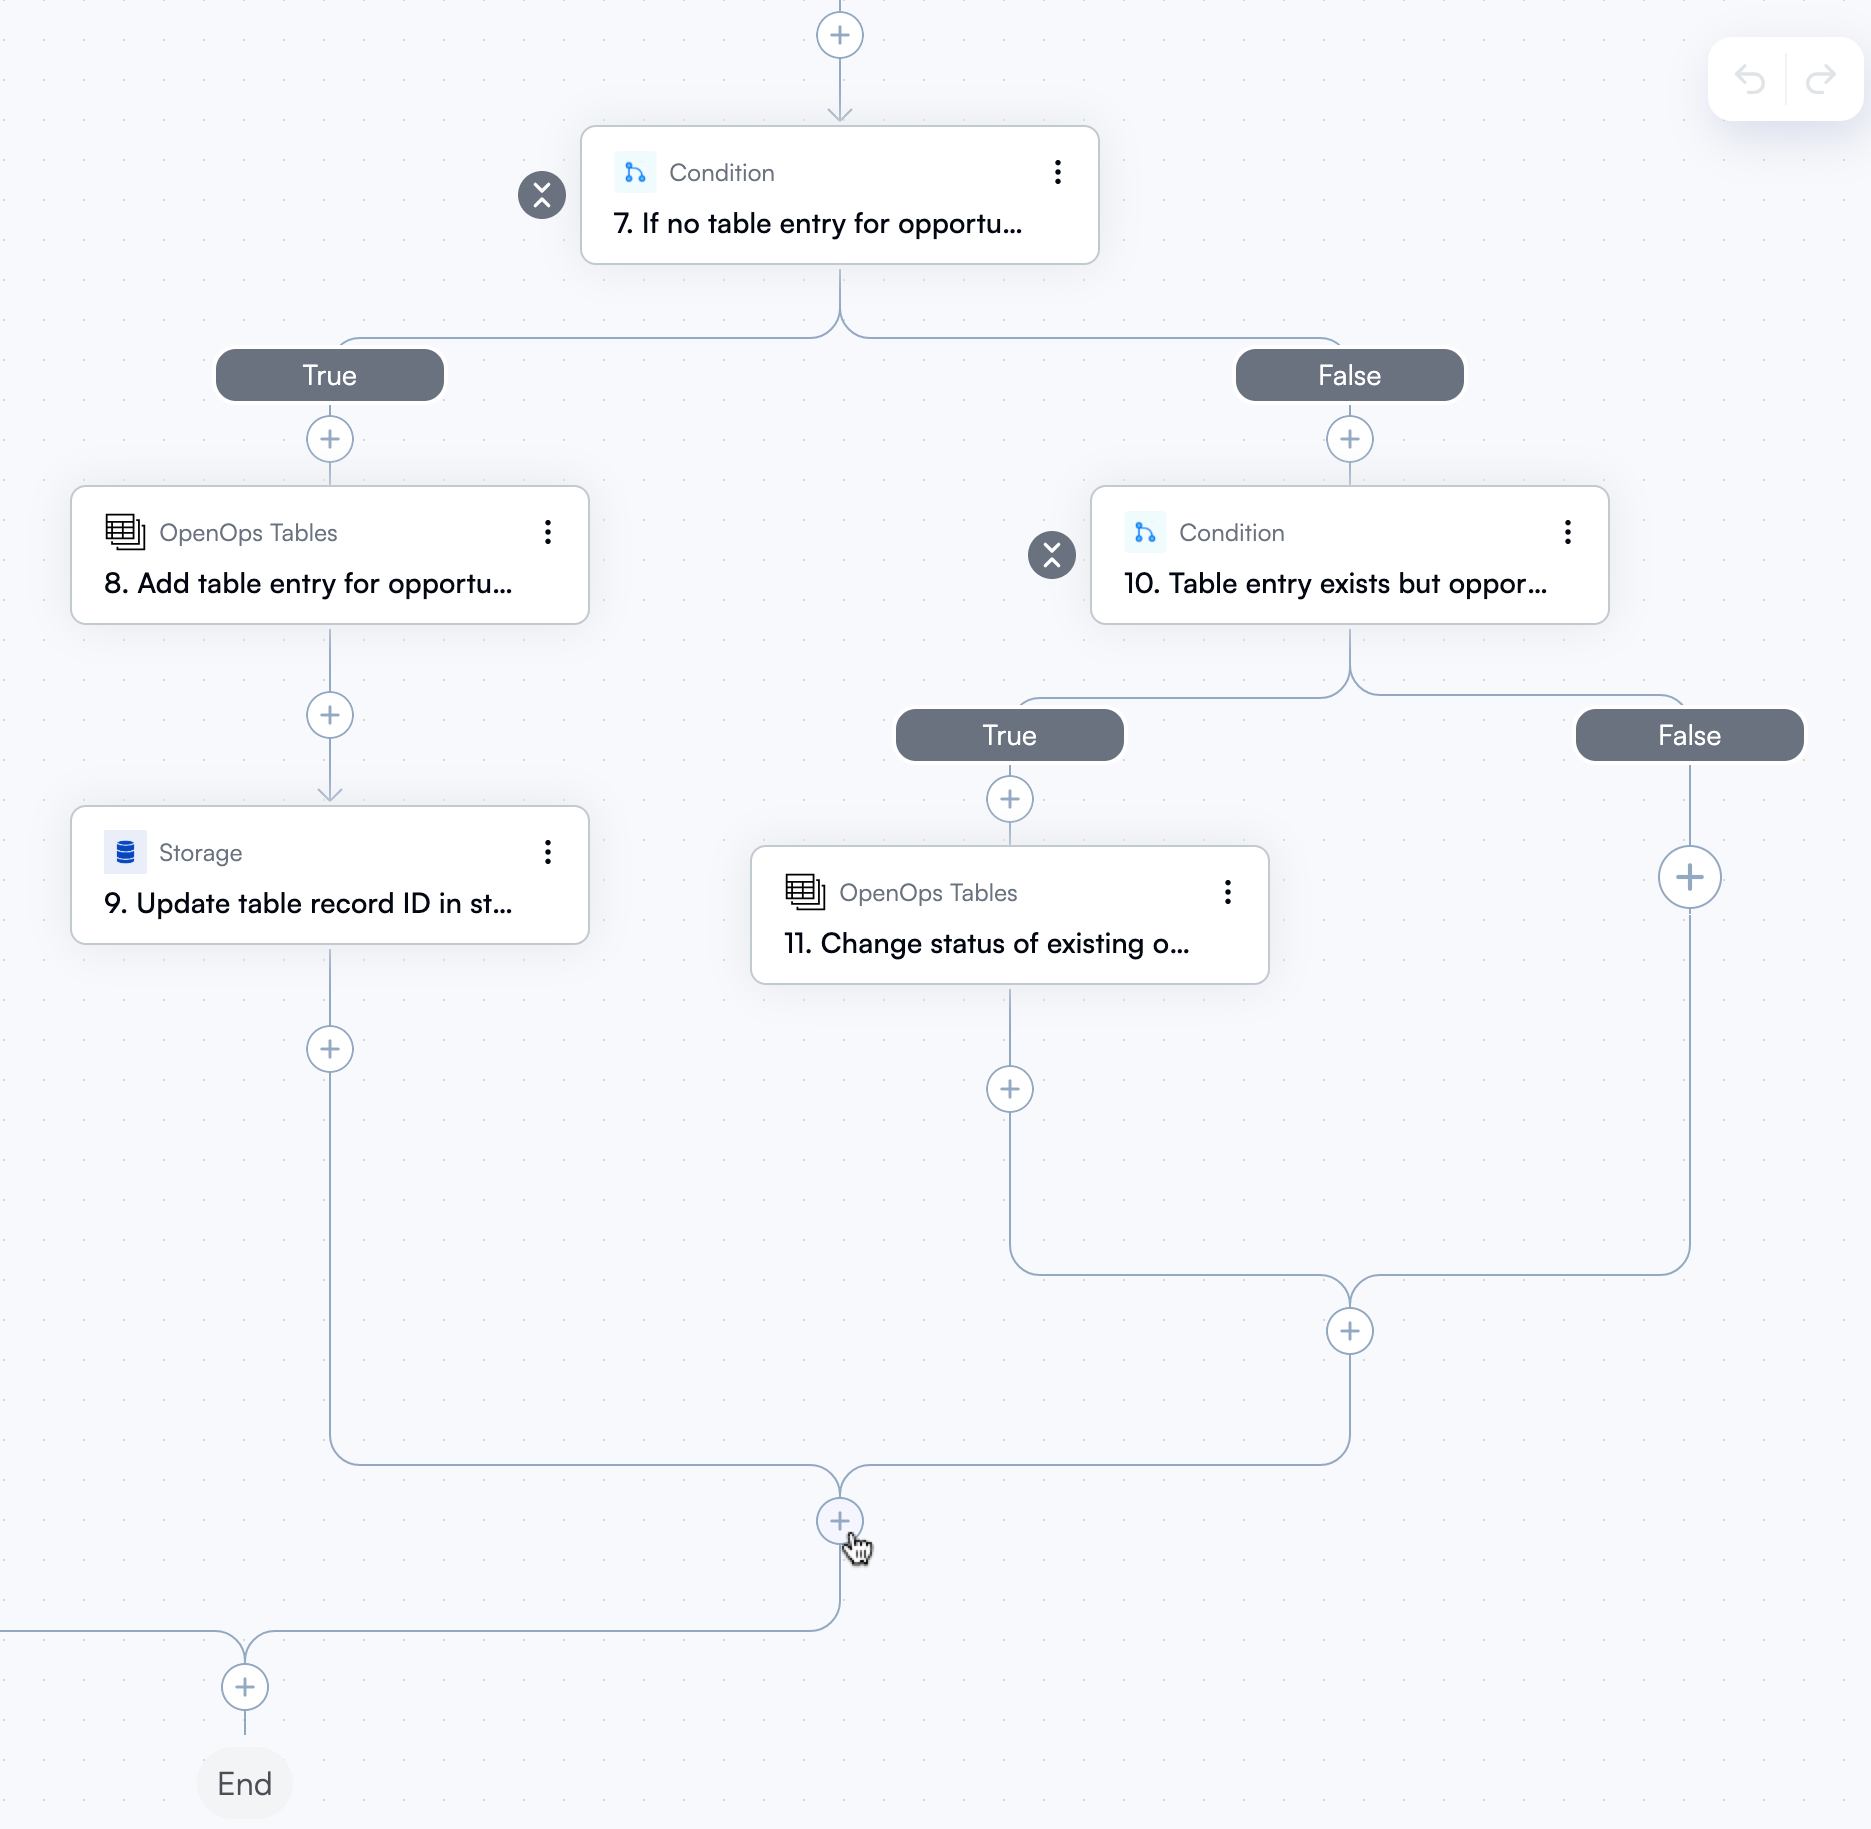
Get table ID for recommendation
Soon you’ll need to decide if the project owner should be notified about the current CloudHealth recommendation. To prepare for this, you first need to fetch the ID of the table record for this recommendation. Click + to add a new step. In the pop-up menu, select Storage in the left pane, then click Get in the right pane. At the top of the new step’s properties pane, click Edit Step Name and rename the step Get table ID for opportunity. In the Key field, use Data Selector to select 4. Opportunity ID. Keep Default Value blank and Store Scope at the default value. The new step in the workflow graph and the Configure tab in its properties pane should now look like this: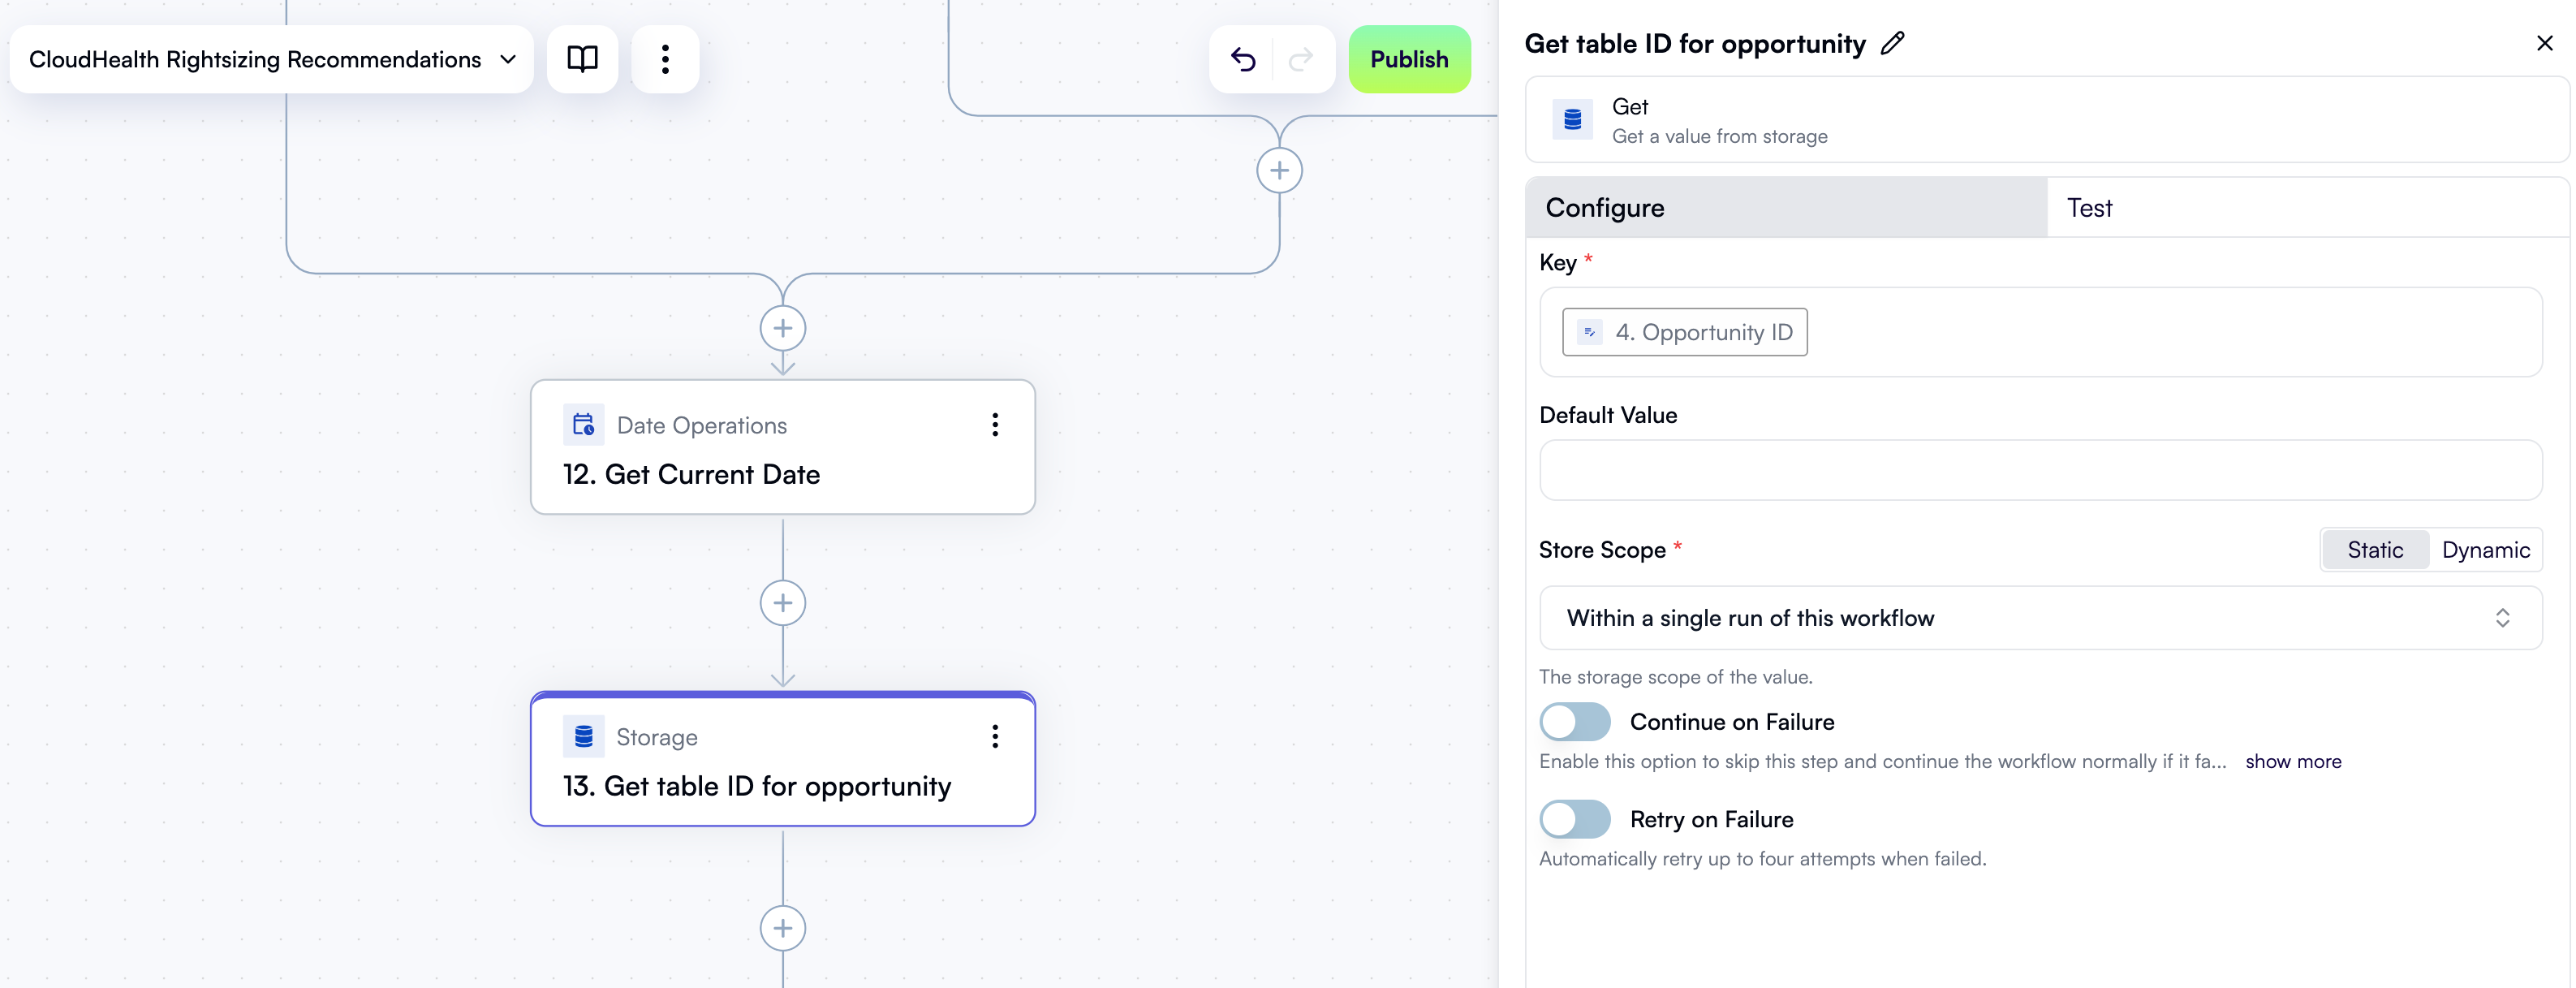
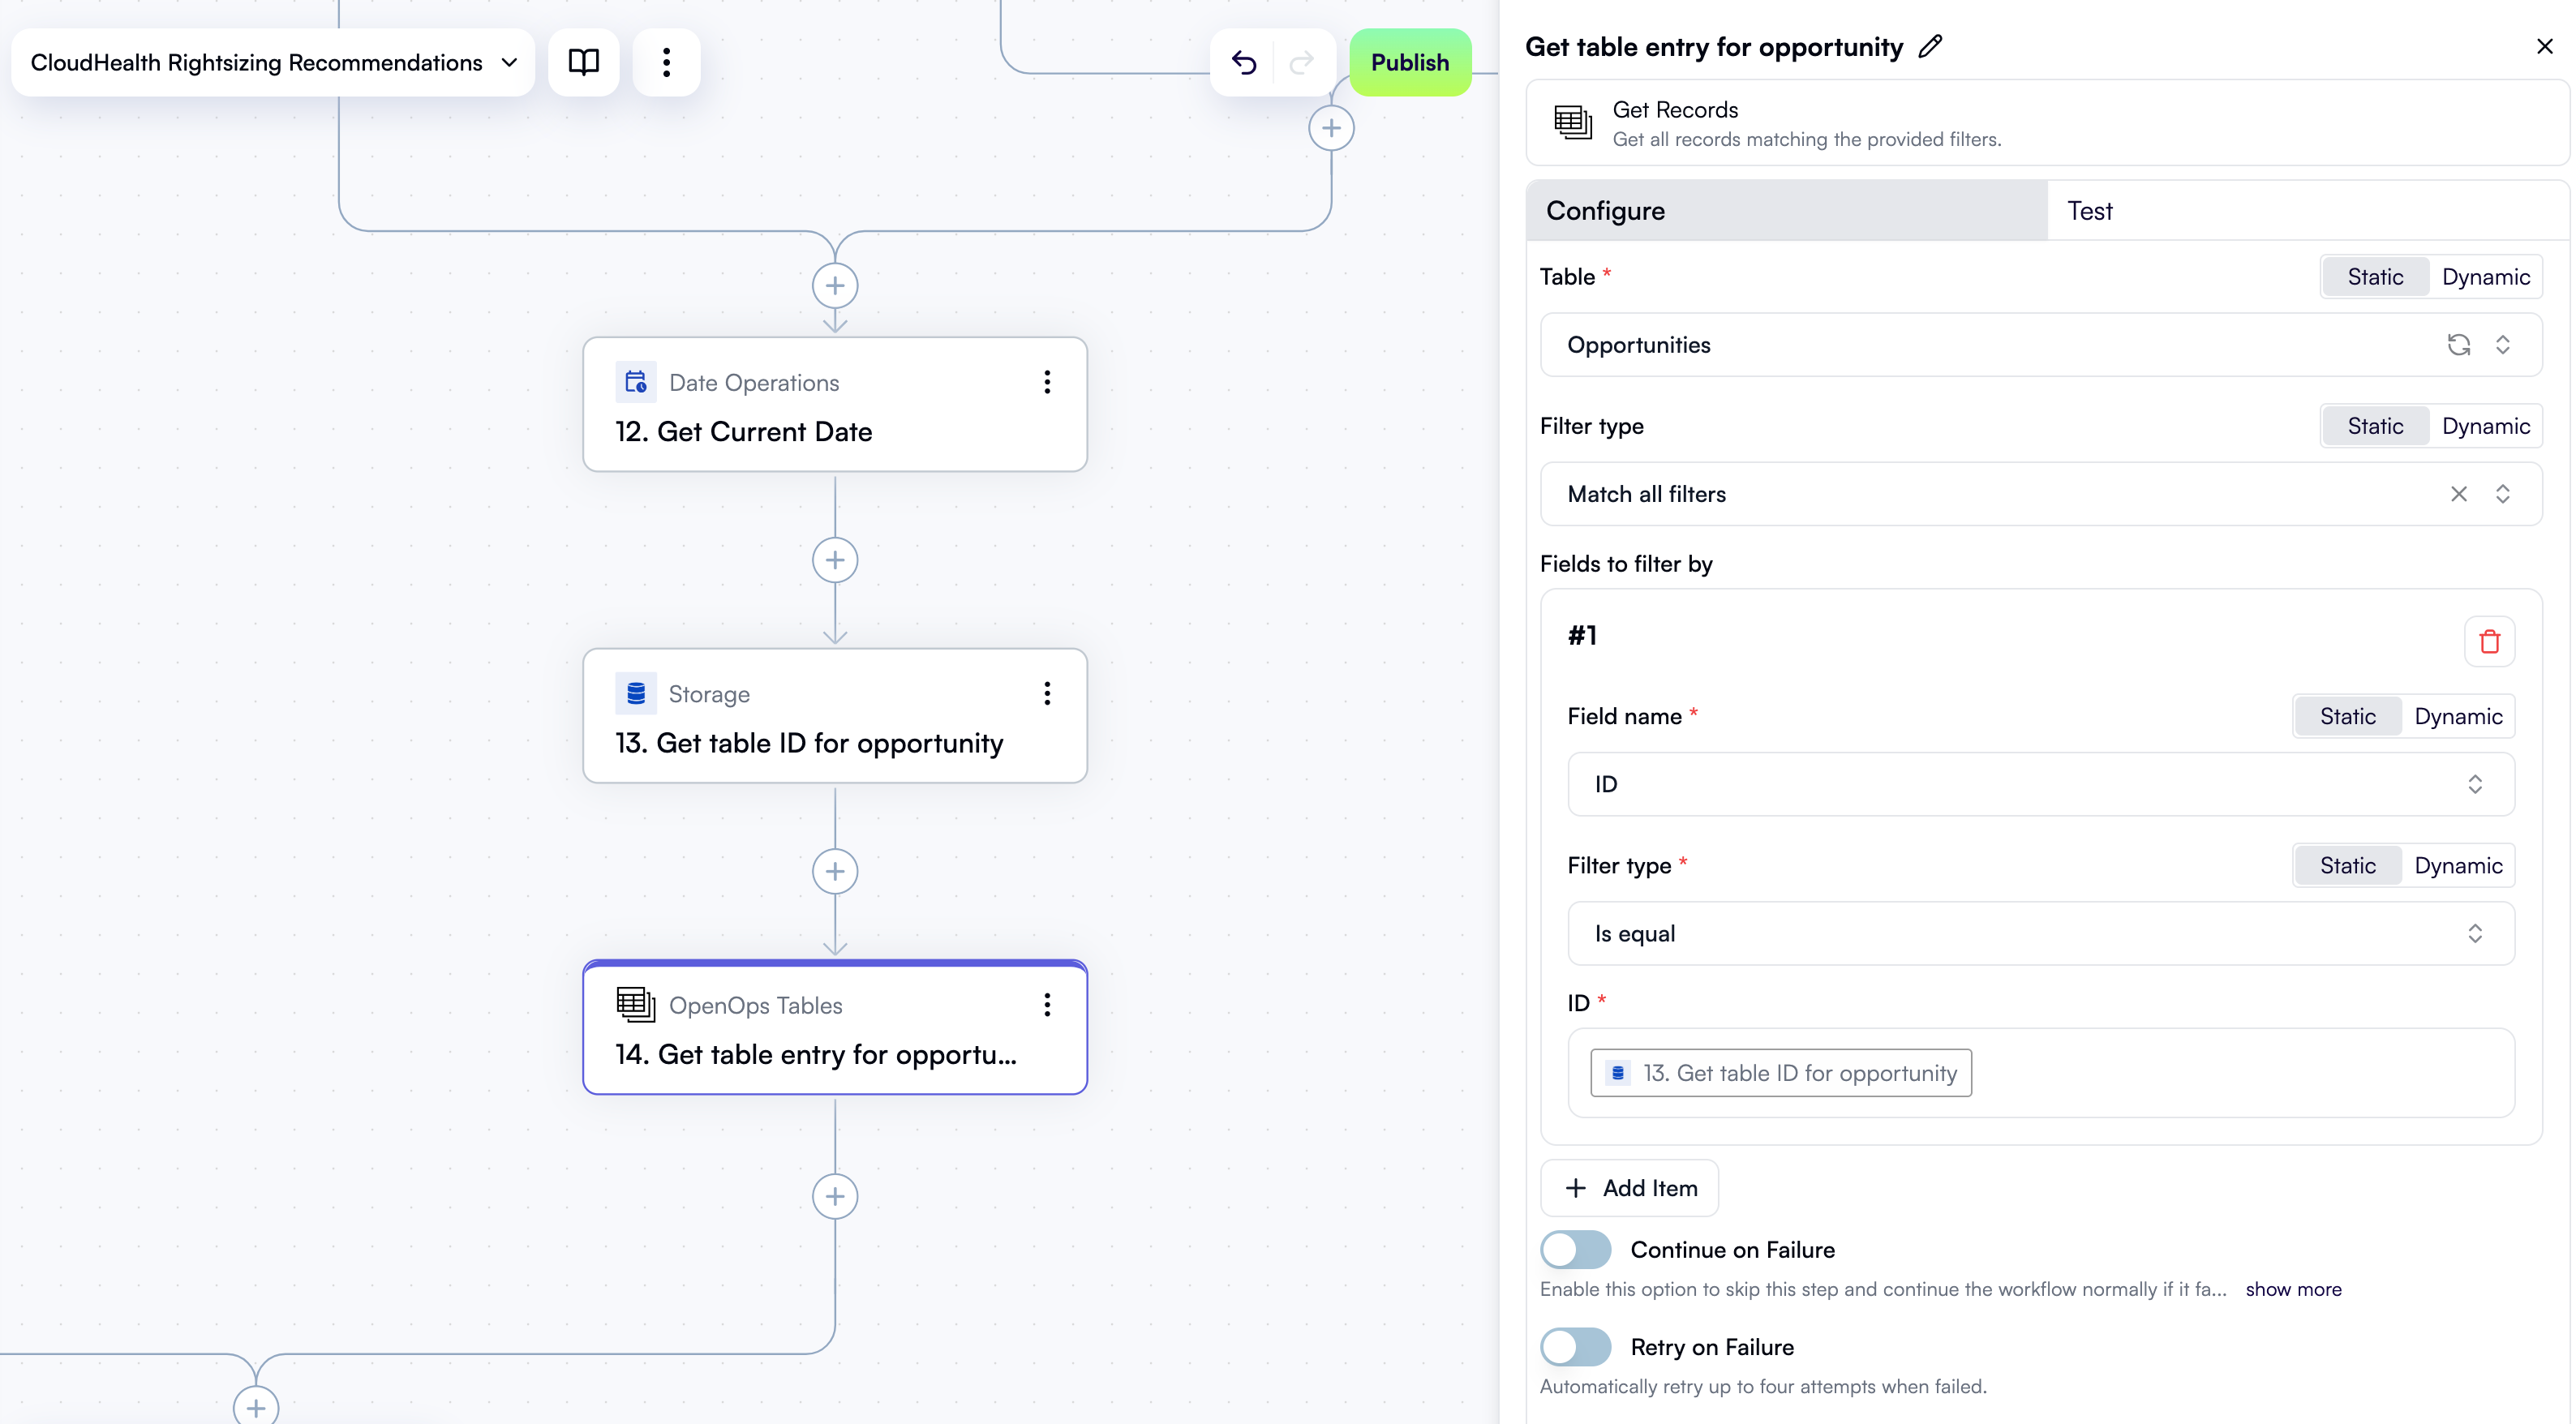
Get table entry for recommendation
With the ID of the current CloudHealth recommendation in the Opportunities table, you can now read its full entry from the table. Click + to add a new step. In the pop-up menu, select OpenOps Tables in the left pane, then click Get Records in the right pane. At the top of the new step’s properties pane, click Edit Step Name and rename the step Get table entry for opportunity. In the Table field, select Opportunities. Under Fields to filter by, click Add Item. In the new area:- For Field name, select ID.
- For Filter type, select Is equal.
- In the ID field, use Data Selector to select 13. Get table ID for opportunity.
Decide to skip or notify the project owner
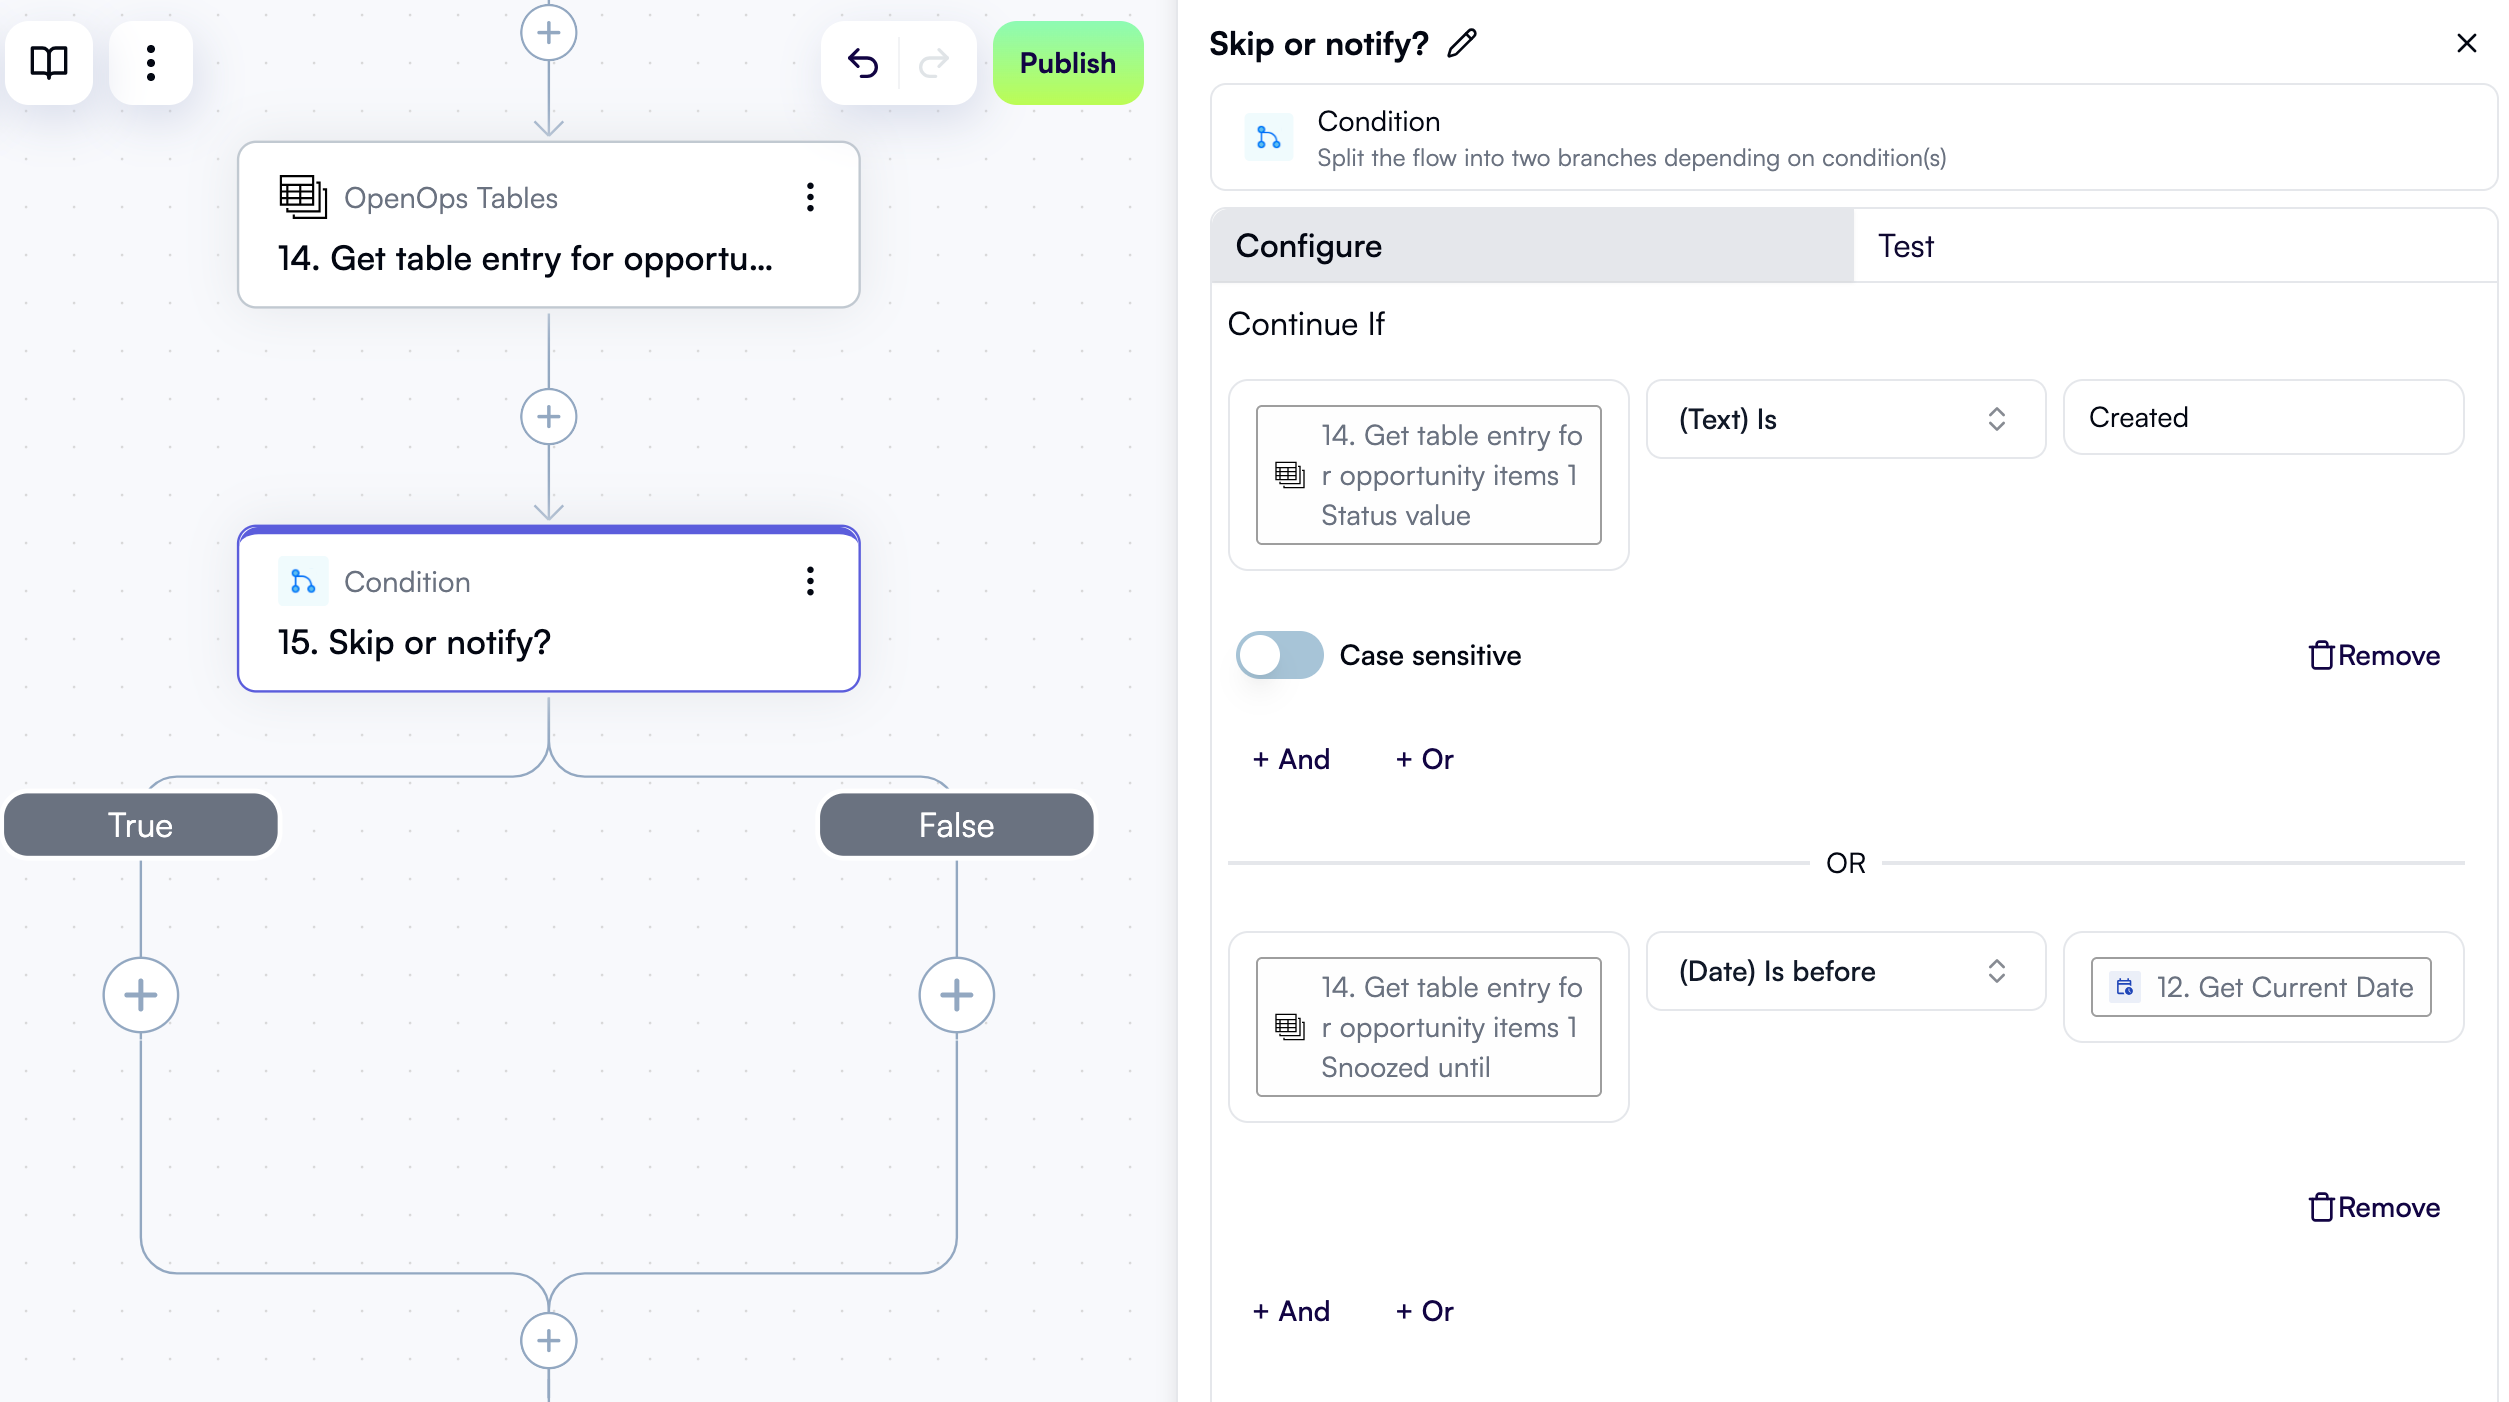
You now have all the information you need to decide whether to notify the project owner about the current recommendation over Slack. To make this decision, you’ll need to introduce a condition step. In the workflow graph, click + to add a new step. In the pop-up menu, select Condition in the left pane, then click Condition in the right pane. At the top of the new step’s properties pane, click Edit Step Name and rename the step Skip or notify?. You want to notify the project owner in two cases:- If this is a new recommendation, as evidenced by the “Created” state.
- If the project owner has been notified of the current recommendation in the past, chose to snooze it, and the snooze date has passed.
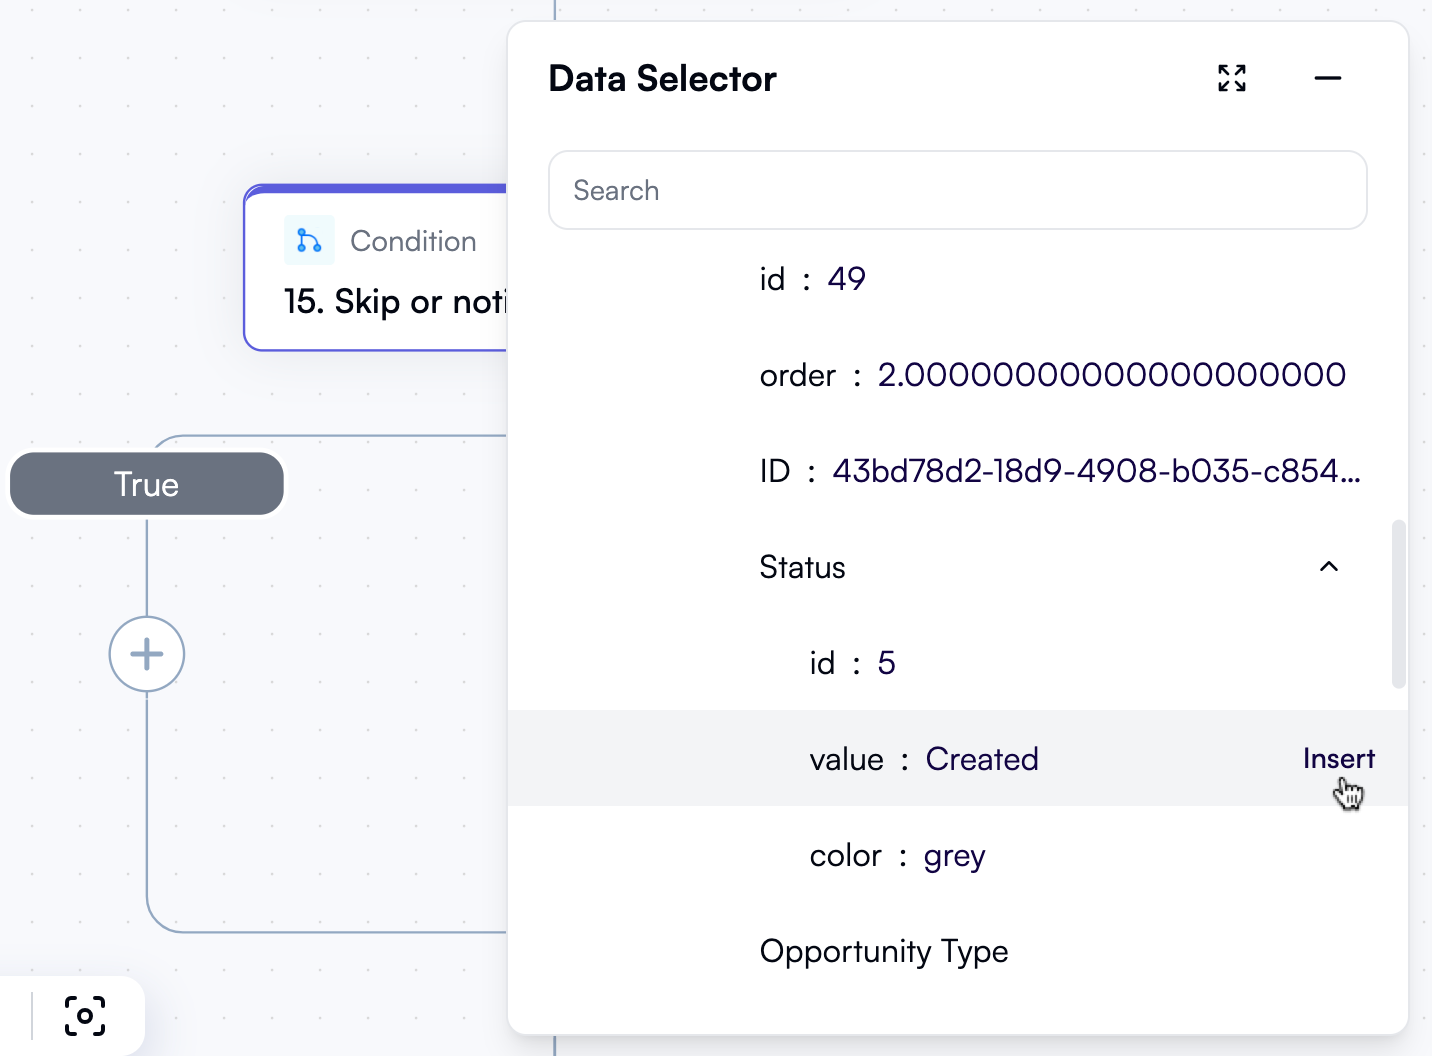
Created.
Click + Or. In the new area, click the left field. In Data Selector, expand 14. Get table entry for opportunity, then items, then items[1]. Scroll down and click Insert alongside the Snoozed until entry.
In the dropdown between the two fields, select (Date) Is before.
In the right field, use Data Selector to insert 12. Get Current Date.
The new step in the workflow graph and the Configure tab in its properties pane should now look like this:
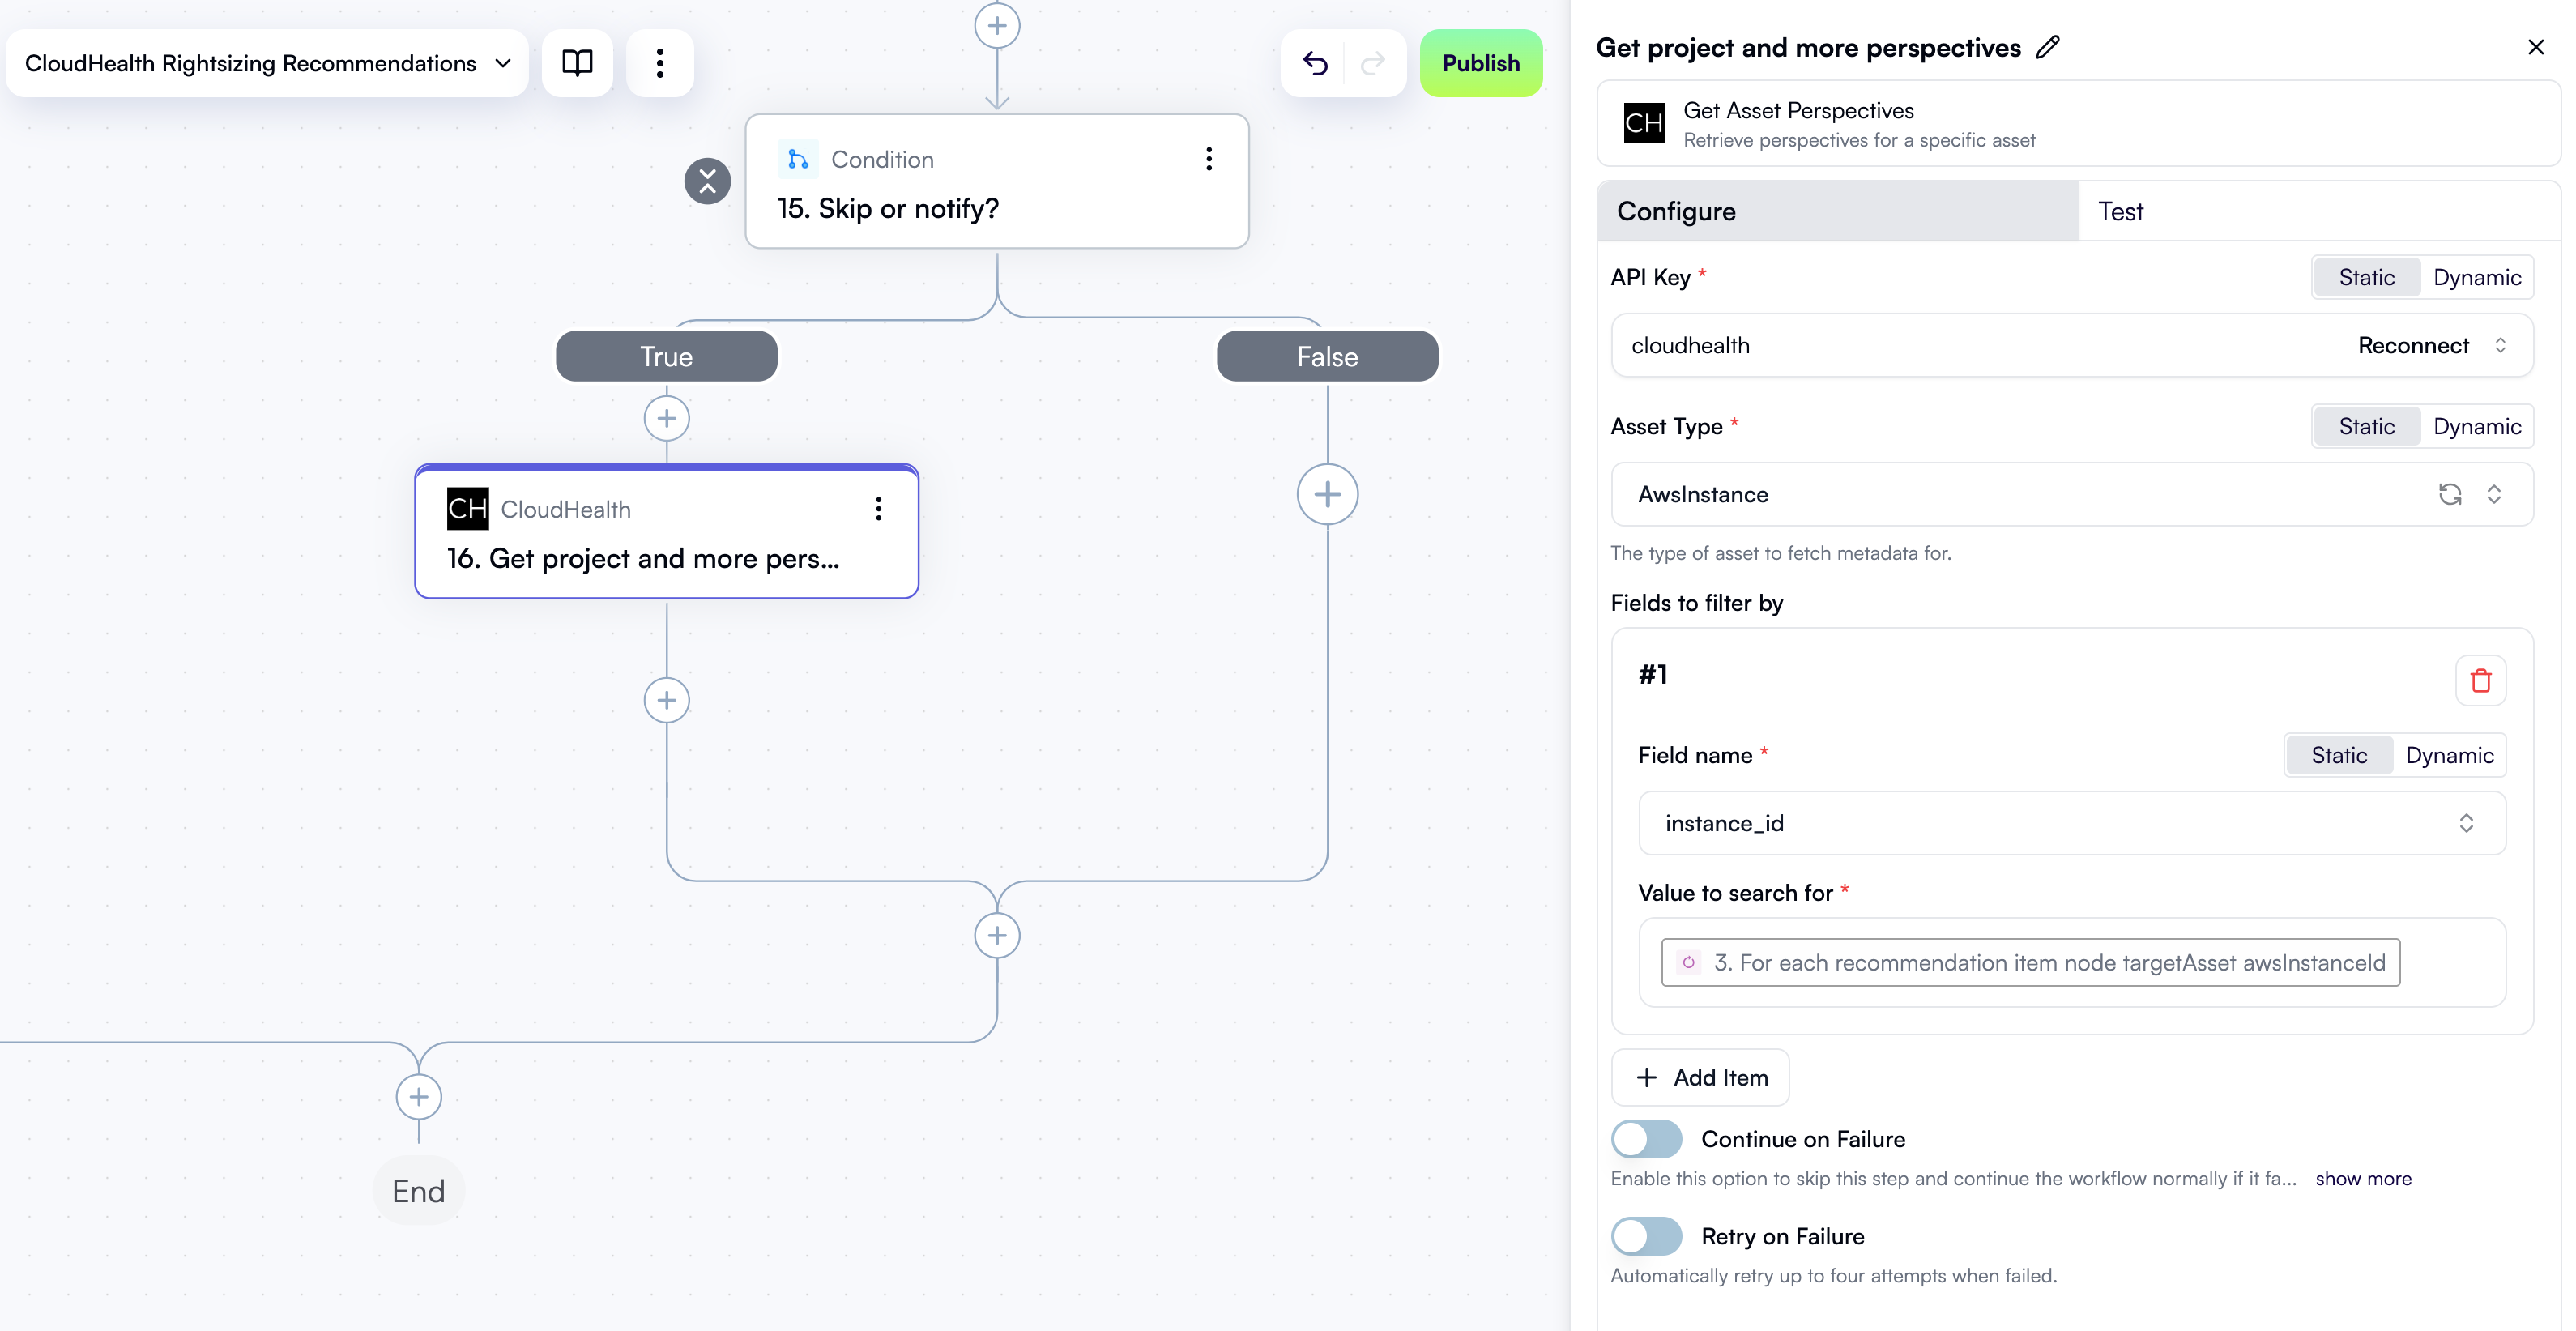
Get asset perspectives from CloudHealth
In case the project owner should be notified, you need to add several preparatory steps in the True branch of the condition, followed by steps to send a Slack notification and handle the project owner’s response. Let’s start with making a call to the CloudHealth API to determine which project the AWS instance related to the current recommendation belongs to. In the True branch of the Skip or notify? condition, click + to add a new step. In the pop-up menu, select CloudHealth in the left pane, then click Get Asset Perspectives in the right pane. At the top of the new step’s properties pane, click Edit Step Name and rename the step Get project and more perspectives. Under API Key in the properties pane, select your existing CloudHealth connection. Under Asset Type, select AwsInstance. Under Fields to filter by, click Add Item. In the new area:- Under Field name, select instance_id.
- In the Value to search for field, use Data Selector to expand 3. For each recommendation, then item, then node, then targetAsset. Click Insert alongside the awsInstanceId entry:
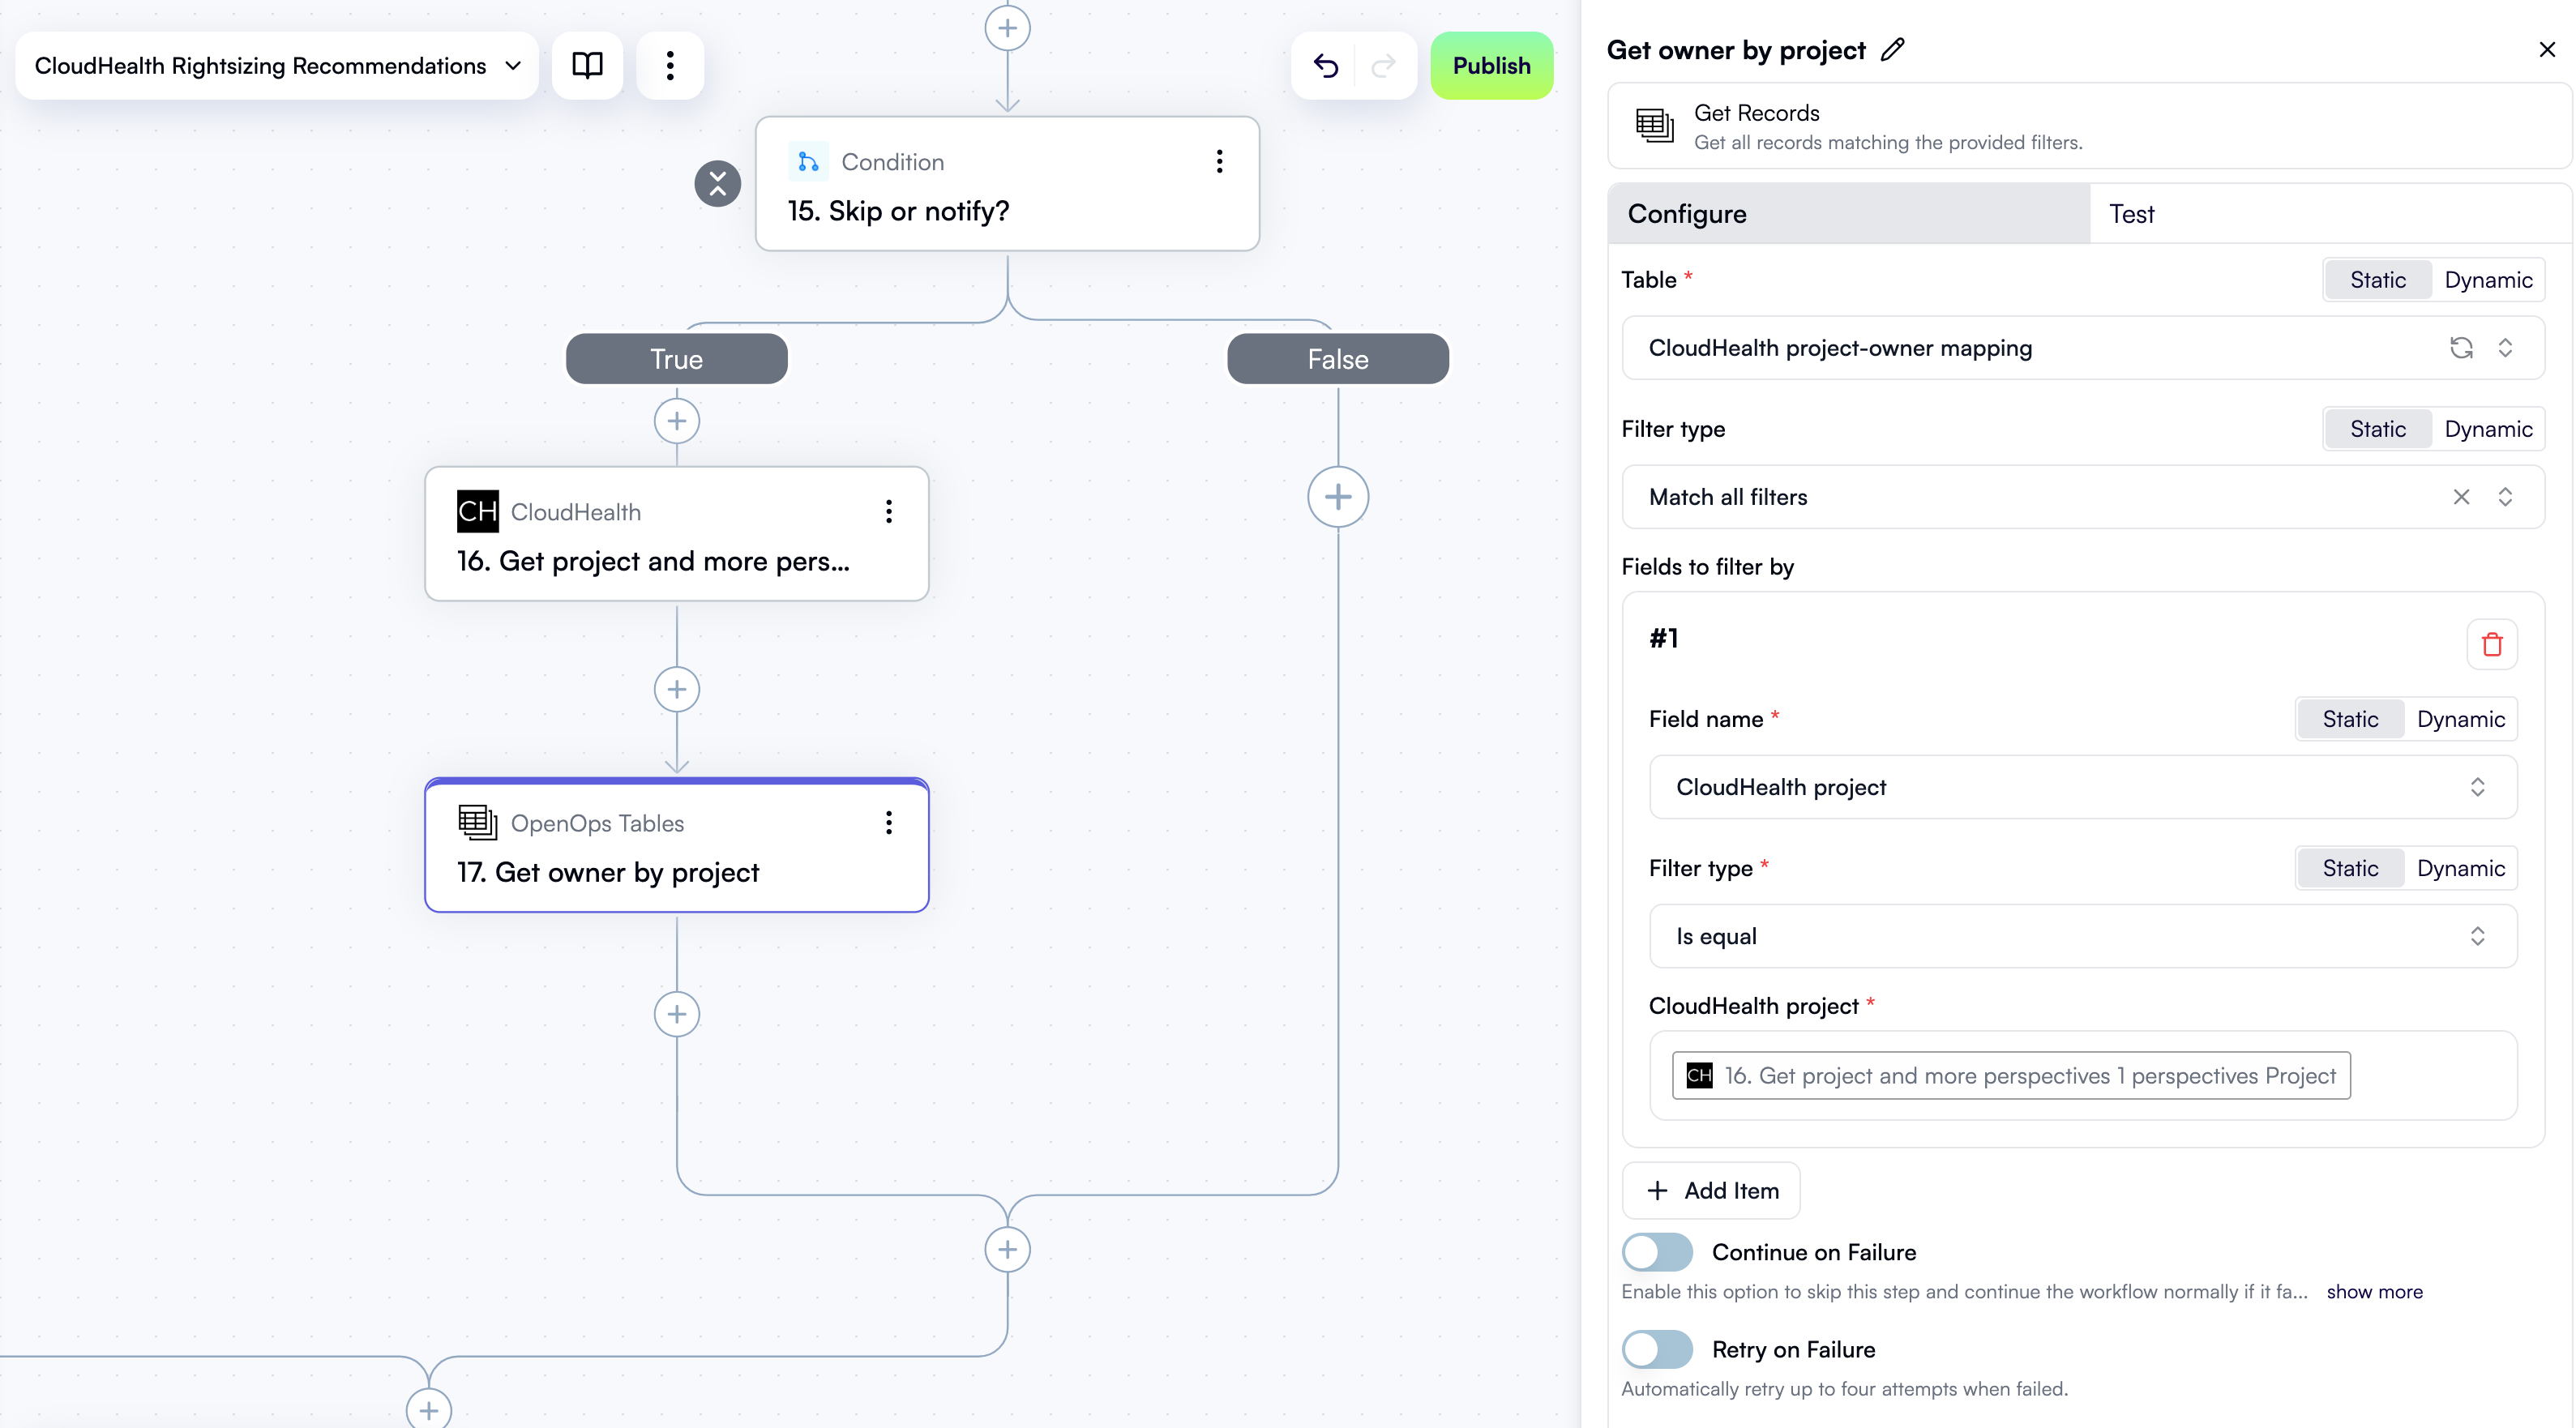
Get owner by project
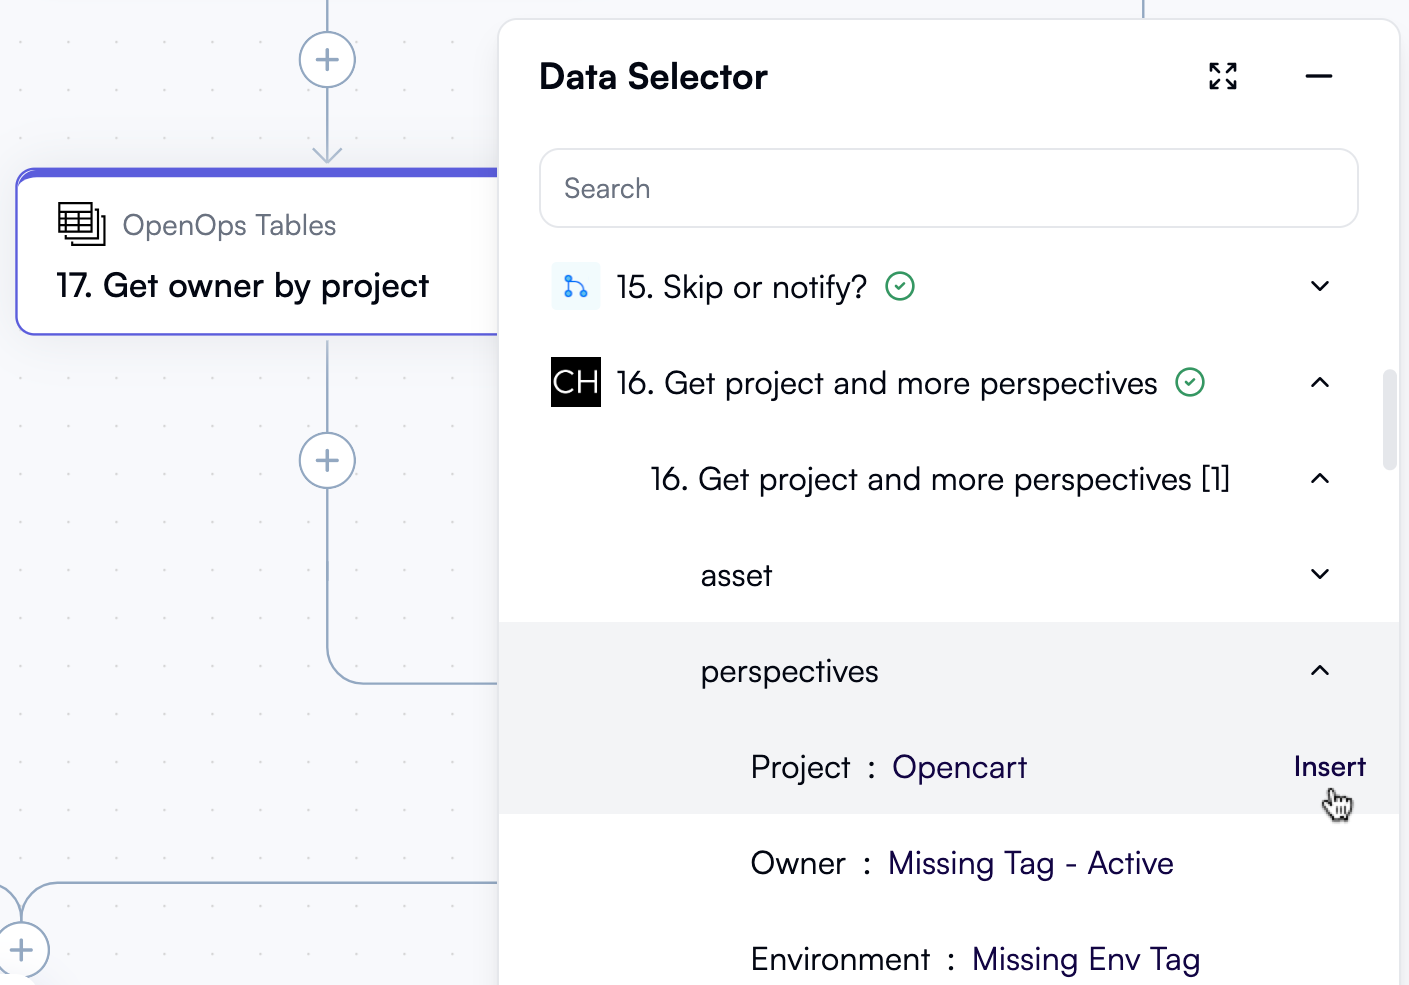
Now that you know which project the recommendation belongs to, you can find out who owns the project. Click + to add a new step. In the pop-up menu, select OpenOps Tables in the left pane, then click Get Records in the right pane. At the top of the new step’s properties pane, click Edit Step Name and rename the step Get owner by project. In the Table field, select CloudHealth project-owner mapping. Under Fields to filter by, click Add Item. In the new area:- For Field name, select CloudHealth project.
- For Filter type, select Is equal.
- In the CloudHealth project field, use Data Selector to expand 16. Get project and more perspectives, then 16. Get project and more perspectives[1], then perspectives. Click Insert alongside the Project entry:
Format monthly savings
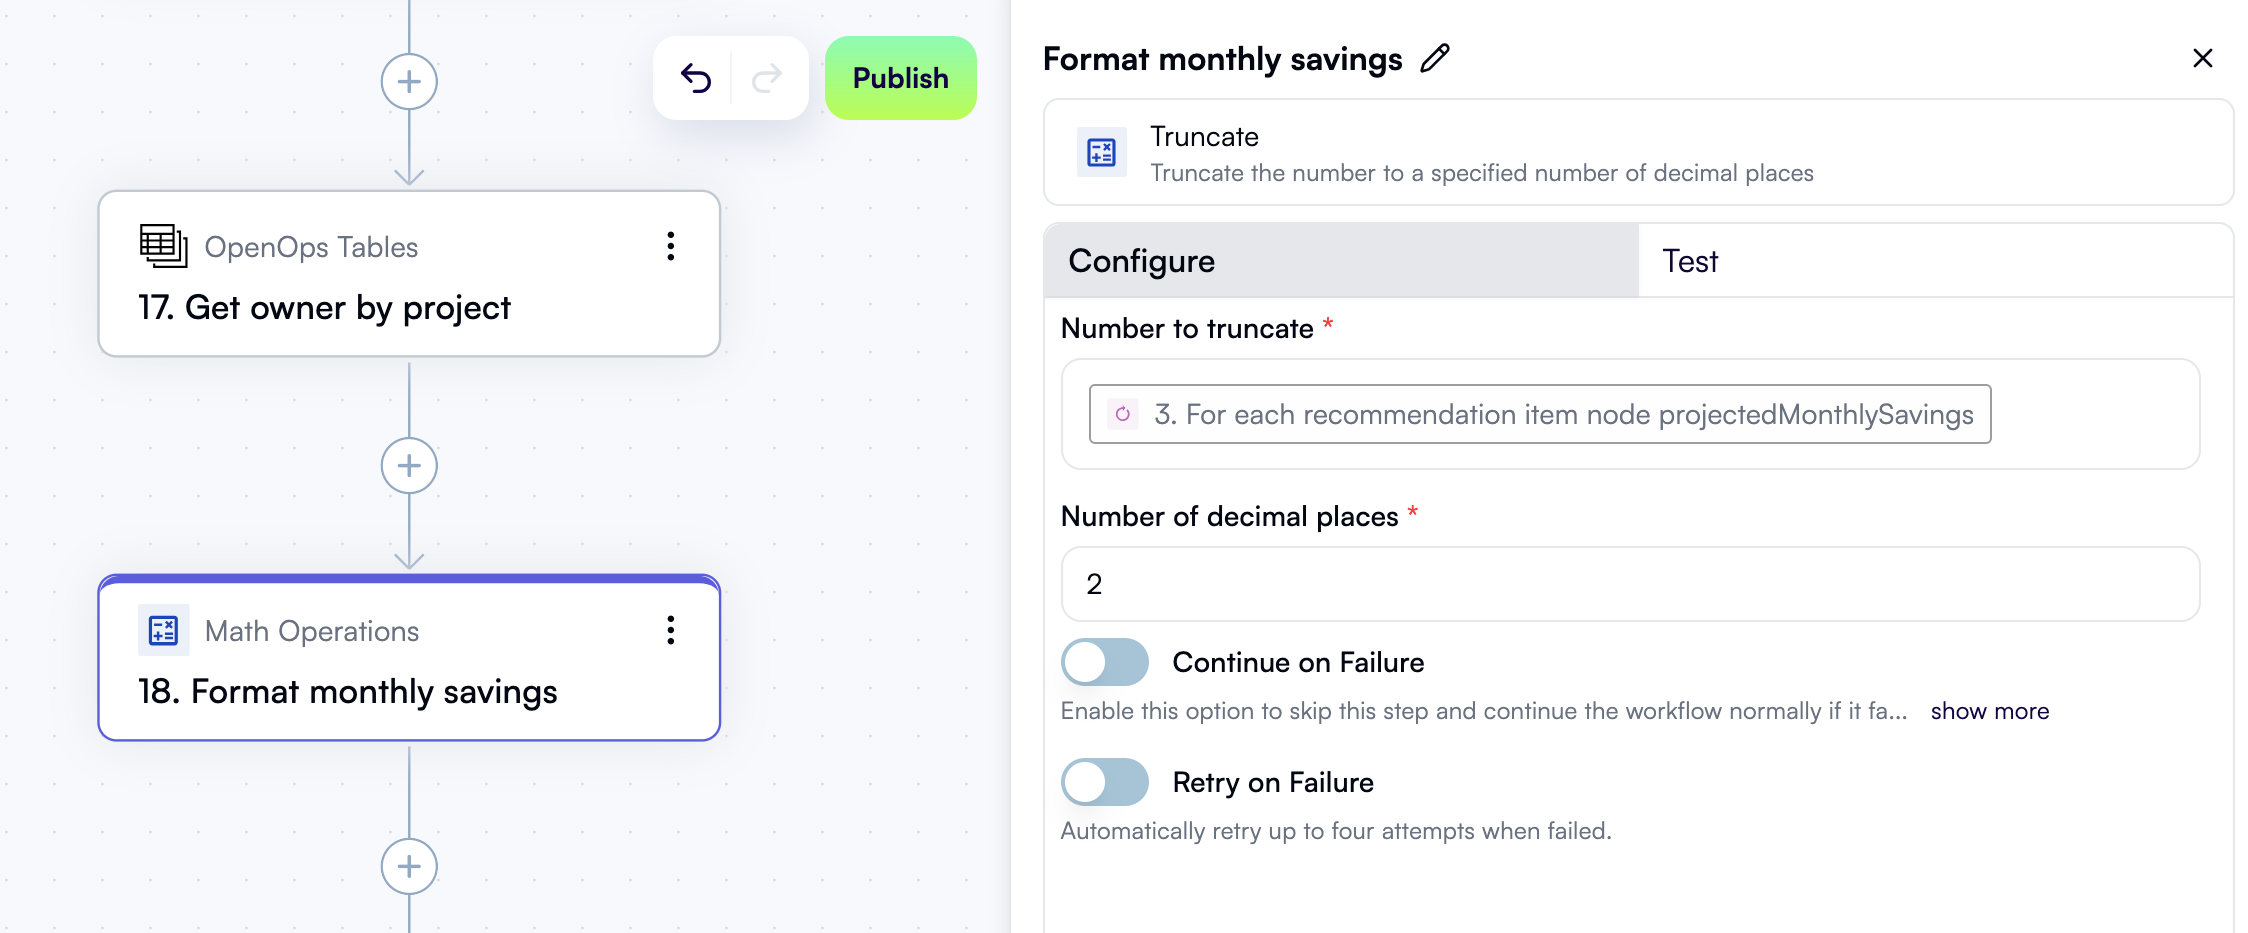
You now know who to notify about the recommendation. What to include in the notification, though? This step and the next one will construct the notification message. First, let’s take the monthly savings that CloudHealth predicts and format the number in a human-readable way. Click + to add a new step. In the pop-up menu, select Math Operations in the left pane, then click Truncate in the right pane. At the top of the new step’s properties pane, click Edit Step Name and rename the step Format monthly savings. In the Number to truncate field, use Data Selector to expand 3. For each recommendation, then item, then node. Scroll down and click Insert alongside the projectedMonthlySavings entry. In Number of decimal places, enter2.
Here’s what the new step in the workflow graph and the Configure tab in its properties pane should now look like:
Describe the recommendation
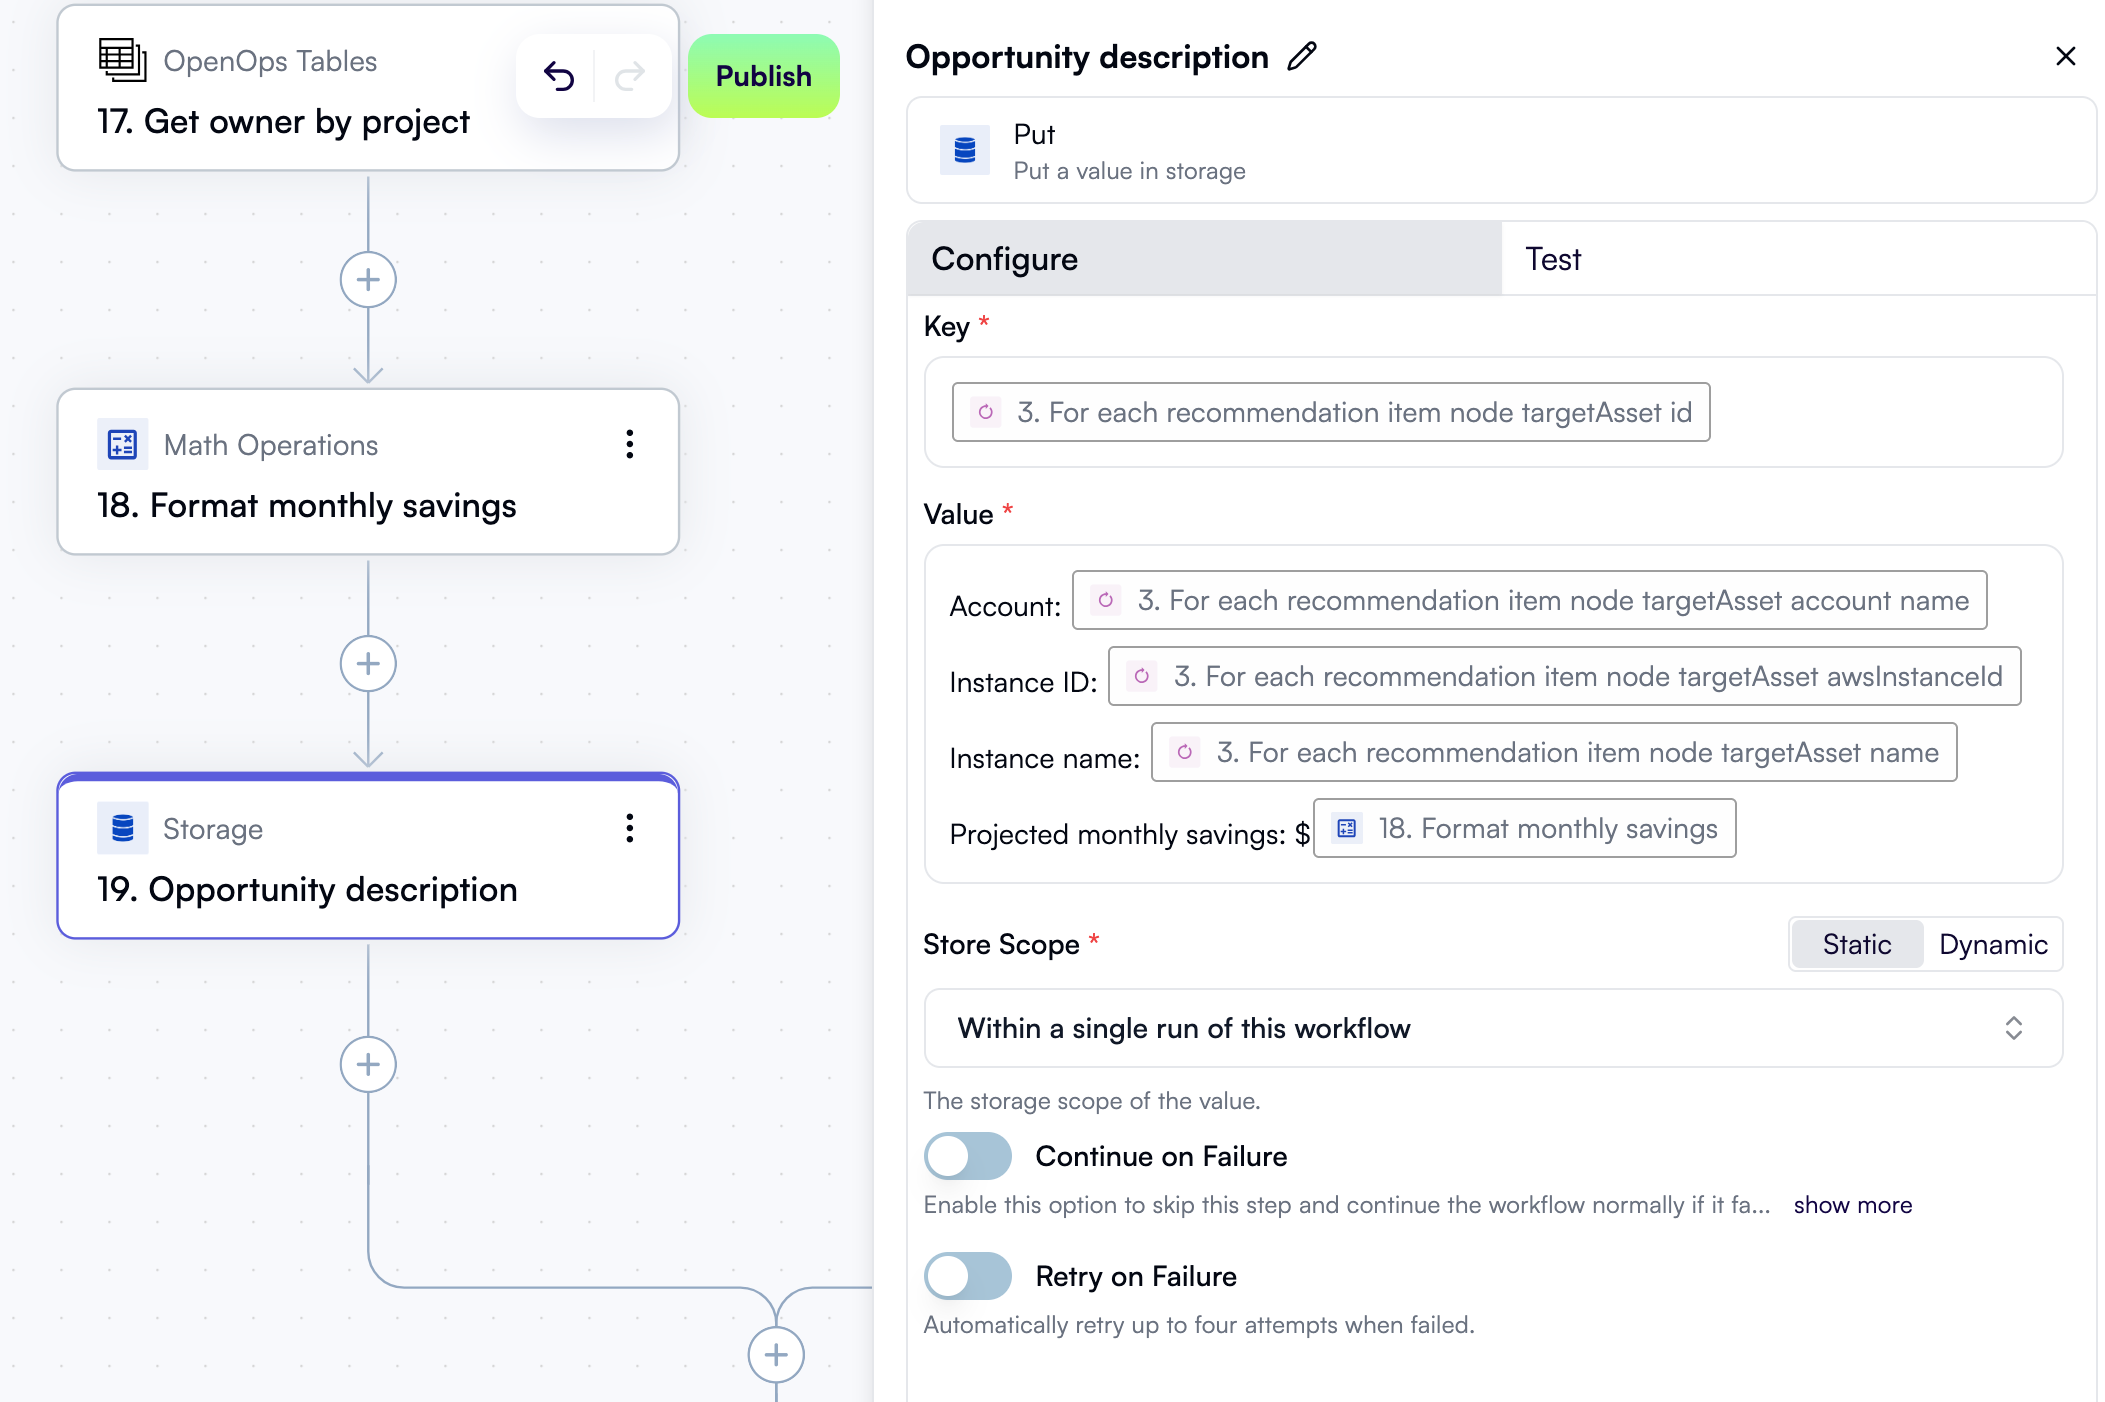
Let’s now use formatted monthly savings and other recommendation details to construct a message that will be sent to the project owner. Later, if the project owner decides to create a Jira issue, this description will also be included in the issue. Click + to add a new step. In the pop-up menu, select Storage in the left pane, then click Put in the right pane. At the top of the new step’s properties pane, click Edit Step Name and rename the step Opportunity description. In the Key field, use Data Selector to expand 3. For each recommendation, then item, then node, then targetAsset. Click Insert alongside the id entry. The Value field represents the opportunity description, and it needs to be multi-line:- In the first line, type in “Account: ”, then use Data Selector to expand 3. For each recommendation, then item, then node, then targetAsset, then account. Click Insert alongside the name entry.
- In the second line, type in “Instance ID: ”, then use Data Selector to expand 3. For each recommendation, then item, then node, then targetAsset. Click Insert alongside the awsInstanceId entry.
- In the third line, type in “Instance name: ”, then use Data Selector to expand 3. For each recommendation, then item, then node, then targetAsset. Click Insert alongside the name entry.
- In the fourth line, type in “Projected monthly savings: $”, then in the Data Selector, insert 18. Format monthly savings.
Get table record ID from storage
You’ll soon implement sending a Slack notification and handling the project owner’s response. For this, you’ll need the ID of the record in the Opportunities table that represents the current recommendation. Let’s fetch this ID from storage. Click + to add a new step. In the pop-up menu, select Storage in the left pane, then click Get in the right pane. At the top of the new step’s properties pane, click Edit Step Name and rename the step Get table record ID from storage. In the Key field, use Data Selector to insert 4. Opportunity ID. Click the Test tab in the properties pane, then under Step output, click Test Step.Send a Slack notification with action buttons
You now have everything you need to notify the project owner about the current recommendation and suggest actions. Click + to add a new step. In the pop-up menu, select Slack in the left pane, then click Request Action in the right pane. In the Connection dropdown, select the Slack connection you created earlier. Alongside the Recipient Channel or User field, click Dynamic to enable specifying the output of a previous step instead of selecting from a dropdown. Then, in Recipient Channel or User, use Data Selector to expand 17. Get owner by project, then items, then items[1]. Click Insert alongside the Owner email entry. In the Header field, enter “New CloudHealth savings opportunity”. The value in the Message field is going to be multi-line:- In the first line, paste the following text:
- In the second line, use Data Selector to insert 19. Opportunity description.
- In the third line, paste the following text:
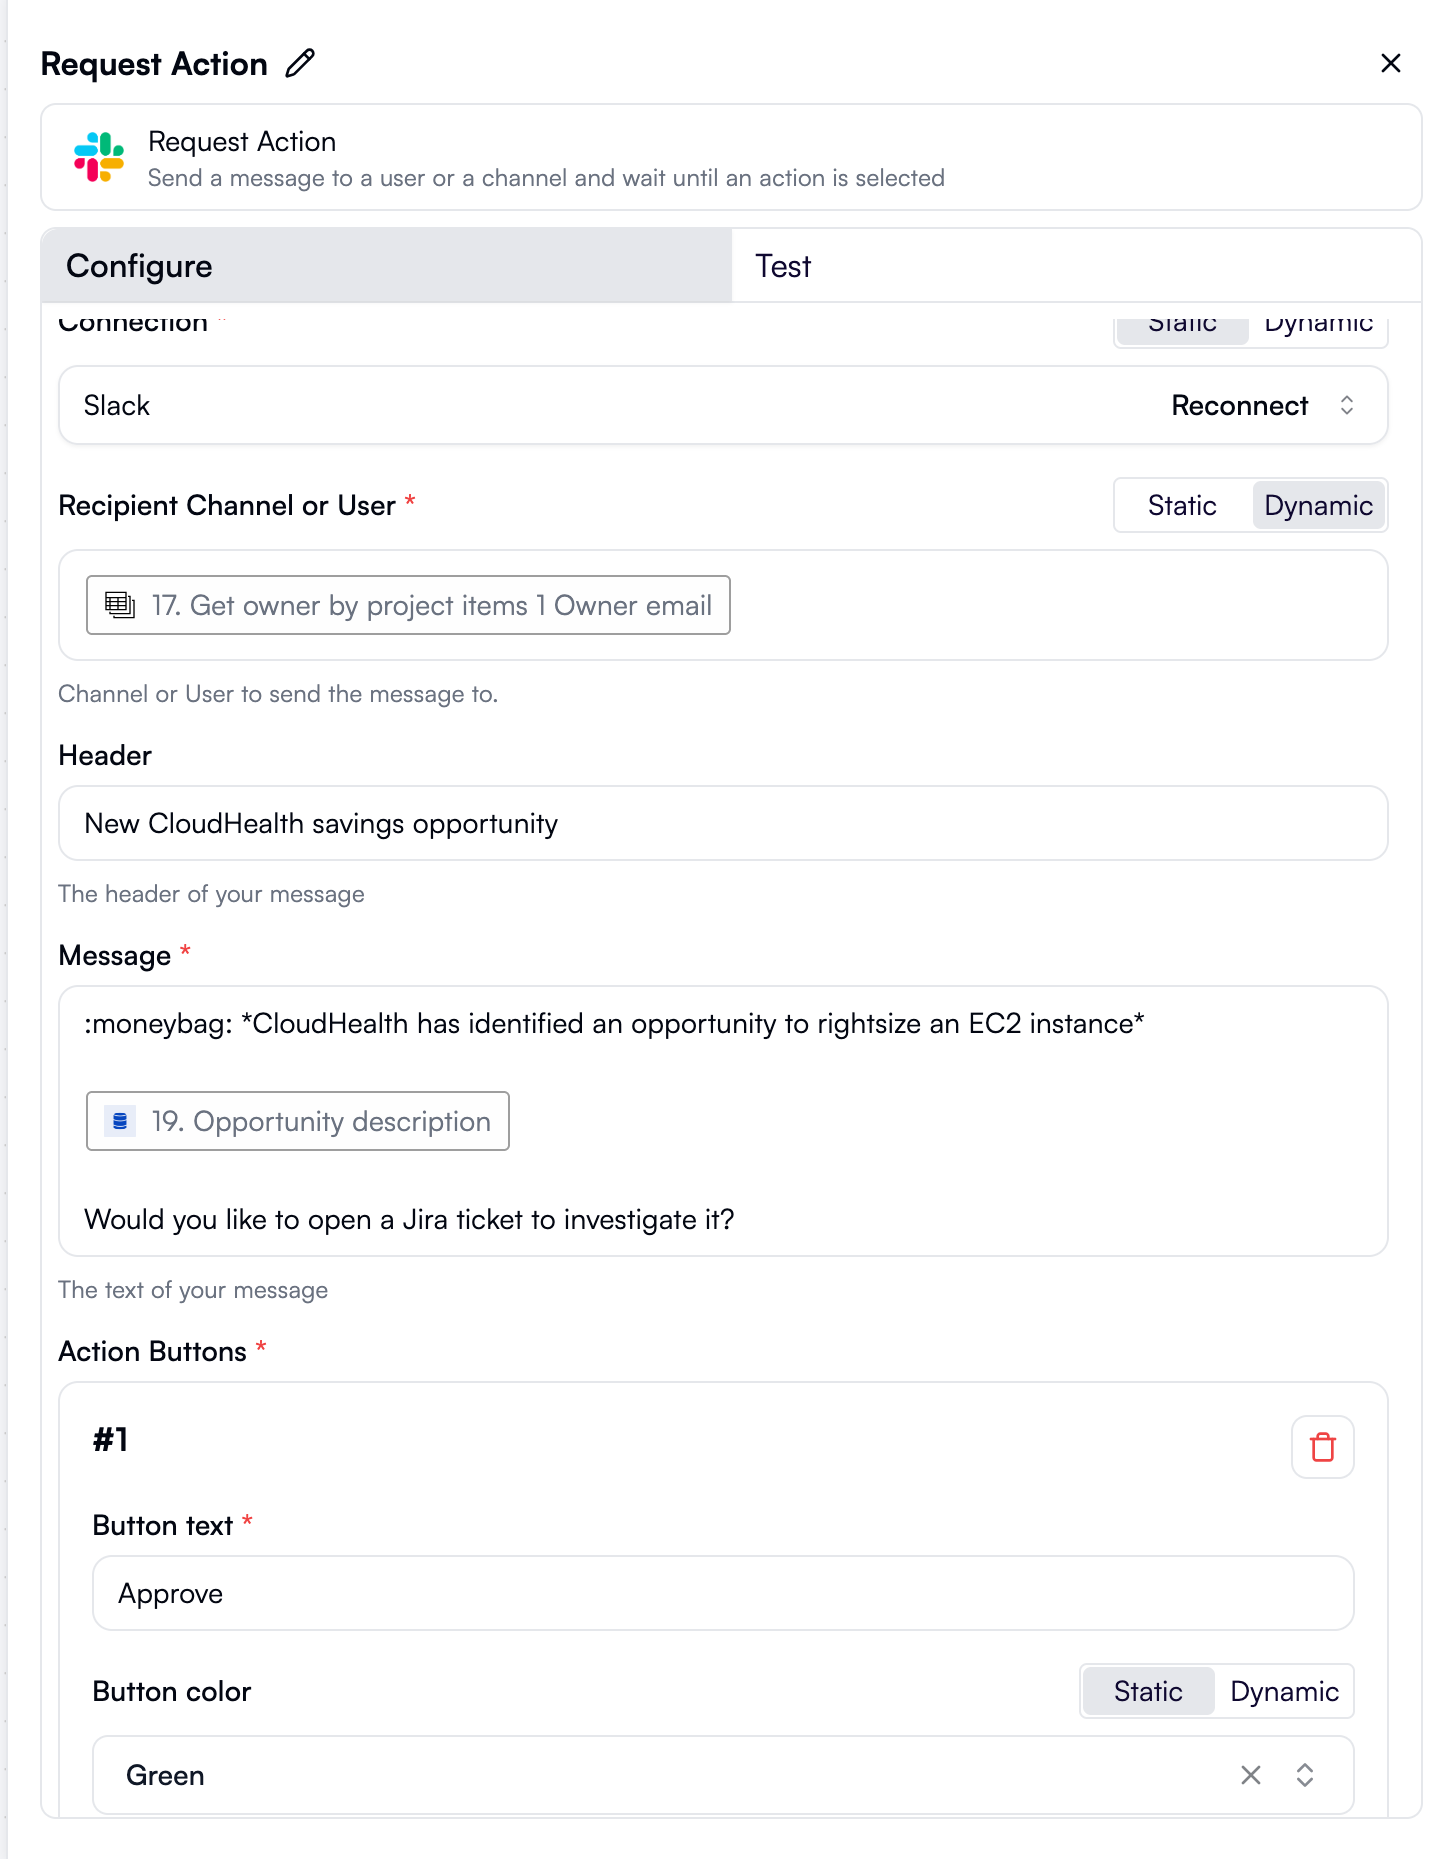
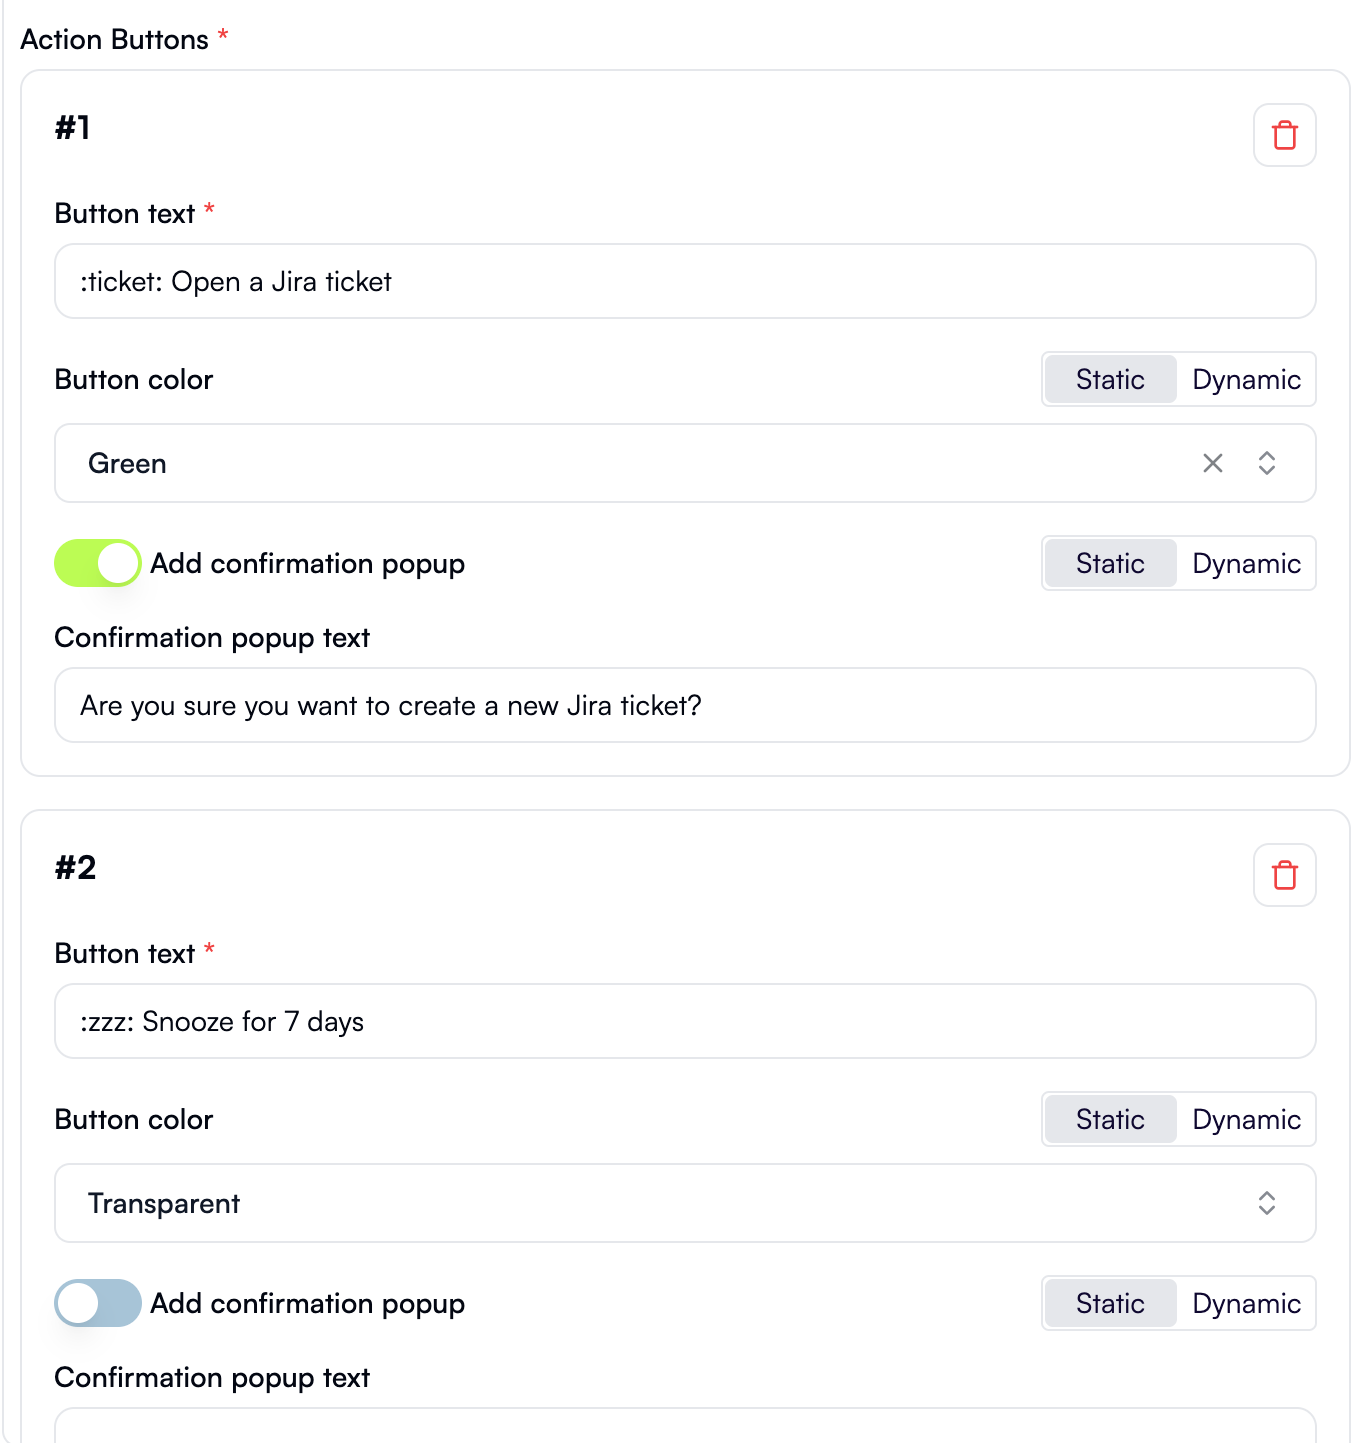
- In the Button text field, paste the following:
- For Button color, keep Green selected.
- Enable Add confirmation popup.
- In Confirmation popup text, paste the following instead of the placeholder:
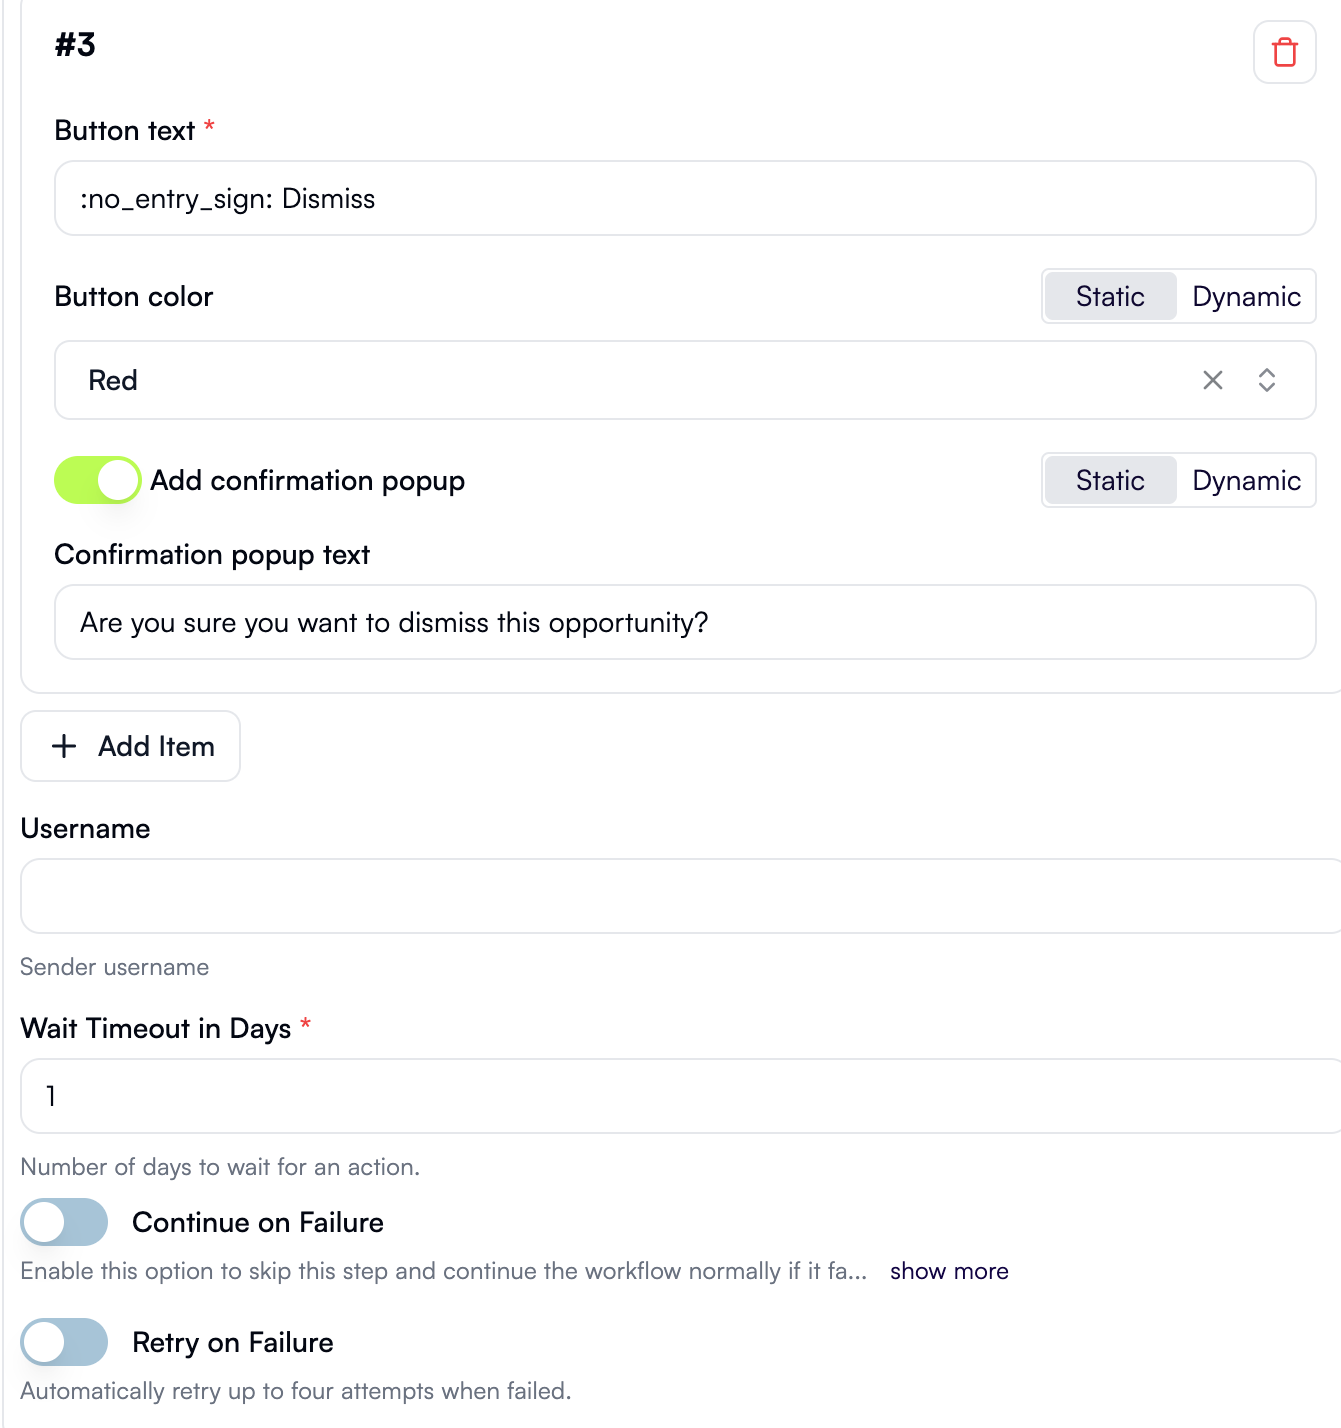
- In the Button text field, paste the following:
- For Button color, select Transparent.
- In the Button text field, paste the following:
- For Button color, select Red.
- Enable Add confirmation popup.
- In Confirmation popup text, paste the following instead of the placeholder:
1.
Here’s what the rest of the Configure tab in this step’s properties pane should now look like:
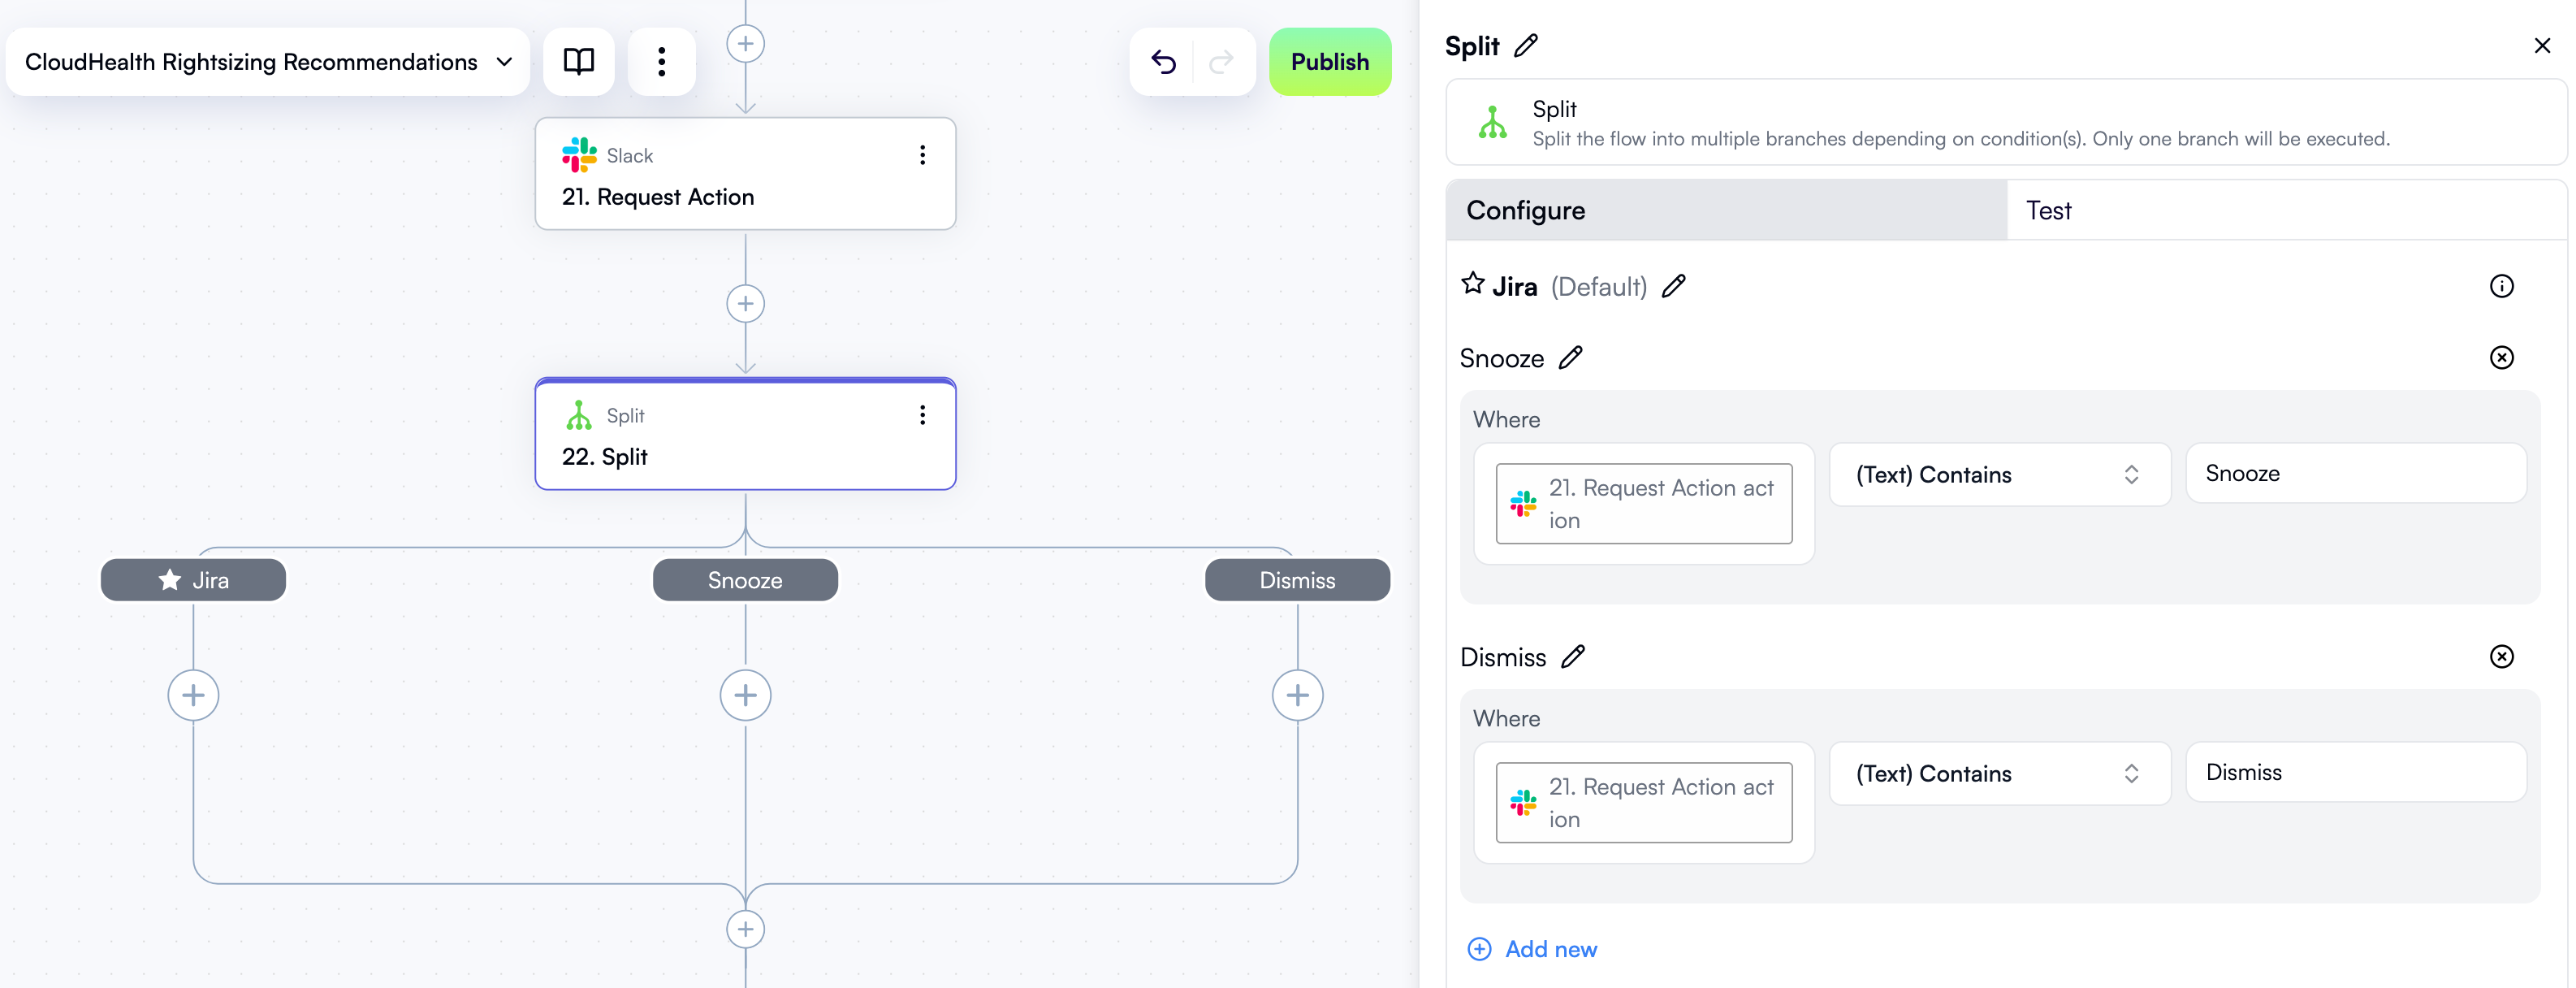
Handle project owner’s response with a split
Click + to add a new step. In the pop-up menu, select Split in the left pane, then click Split in the right pane. Rename the default branch (Branch 1) to Jira. Rename the second branch (Branch 2) to Snooze. In the Where section of this branch:- In the left field, use Data Selector to expand 21. Request Action, then click Insert alongside the action entry.
- In the dropdown, select (Text) Contains.
- In the right field, enter
Snooze.
- In the left field, use Data Selector to expand 21. Request Action, then click Insert alongside the action entry.
- In the dropdown, select (Text) Contains.
- In the right field, enter
Dismiss.
Create a Jira issue
Let’s now add the steps that the workflow should take if the project owner clicks the Open a Jira ticket button. There will be three of them:- Actually creating a Jira issue.
- Updating the recommendation in the Opportunities table by setting it to Approved status.
- Sending a confirmation on Slack.
Create a new issue in Jira Cloud
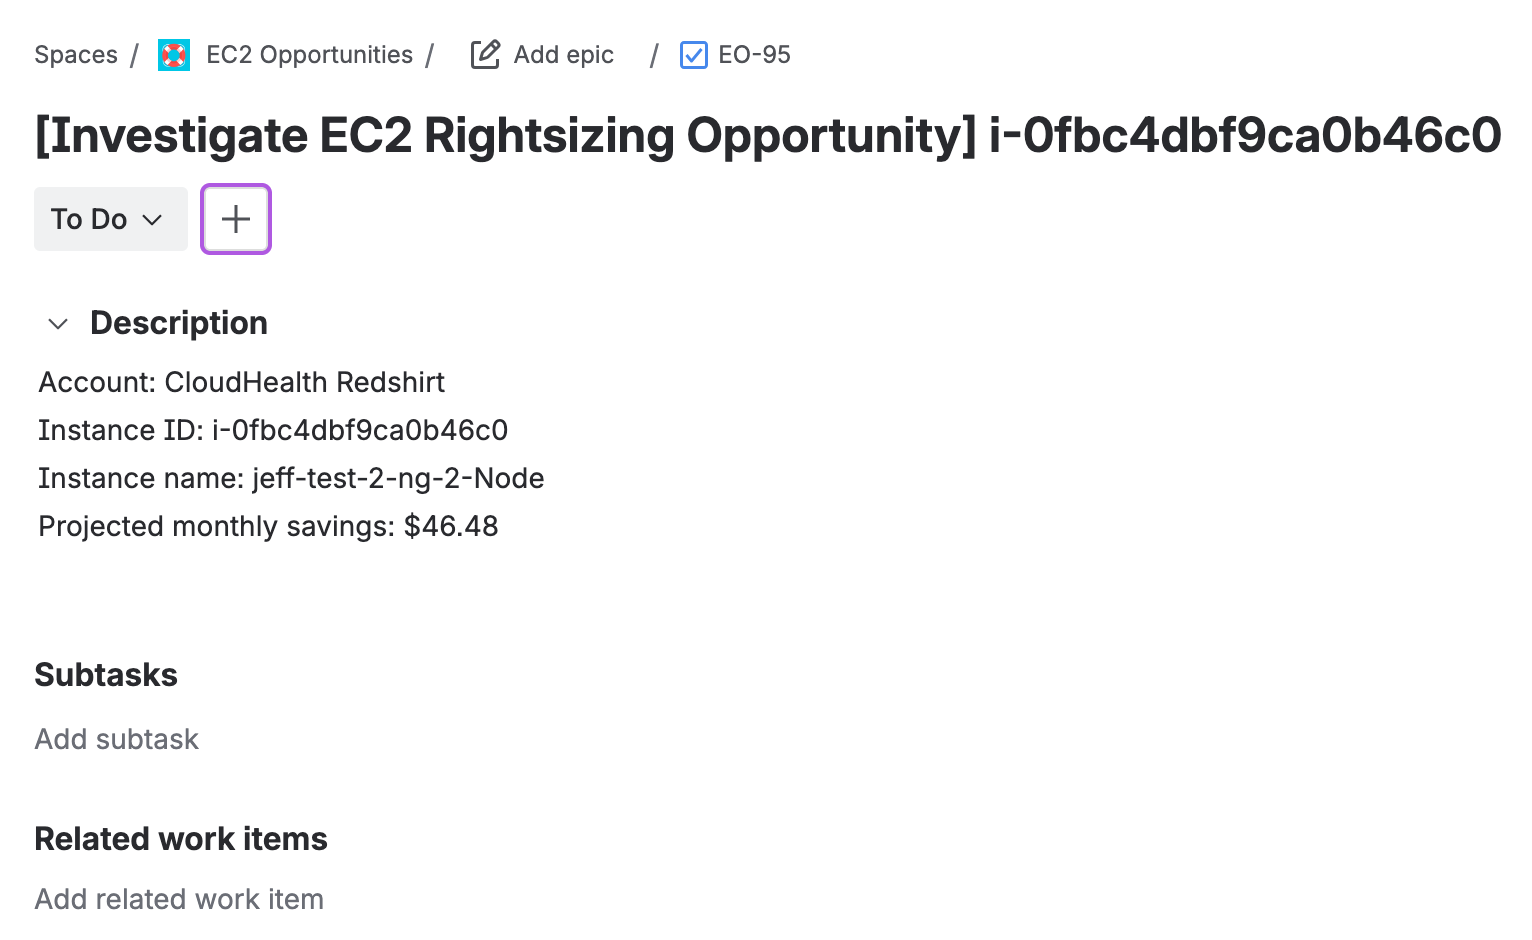
In the Jira branch, click + to add a new step. In the pop-up menu, select Jira Cloud in the left pane, then click Create Issue in the right pane. At the top of the new step’s properties pane, click Edit Step Name and rename the step Create Jira issue to investigate opportunity. In the Connection dropdown, select the Jira connection you created earlier. In the Project dropdown, select a project in your Jira Cloud instance that you want to create issues in. In the Issue Type dropdown, select Task. In the Summary field, type in “[Investigate EC2 Rightsizing Opportunity]”. Add a space, and use Data Selector to expand 3. For each recommendation, then item, then node, then targetAsset. Click Insert alongside the awsInstanceId entry: In the Description field, use Data Selector to insert 19. Opportunity description. Here’s what the new step in the workflow graph and the Configure tab in its properties pane should now look like: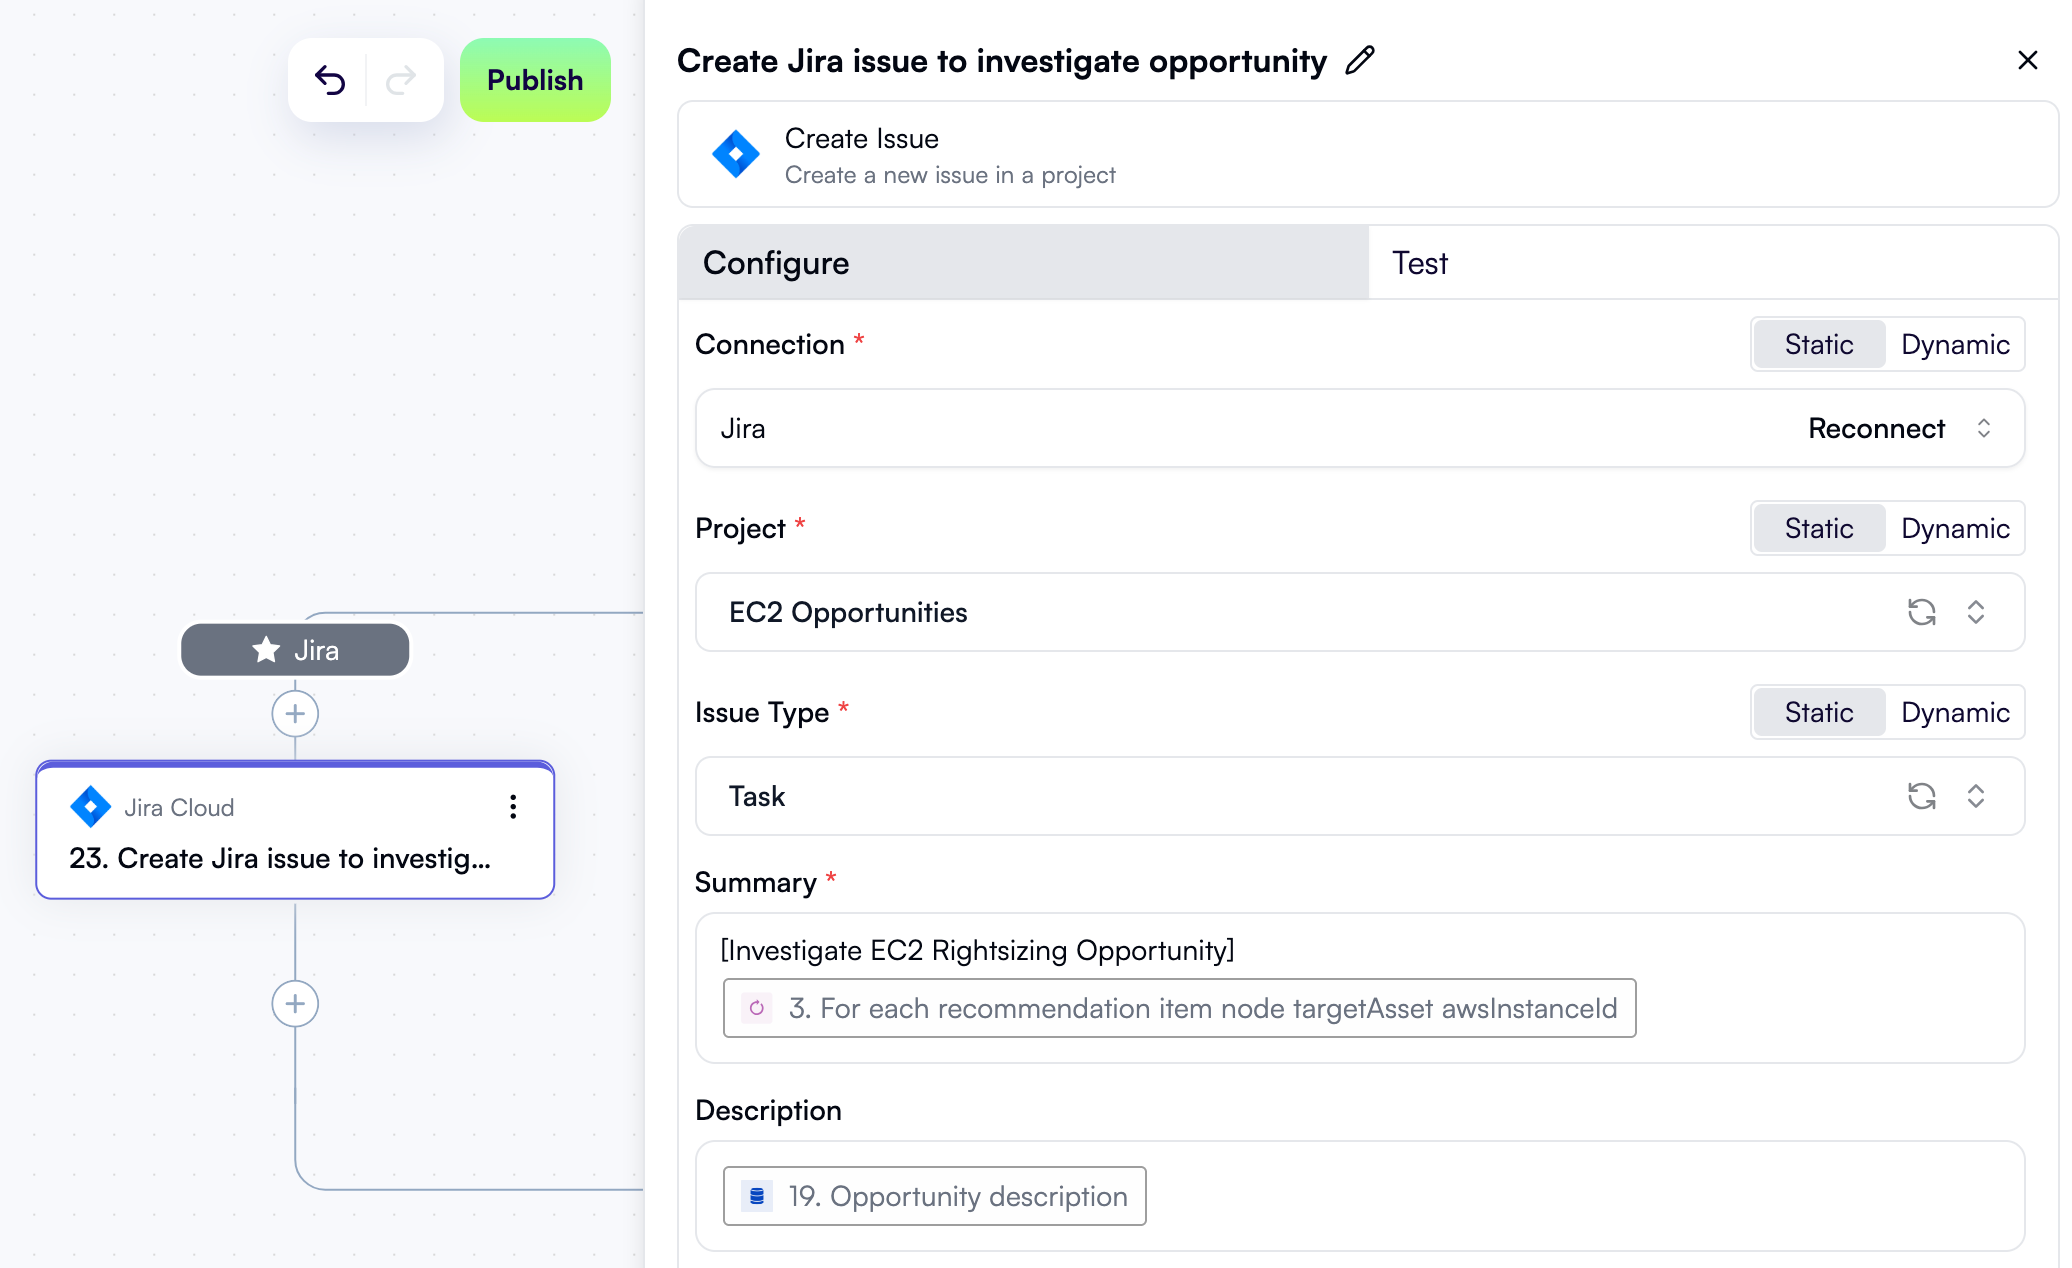
htmlUrl to see the issue in your Jira Cloud instance:
Update recommendation status
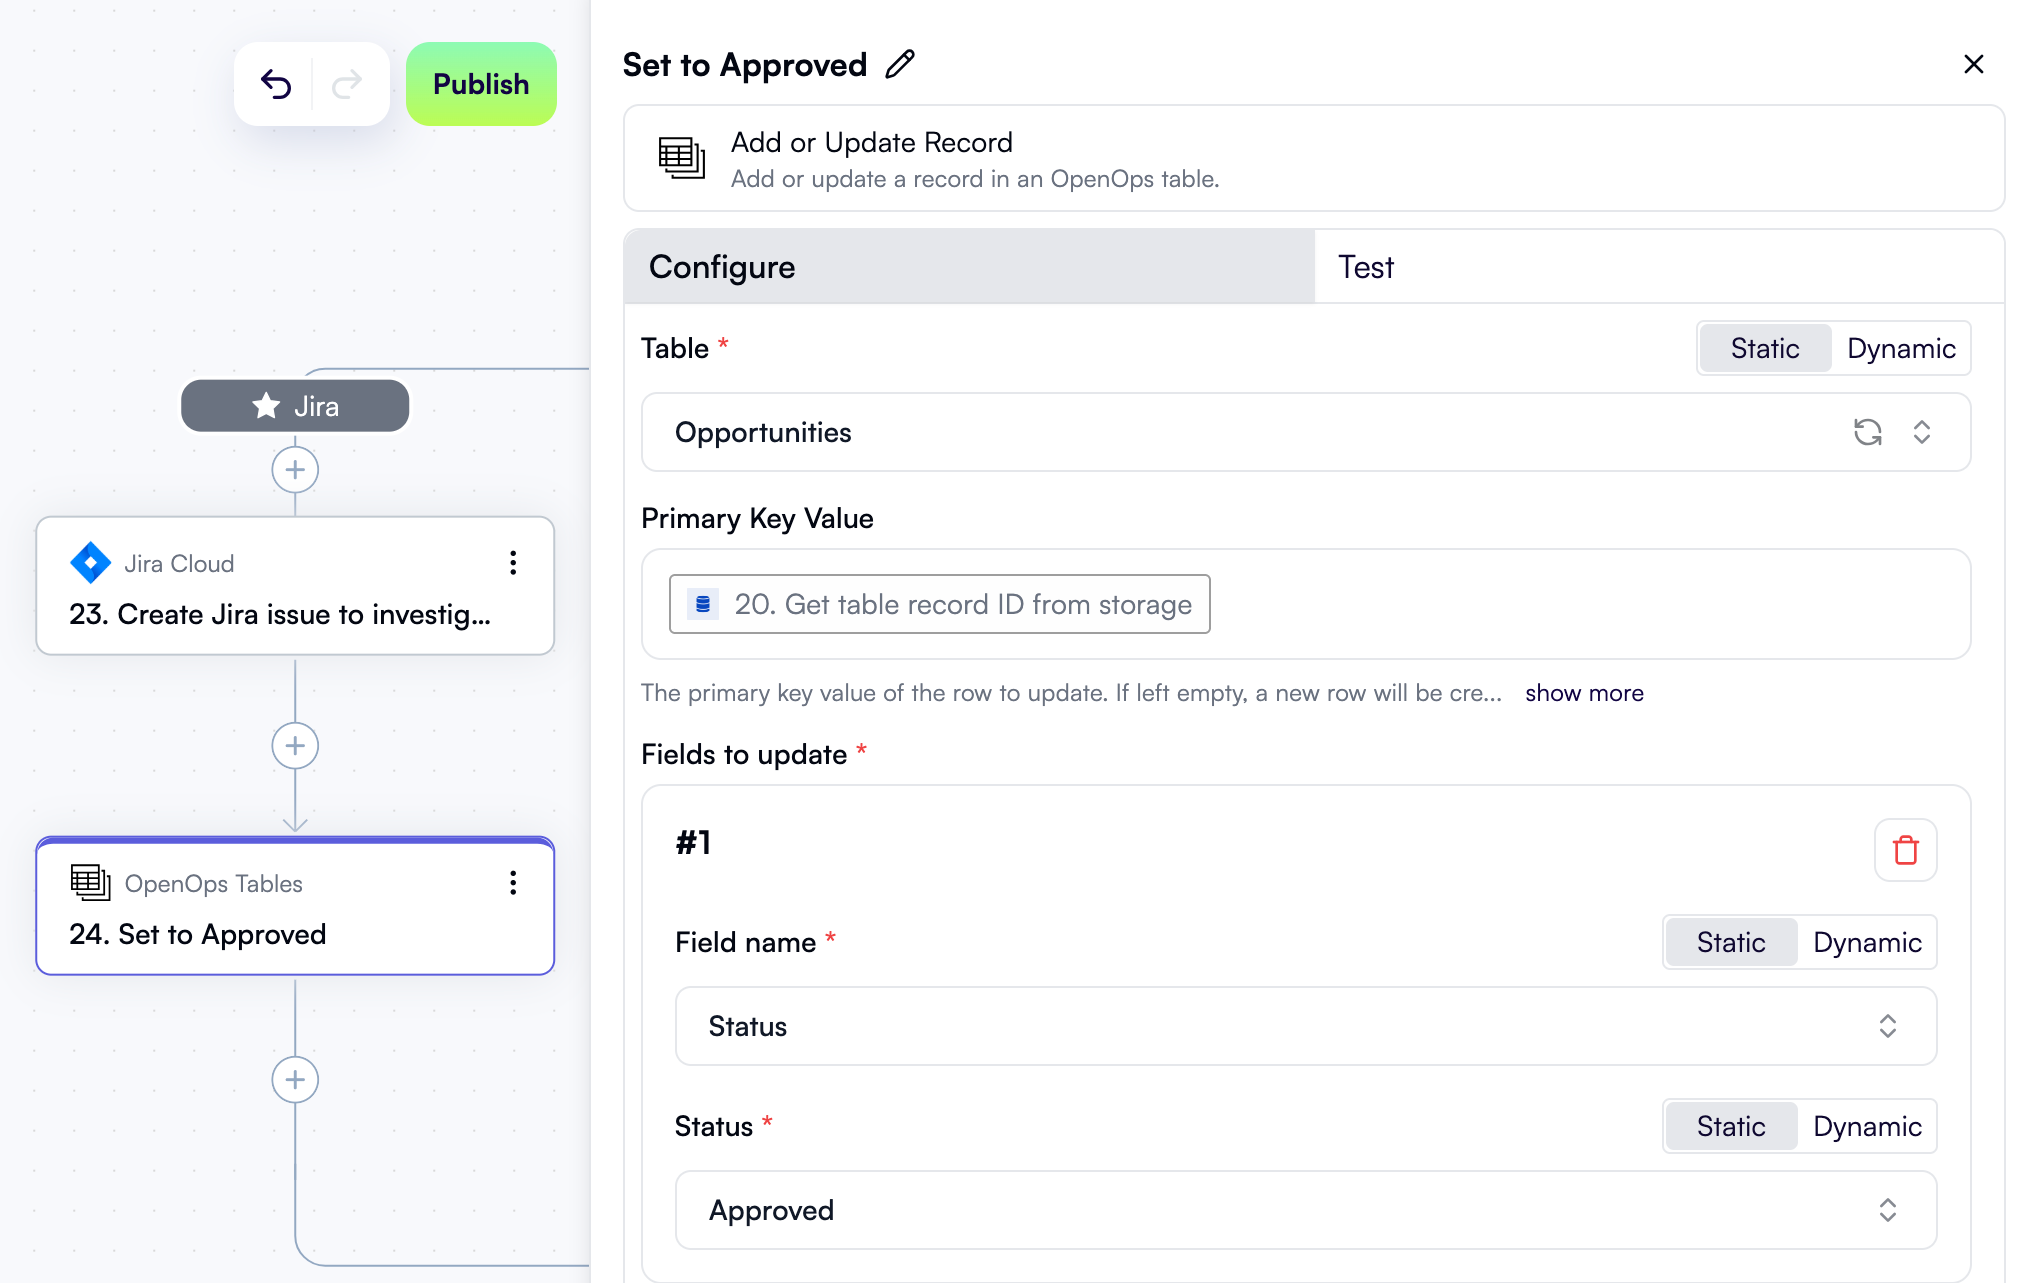
Since the project owner has selected to raise a Jira issue for the CloudHealth recommendation, it means further work on addressing the recommendation will be performed in Jira, and there’s no need for your workflow to notify the project owner about it in subsequent runs. To make this happen, you’ll need to update the status of the current recommendation in the Opportunities table. In the Jira branch, click + to add a new step. In the pop-up menu, select OpenOps Tables in the left pane, then click Add or Update Record in the right pane. At the top of the new step’s properties pane, click Edit Step Name and rename the step Set to Approved. In the Table field, select Opportunities. In the Primary Key Value field, use Data Selector to select 20. Get table record ID from storage. In the Fields to update section, click Add Item. In the new area:- For Field name, select Status.
- For Status, select Approved.
Send a Slack confirmation
Lastly, after creating a Jira issue, it makes sense to notify the project owner about it and provide a link to the issue. In the Jira branch, click + to add a new step. In the pop-up menu, select Slack in the left pane, then click Send Message in the right pane. At the top of the new step’s properties pane, click Edit Step Name and rename the step Send confirmation on Slack. In the Connection dropdown, select the Slack connection that you created earlier. Alongside the Recipient Channel or User field, click Dynamic. Then use Data Selector to expand 17. Get owner by project, then items, then items[1]. Click Insert alongside the Owner email entry. Scroll down to the Message field. There, type in ”✅ Issue created successfully: ”, then use Data Selector to expand 23. Create Jira issue to investigate opportunity, and click Insert alongside the htmlUrl entry. Here’s what the Configure tab in this step’s properties pane should look like so far: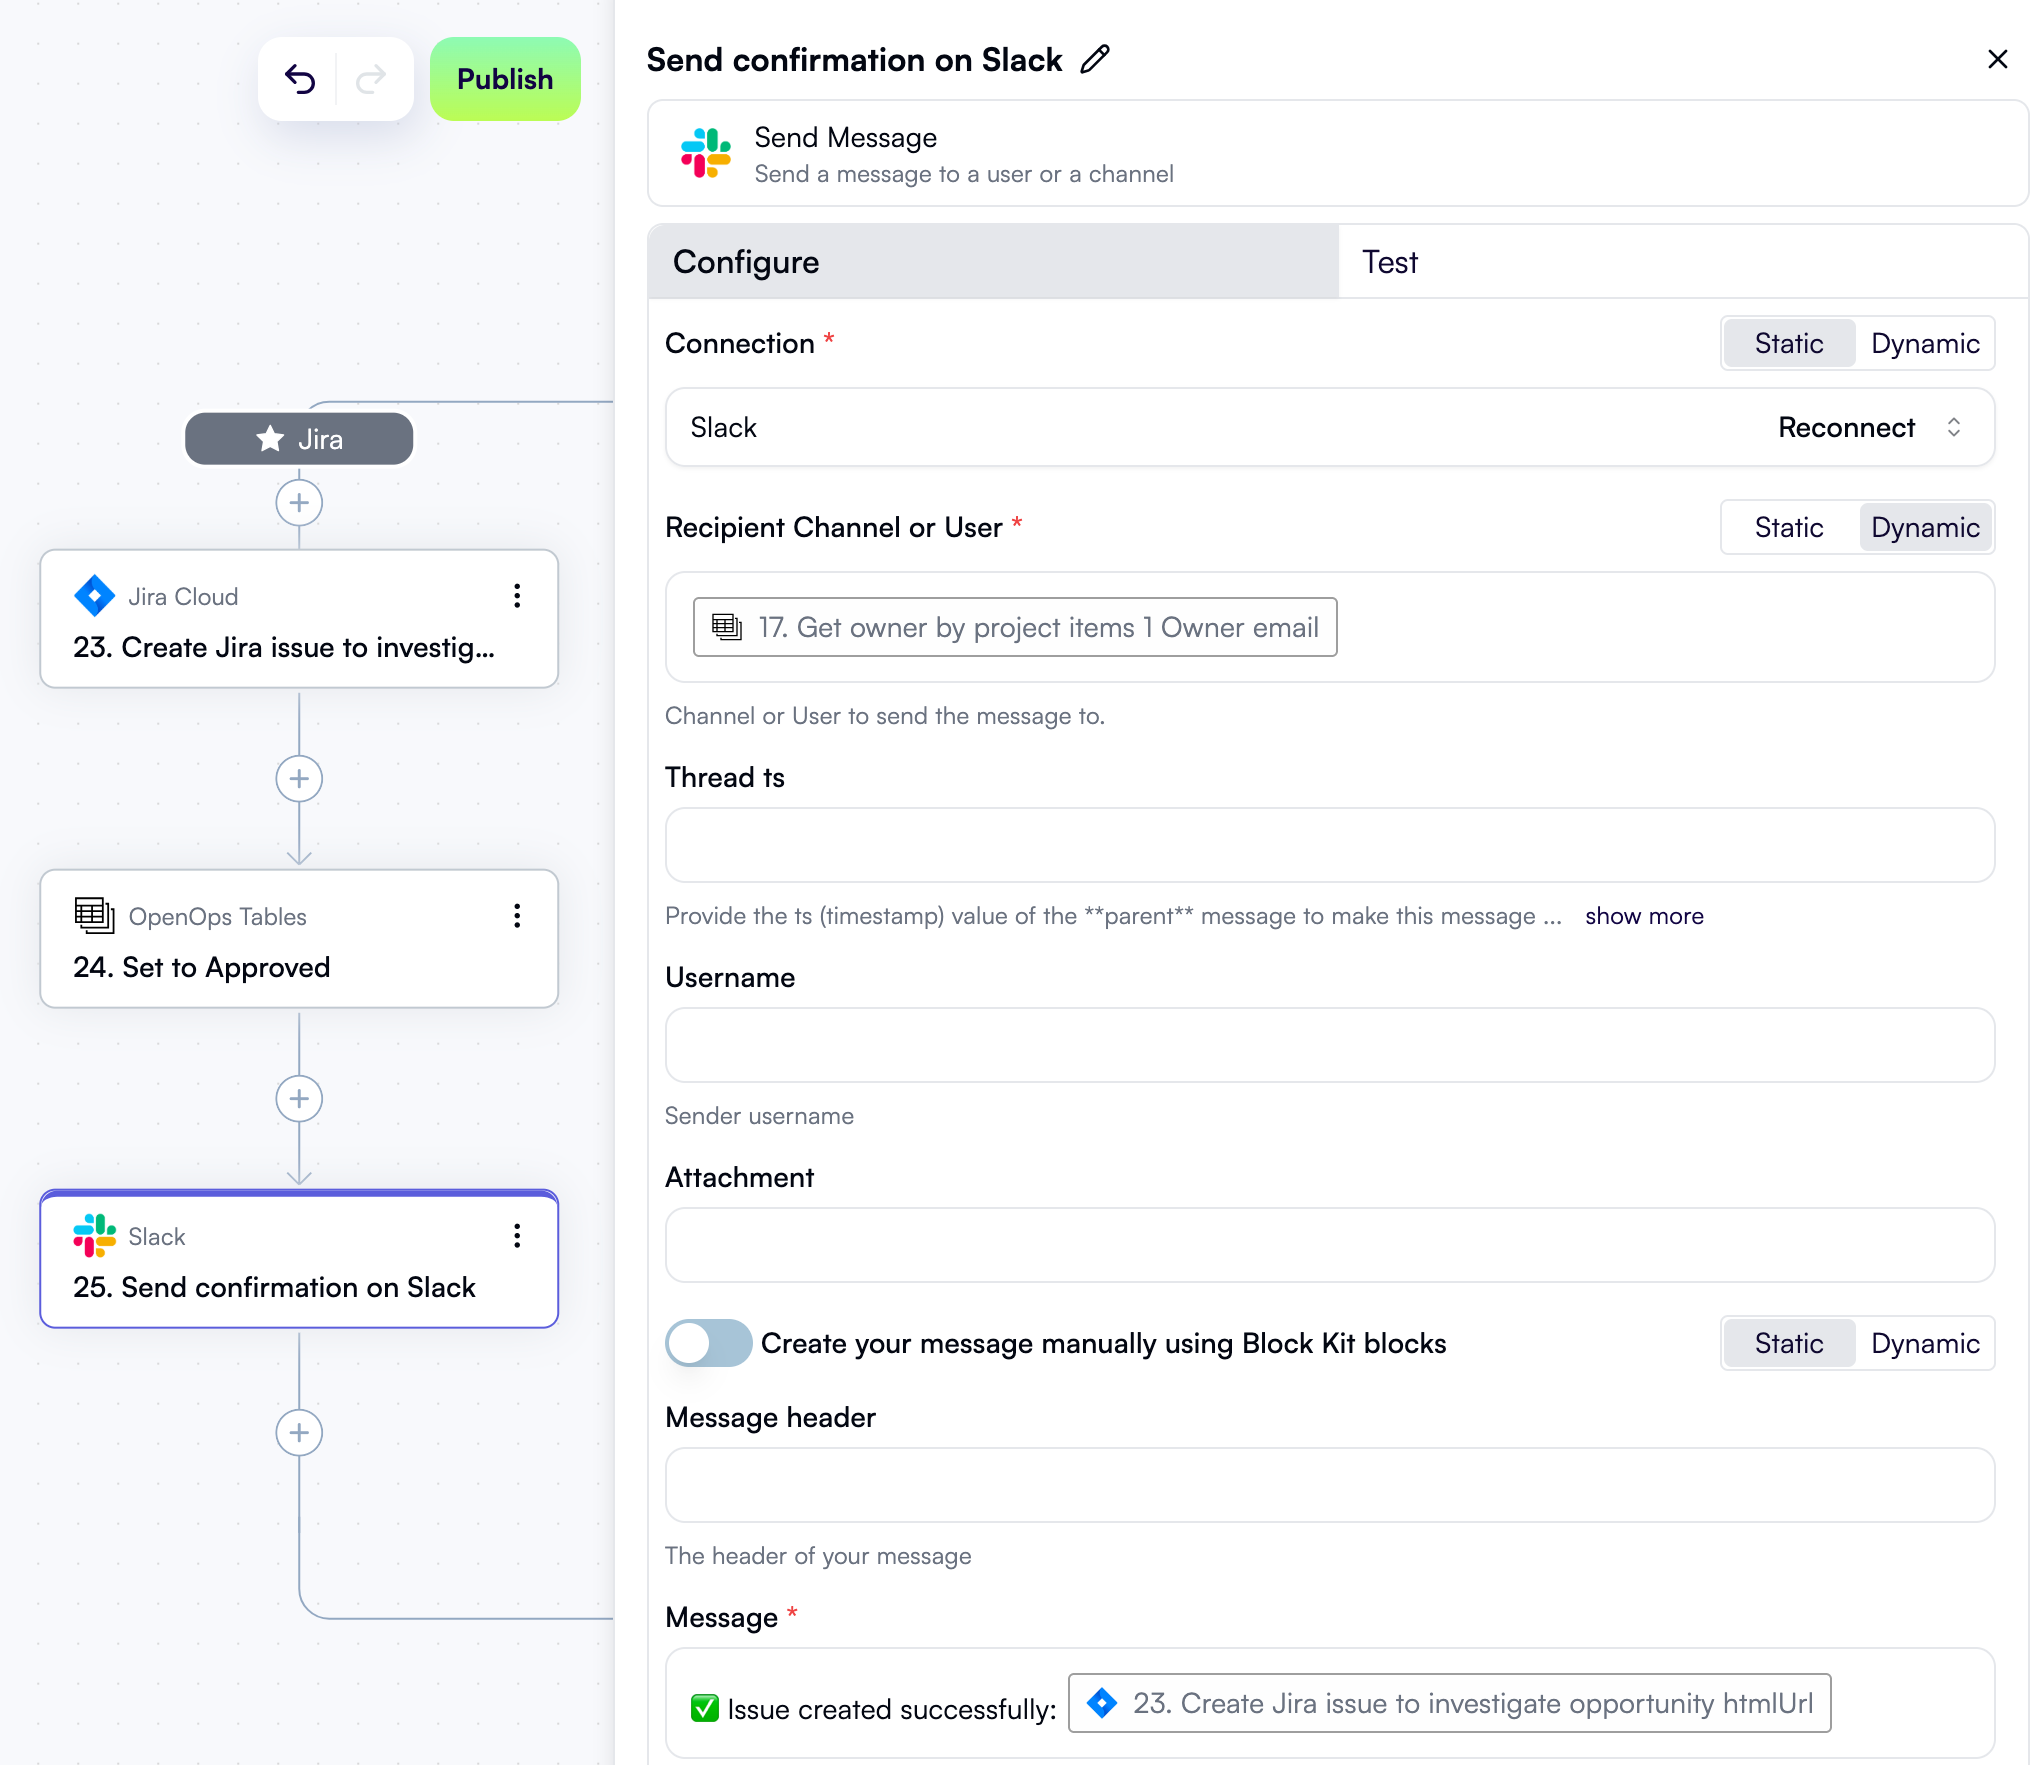

Snooze the recommendation
Let’s now handle the project owner’s choice to snooze the recommendation for 7 days. To do this, you need two steps:- One that determines the date until which the recommendation should be snoozed.
- One that updates the status of the recommendation in the Opportunities table.
Determine the snooze date
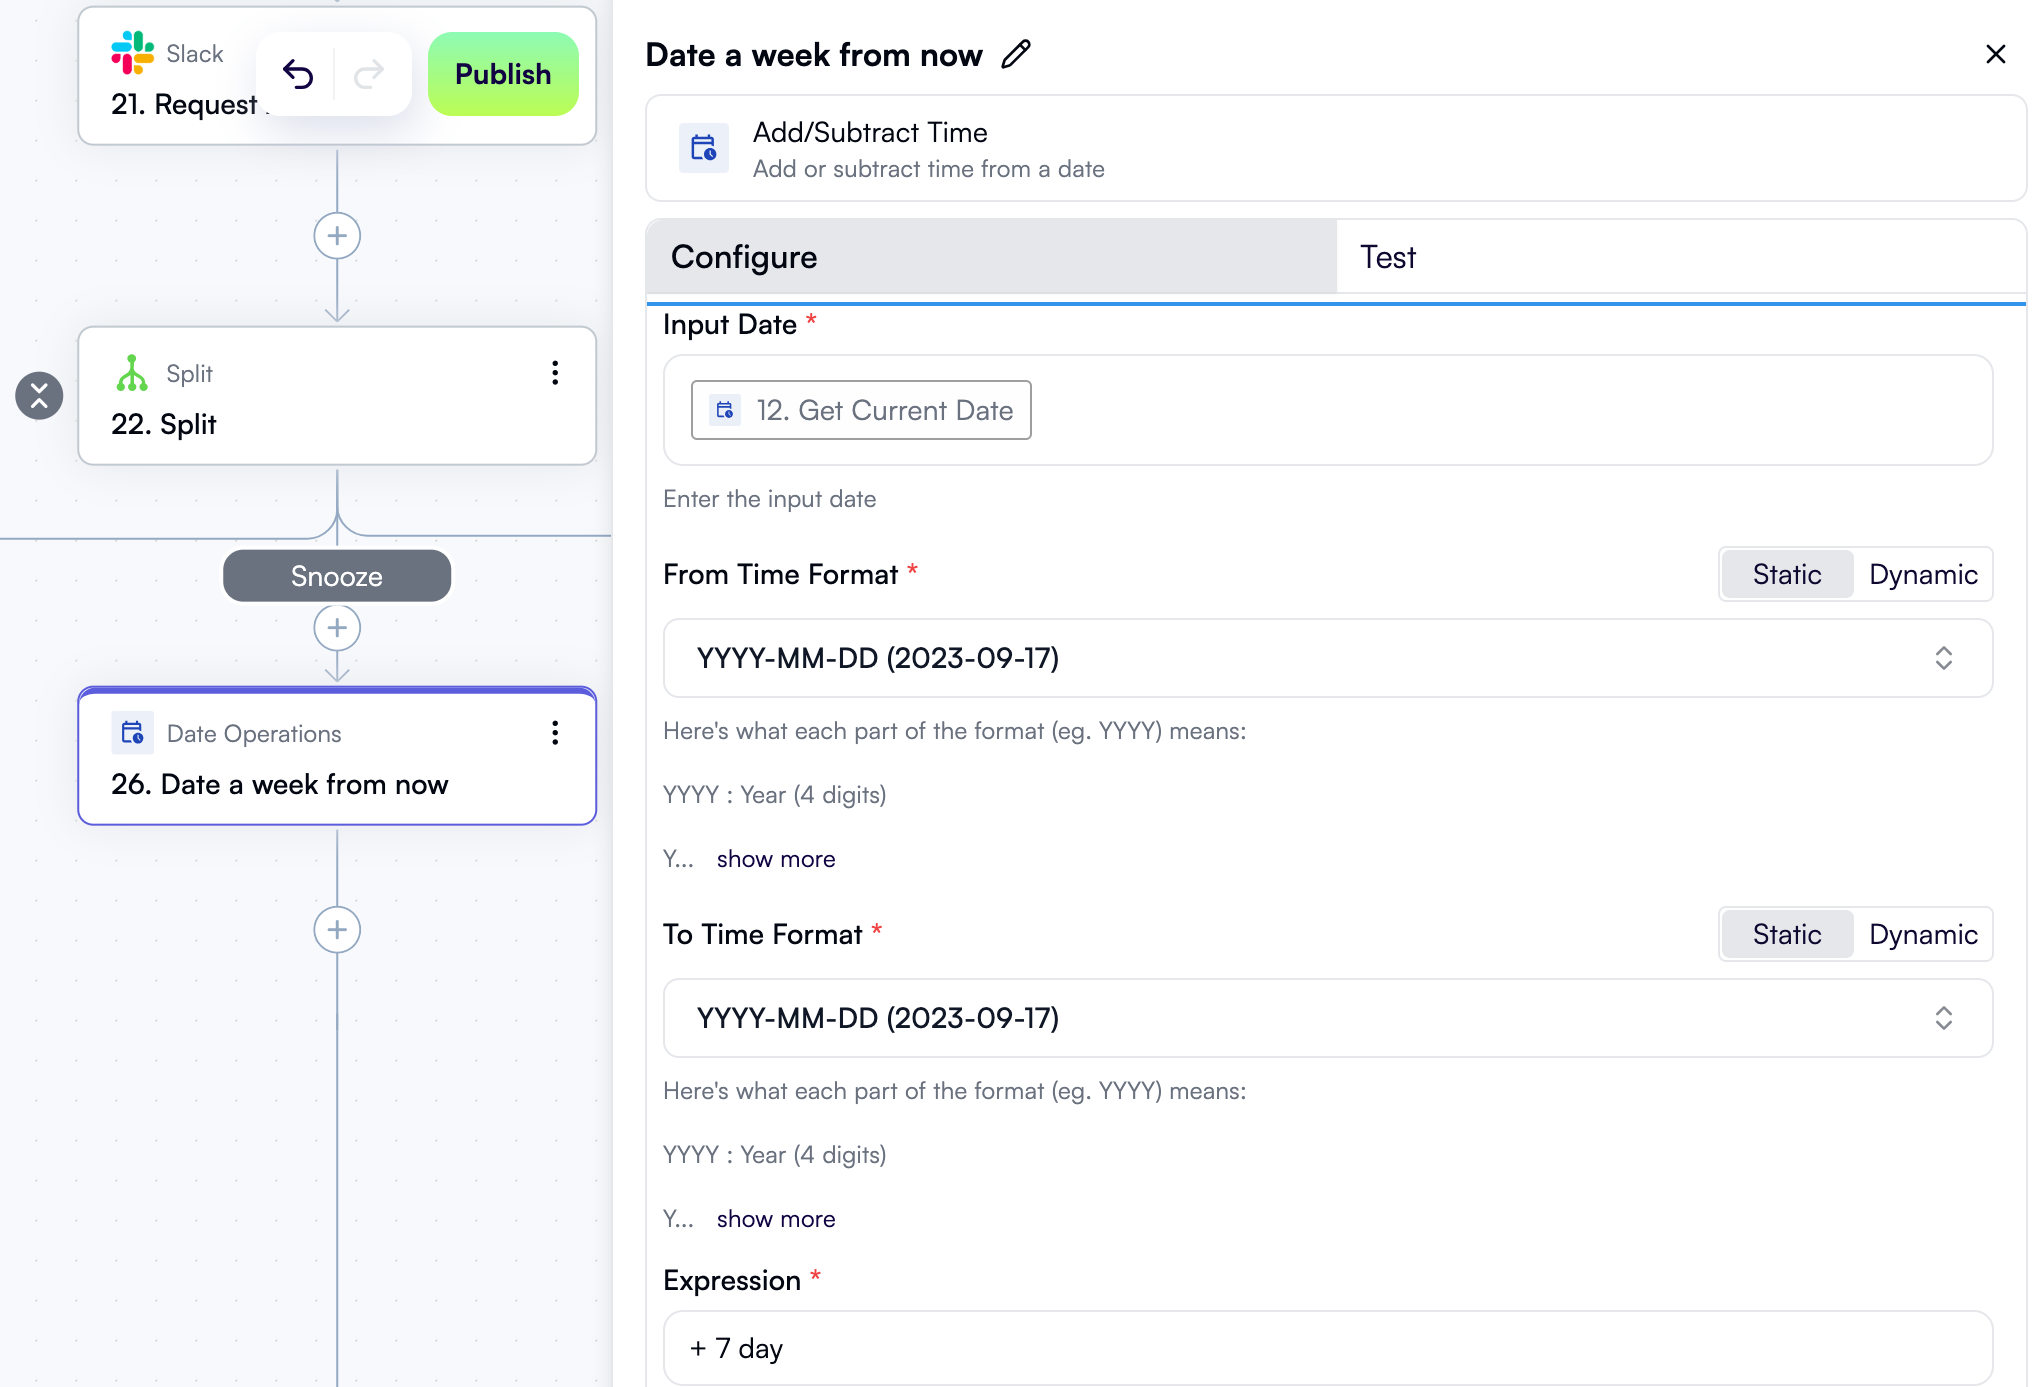
In the Snooze branch, click + to add a new step. In the pop-up menu, select Date Operations in the left pane, then click Add/Subtract Time in the right pane. At the top of the new step’s properties pane, click Edit Step Name and rename the step Date a week from now. In the Input Date field, use Data Selector to select 12. Get Current Date. In the Expression field, type in+ 7 day.
Here’s what the new step in the workflow graph and the Configure tab in its properties pane should now look like:
Update recommendation status
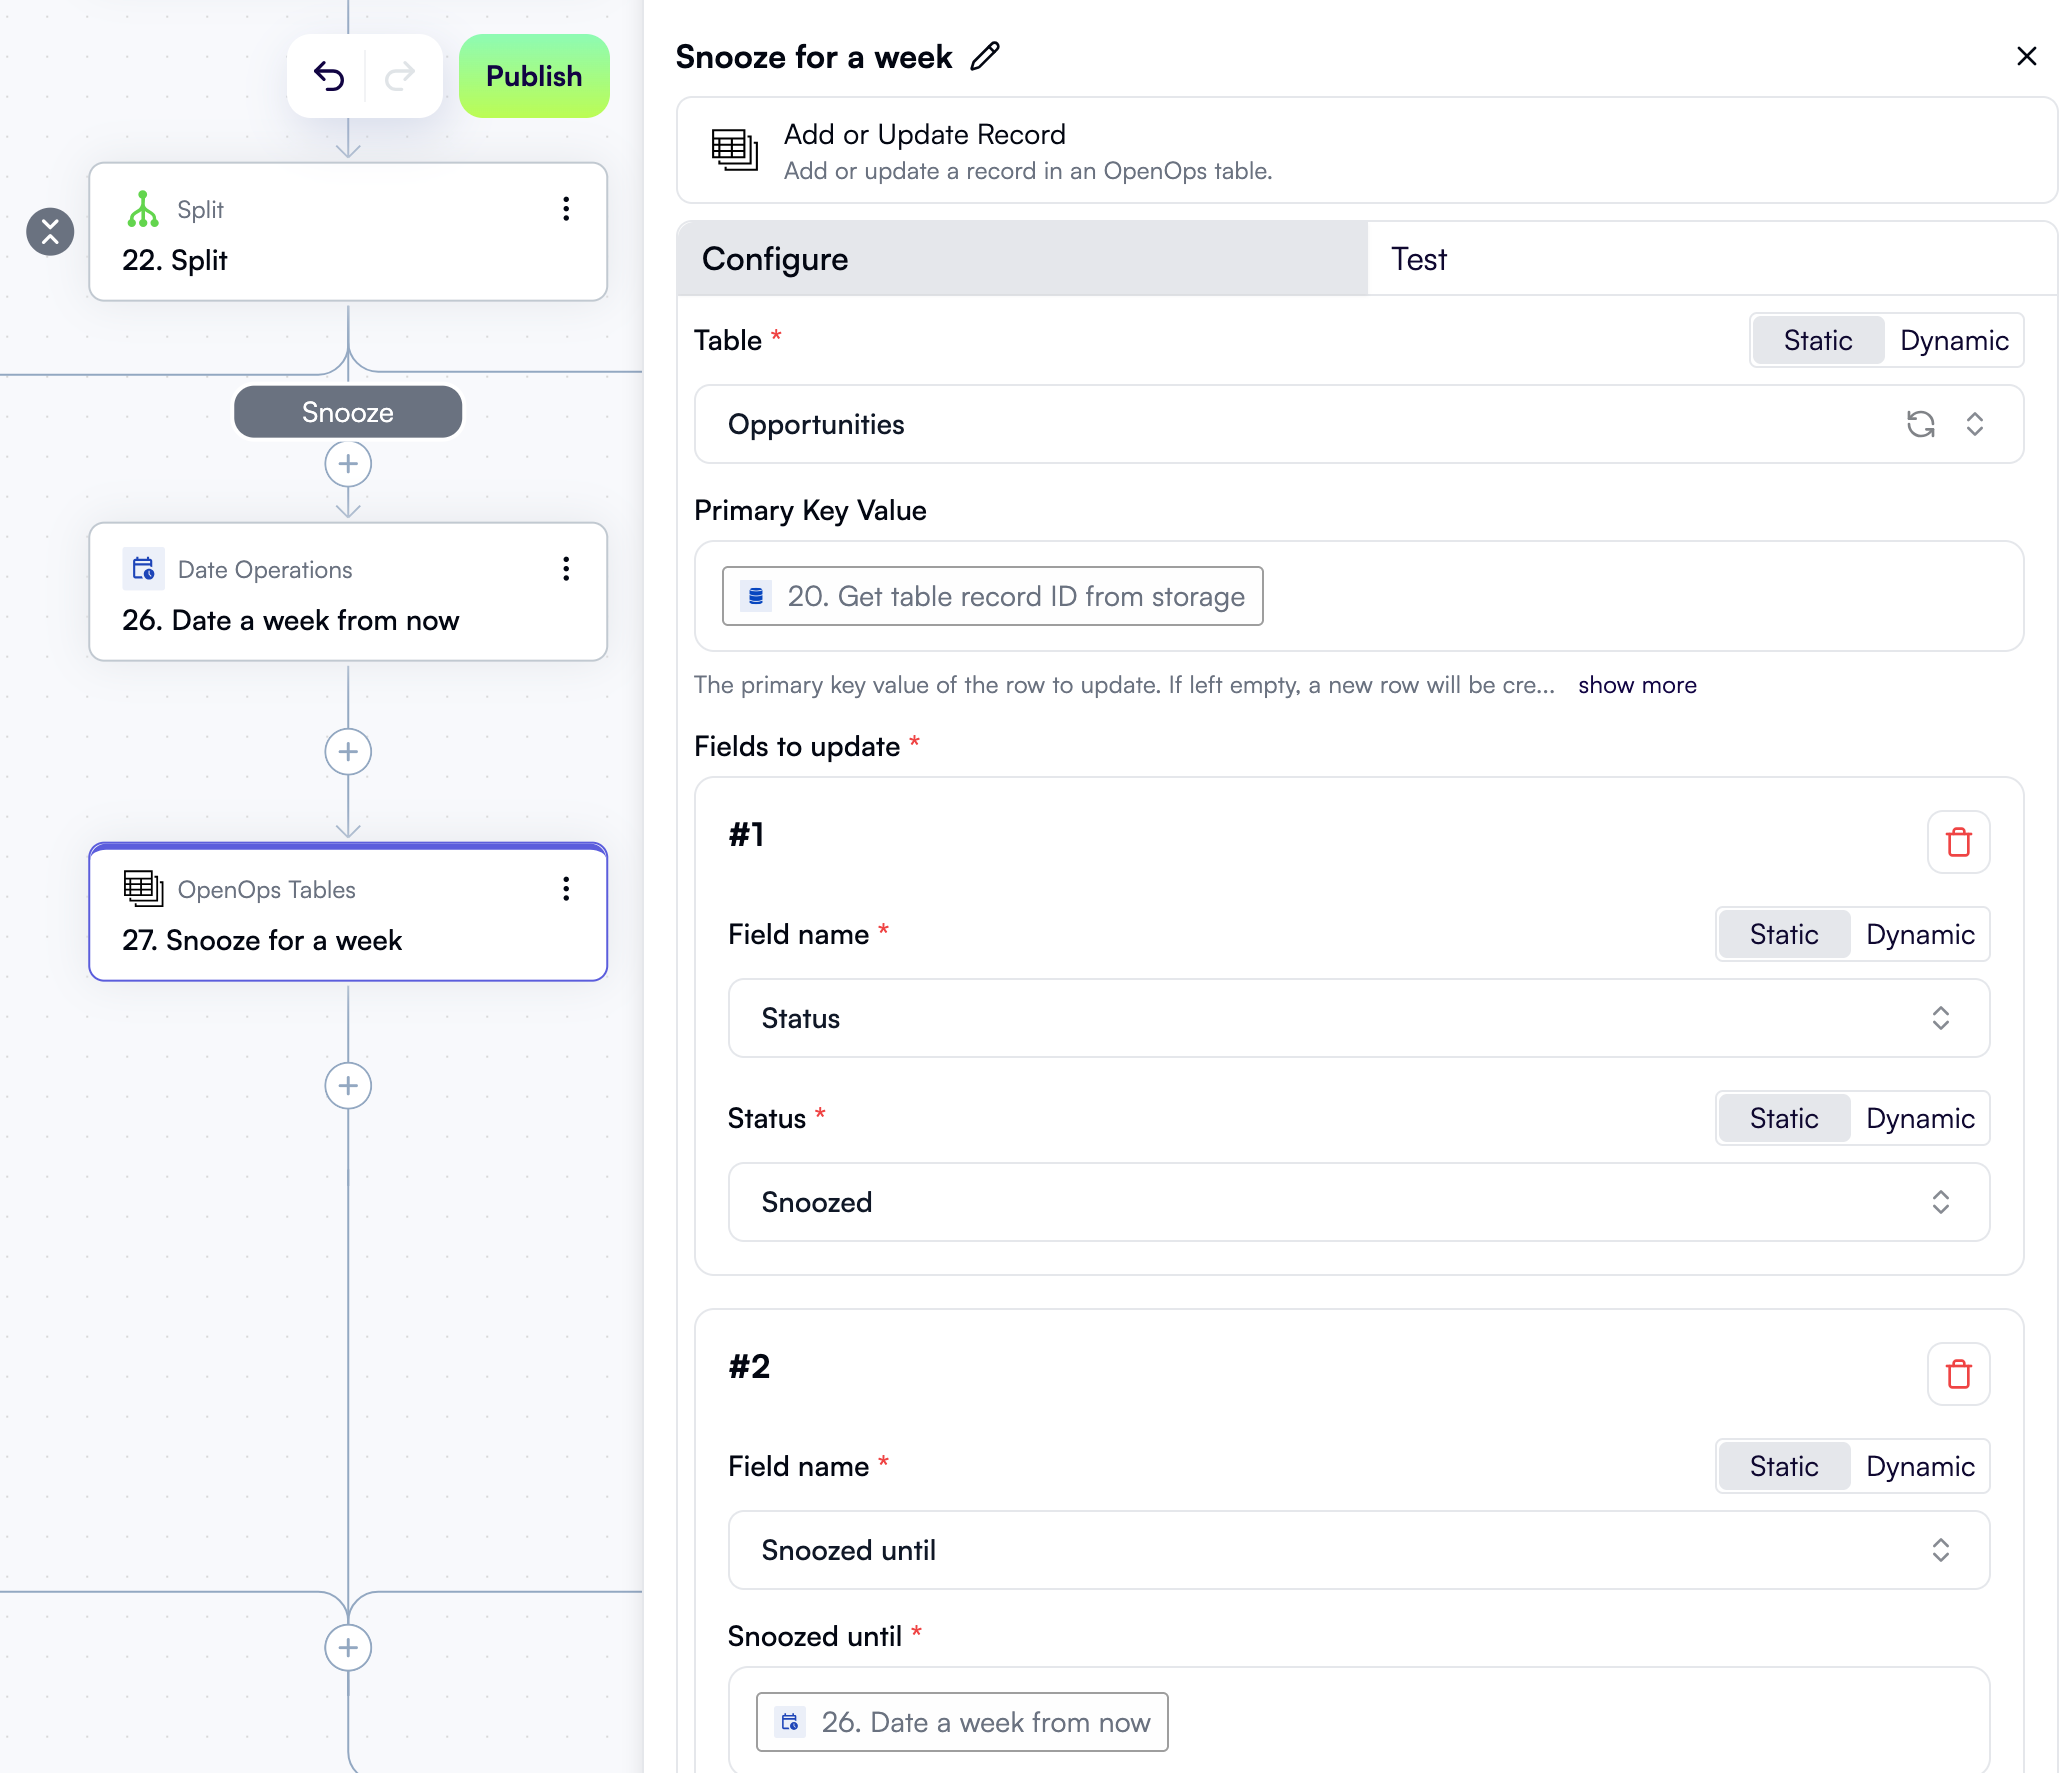
In the Snooze branch, click + to add a new step. In the pop-up menu, select OpenOps Tables in the left pane, then click Add or Update Record in the right pane. At the top of the new step’s properties pane, click Edit Step Name and rename the step Snooze for a week. In the Table field, select Opportunities. In the Primary Key Value field, use Data Selector to select 20. Get table record ID from storage. In the Fields to update section, click Add Item. In the new area:- For Field name, select Status.
- For Status, select Snoozed.
- For Field name, select Snooze until.
- For Snooze Until, use Data Selector to select 26. Date a week from now.
Dismiss the recommendation
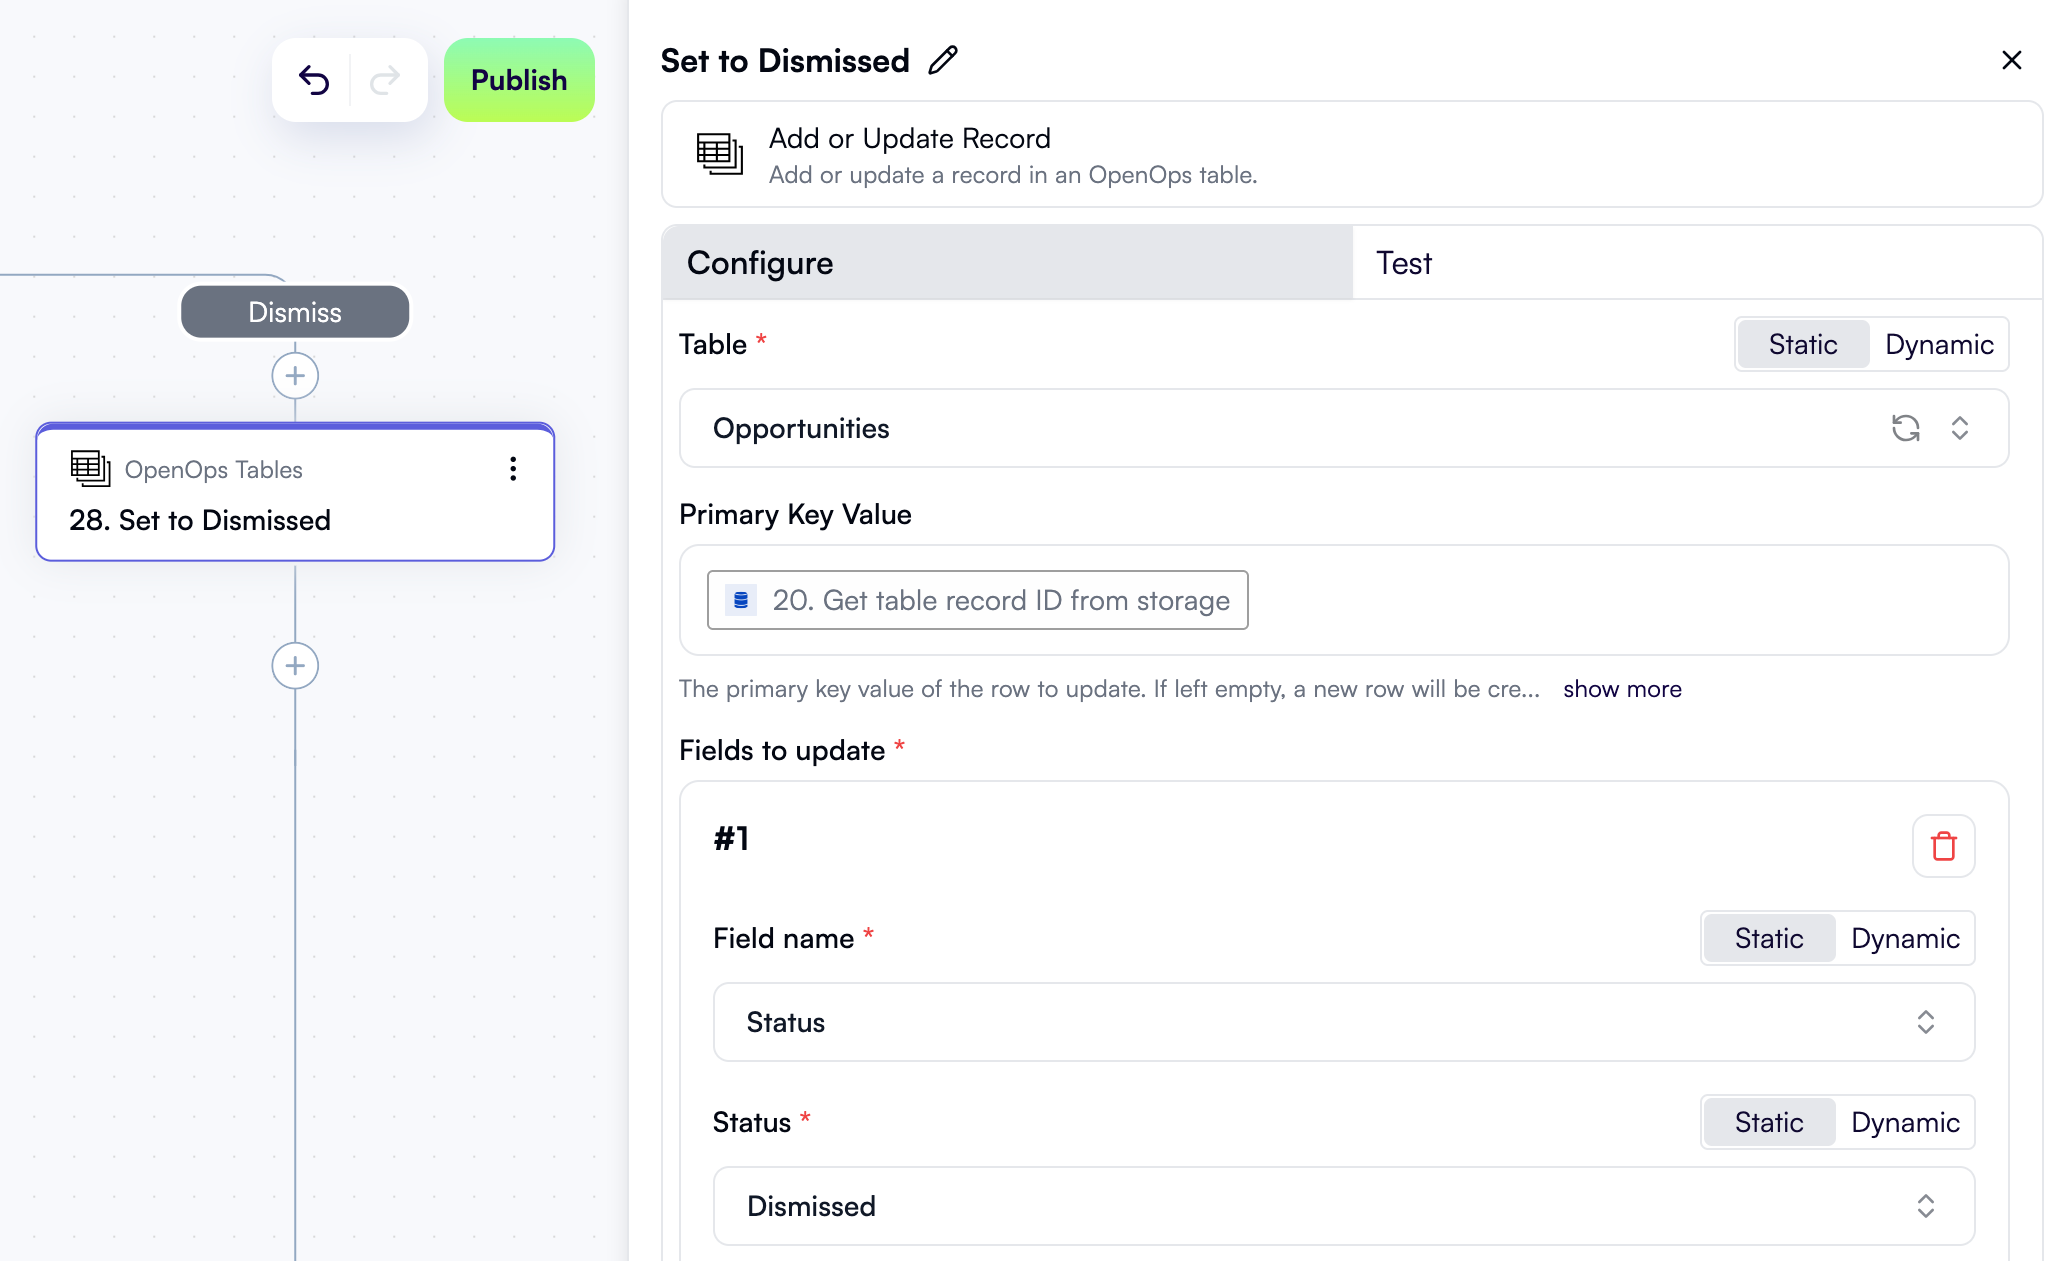
Finally, if the project owner chooses to dismiss the CloudHealth recommendation, you need to update the status of the current recommendation in the Opportunities table to make sure that OpenOps does not send any further notifications about it. In the Dismiss branch, click + to add a new step. In the pop-up menu, select OpenOps Tables in the left pane, then click Add or Update Record in the right pane. At the top of the new step’s properties pane, click Edit Step Name and rename the step Set to Dismissed. In the Table field, select Opportunities. In the Primary Key Value field, use Data Selector to select 20. Get table record ID from storage. In the Fields to update section, click Add Item. In the new area:- For Field name, select Status.
- For Status, select Dismissed.
Finishing touches
The rightsizing workflow now contains all the steps that you need for OpenOps to get current CloudHealth recommendations, determine if each of them needs to be addressed, and notify the relevant project owners about them.Increase the limit on recommendations
Remember that when configuring the step to fetch CloudHealth recommendations, you set the limit to 3? This was just fine for testing purposes, but now that you’re ready to start running the workflow in real-world conditions, you may want to increase the limit. To do this, scroll the workflow graph up to step 2. Get EC2 rightsizing recommendations, and in the Configure tab, either set the Limit field to a higher value, such as10, or remove the value altogether to fetch all available recommendations.
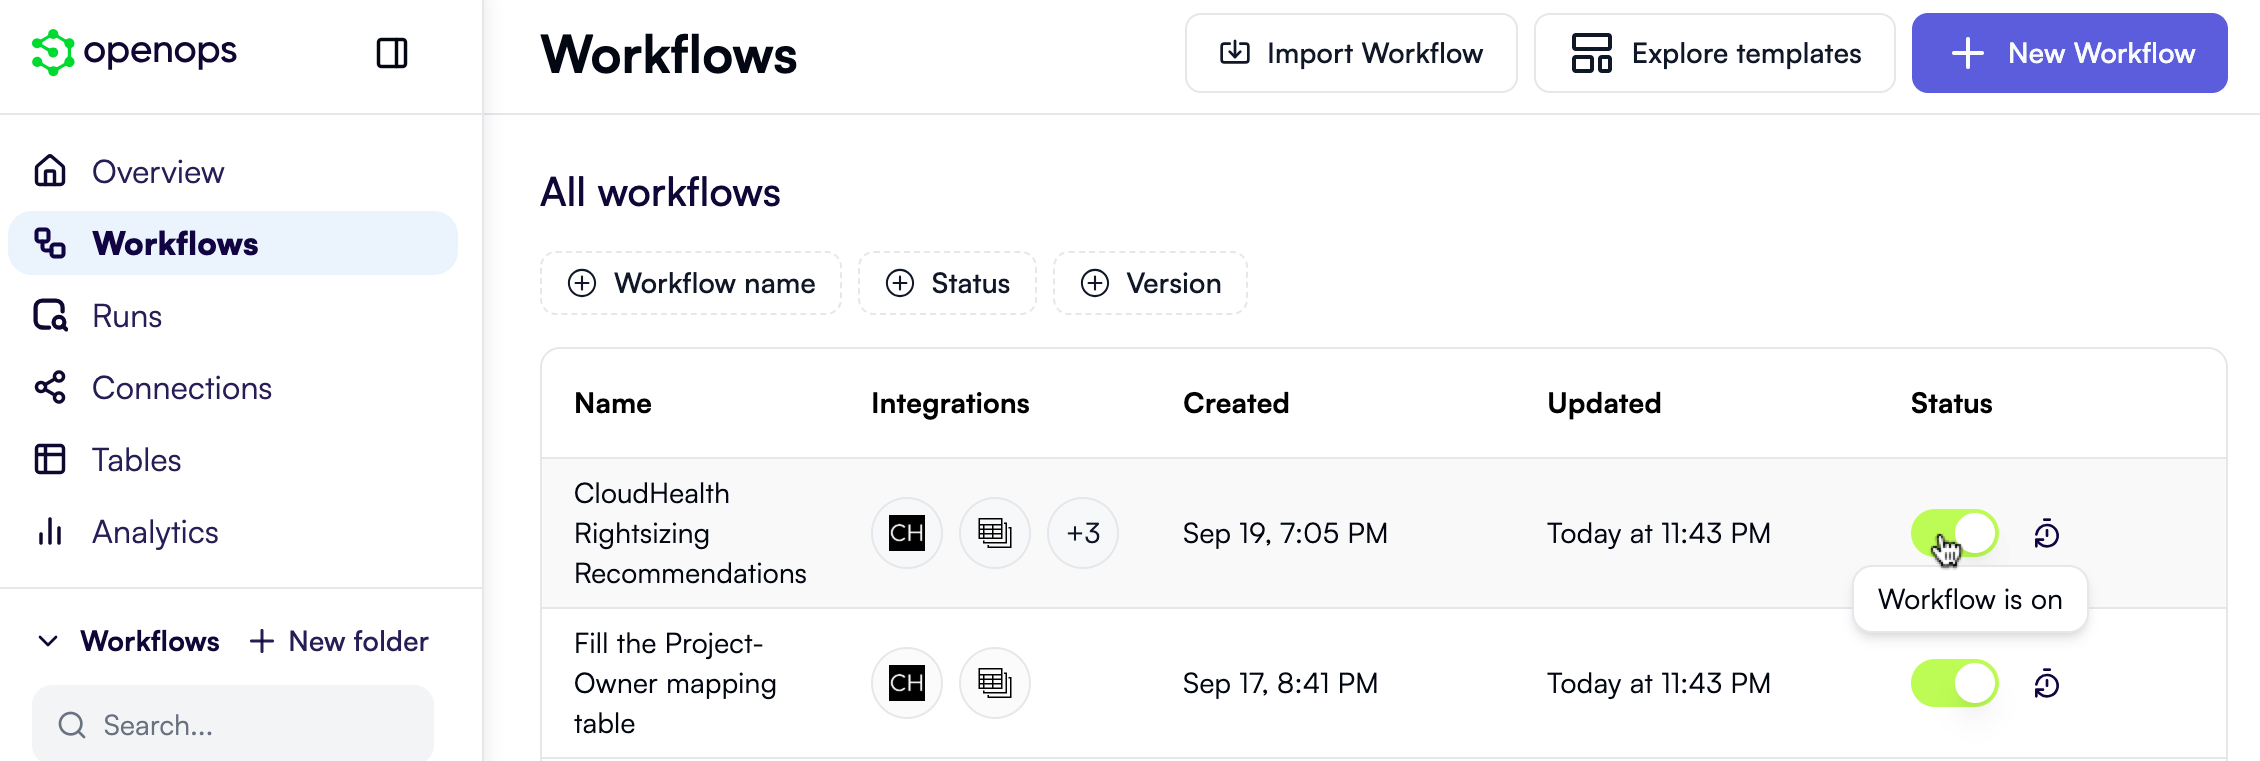
Publish the workflow
To get the workflow live, click Publish in the top-right corner of the workflow editor. Now, if you click Workflows in the left pane, you should see the workflow you just created, along with the project-owner mapping workflow, both in the On status: