> ## Documentation Index
> Fetch the complete documentation index at: https://docs.openops.com/llms.txt
> Use this file to discover all available pages before exploring further.
# Iterating Over Multiple Azure Subscriptions
> How to build a workflow that performs actions across multiple Microsoft Azure subscriptions
export const NarrowImage = ({src, alt, widthPercent}) => {
const className = `narrow-image-${useId().replace(/:/g, '-')}`;
const widthRule = widthPercent ? `width: ${widthPercent}%;` : '';
return <>
 ;
};
You can build workflows that retrieve the list of available Azure subscriptions and iterate over them.
Here's how to proceed.
## 1. Create an Azure connection that enables access to multiple subscriptions
First, create an [Azure connection](/cloud-access/access-levels-permissions#azure-connections) if you don't already have one.
Unlike AWS connections, OpenOps doesn't provide a built-in way to grant access to multiple Azure subscriptions from connection settings.
Instead, you can use a single Azure **service principal** (application) to access multiple subscriptions by assigning it roles in each of them.
To do this:
1. In your Azure Active Directory tenant, create an app registration and a corresponding service principal.
2. Generate a client secret for the service principal. Use the service principal's **Application (client) ID**, **Client secret**, and **Directory (tenant) ID** to create an OpenOps connection.
3. In the Azure Portal or CLI, assign the same service principal appropriate RBAC roles (for example, *Reader* or *Contributor*) in each subscription you want OpenOps to access.
Once the service principal has access to multiple subscriptions, an OpenOps connection configured with its credentials can perform actions in any of those subscriptions.
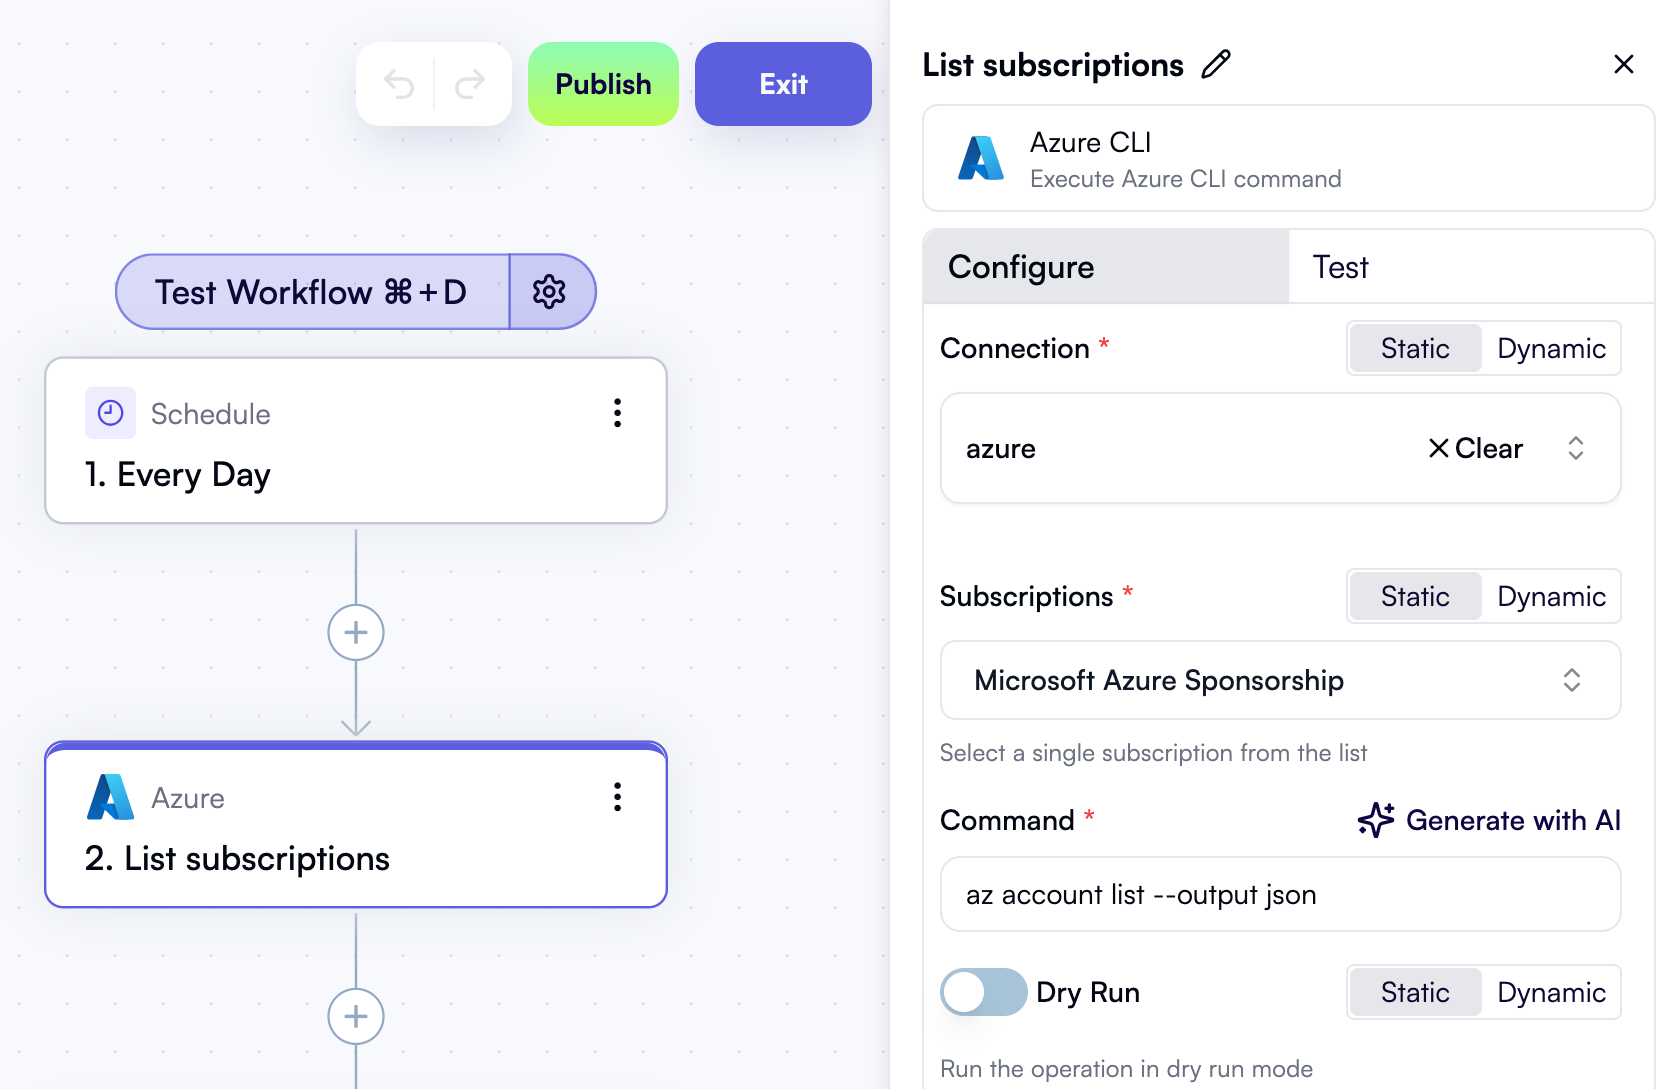
## 2. Get the list of subscriptions
In your workflow, add an **Azure CLI** action.
In the action's properties, select the connection that enables access to multiple subscriptions.
Select any subscription in the **Subscriptions** dropdown.
In the **Command** field, enter the following:
```shell theme={null}
az account list --output json
```
;
};
You can build workflows that retrieve the list of available Azure subscriptions and iterate over them.
Here's how to proceed.
## 1. Create an Azure connection that enables access to multiple subscriptions
First, create an [Azure connection](/cloud-access/access-levels-permissions#azure-connections) if you don't already have one.
Unlike AWS connections, OpenOps doesn't provide a built-in way to grant access to multiple Azure subscriptions from connection settings.
Instead, you can use a single Azure **service principal** (application) to access multiple subscriptions by assigning it roles in each of them.
To do this:
1. In your Azure Active Directory tenant, create an app registration and a corresponding service principal.
2. Generate a client secret for the service principal. Use the service principal's **Application (client) ID**, **Client secret**, and **Directory (tenant) ID** to create an OpenOps connection.
3. In the Azure Portal or CLI, assign the same service principal appropriate RBAC roles (for example, *Reader* or *Contributor*) in each subscription you want OpenOps to access.
Once the service principal has access to multiple subscriptions, an OpenOps connection configured with its credentials can perform actions in any of those subscriptions.
## 2. Get the list of subscriptions
In your workflow, add an **Azure CLI** action.
In the action's properties, select the connection that enables access to multiple subscriptions.
Select any subscription in the **Subscriptions** dropdown.
In the **Command** field, enter the following:
```shell theme={null}
az account list --output json
```
 When you test this action, it returns an array of objects, where each object includes the subscription ID and related metadata:
```json theme={null}
[
{
"cloudName": "AzureCloud",
"homeTenantId": "536df0a4-c5d9-4a38-adfa-3a81dcc81a33",
"id": "85ec64cc-2107-4774-a848-87a92543bacd",
"isDefault": true,
"managedByTenants": [],
"name": "Microsoft Azure Sponsorship",
"state": "Enabled",
"tenantId": "536df0a4-c5d9-4a38-adfa-3a81dcc81a33",
"user": {
"name": "2008127b-13d0-41e4-ad41-d8f2b2de6c92",
"type": "servicePrincipal"
}
},
{
"cloudName": "AzureCloud",
"homeTenantId": "536df0a4-c5d9-4a38-adfa-3a81dcc81a33",
"id": "2c4a9e11-7f21-4e5a-bdfb-83e4c3a951d0",
"isDefault": false,
"managedByTenants": [],
"name": "Development Sandbox",
"state": "Enabled",
"tenantId": "536df0a4-c5d9-4a38-adfa-3a81dcc81a33",
"user": {
"name": "2008127b-13d0-41e4-ad41-d8f2b2de6c92",
"type": "servicePrincipal"
}
}
]
```
## 3. Iterate over subscriptions
Add a **Loop on Items** step to your workflow.
In the **Items** property, use the **Data Selector** view to select the entire output of the previous step:
When you test this action, it returns an array of objects, where each object includes the subscription ID and related metadata:
```json theme={null}
[
{
"cloudName": "AzureCloud",
"homeTenantId": "536df0a4-c5d9-4a38-adfa-3a81dcc81a33",
"id": "85ec64cc-2107-4774-a848-87a92543bacd",
"isDefault": true,
"managedByTenants": [],
"name": "Microsoft Azure Sponsorship",
"state": "Enabled",
"tenantId": "536df0a4-c5d9-4a38-adfa-3a81dcc81a33",
"user": {
"name": "2008127b-13d0-41e4-ad41-d8f2b2de6c92",
"type": "servicePrincipal"
}
},
{
"cloudName": "AzureCloud",
"homeTenantId": "536df0a4-c5d9-4a38-adfa-3a81dcc81a33",
"id": "2c4a9e11-7f21-4e5a-bdfb-83e4c3a951d0",
"isDefault": false,
"managedByTenants": [],
"name": "Development Sandbox",
"state": "Enabled",
"tenantId": "536df0a4-c5d9-4a38-adfa-3a81dcc81a33",
"user": {
"name": "2008127b-13d0-41e4-ad41-d8f2b2de6c92",
"type": "servicePrincipal"
}
}
]
```
## 3. Iterate over subscriptions
Add a **Loop on Items** step to your workflow.
In the **Items** property, use the **Data Selector** view to select the entire output of the previous step:
 ## 4. Add an Azure step inside the loop and inject the subscription ID into the command
Inside the loop, add an Azure action that you want to perform for each subscription — for example, another **Azure CLI** action.
In the action's properties, select the connection that enables access to multiple subscriptions.
Select any subscription in the **Subscriptions** dropdown.
In the **Command** field, enter the command you want to run. For example, to list active VMs in each subscription, enter:
```shell theme={null}
az vm list --subscription= --show-details --output json
```
Set the caret after the `--subscription=` flag. Use **Data Selector** to expand **Loop on Items**, then **item**, and click **Insert** next to the **id** property:
The resulting command in the properties pane will look like this, dynamically inserting the current subscription ID into the command template:
## 4. Add an Azure step inside the loop and inject the subscription ID into the command
Inside the loop, add an Azure action that you want to perform for each subscription — for example, another **Azure CLI** action.
In the action's properties, select the connection that enables access to multiple subscriptions.
Select any subscription in the **Subscriptions** dropdown.
In the **Command** field, enter the command you want to run. For example, to list active VMs in each subscription, enter:
```shell theme={null}
az vm list --subscription= --show-details --output json
```
Set the caret after the `--subscription=` flag. Use **Data Selector** to expand **Loop on Items**, then **item**, and click **Insert** next to the **id** property:
The resulting command in the properties pane will look like this, dynamically inserting the current subscription ID into the command template:
 Similarly, you can use **Data Selector** to inject the subscription ID into other Azure actions inside the loop.
You can [download the workflow](https://docs.openops.com/workflows/multiple-azure-subscriptions.json) described above and [import it](/workflow-management/import-export/#importing-workflows) into your OpenOps instance.
Similarly, you can use **Data Selector** to inject the subscription ID into other Azure actions inside the loop.
You can [download the workflow](https://docs.openops.com/workflows/multiple-azure-subscriptions.json) described above and [import it](/workflow-management/import-export/#importing-workflows) into your OpenOps instance.