> ## Documentation Index
> Fetch the complete documentation index at: https://docs.openops.com/llms.txt
> Use this file to discover all available pages before exploring further.
# Iterating Over Multiple AWS Accounts
> How to configure a connection and build a workflow to work with multiple AWS accounts
export const NarrowImage = ({src, alt, widthPercent}) => {
const className = `narrow-image-${useId().replace(/:/g, '-')}`;
const widthRule = widthPercent ? `width: ${widthPercent}%;` : '';
return <>
 ;
};
If you want to build a workflow that works across multiple AWS accounts instead of just one, this is possible, but there's a quirk.
Some AWS-related actions have built-in support for multiple AWS accounts via a multi-select dropdown:
In the *AWS* block, these actions are *Get Account IDs*, *EBS Get Volumes*, *EBS Get Snapshots*, *EC2 Get Instances*, *RDS Get Instances*, and *RDS Get Snapshots*.
In addition, all actions in the *AWS Compute Optimizer* block support multiple accounts.
All other actions in AWS-related blocks only support a single account.
This means that if your workflow contains at least one action that only supports a single AWS account, you need to first **get a list of accounts**, then **introduce a loop step to iterate** over them.
Additionally, you'll need a specifically configured AWS connection that enables access to multiple accounts.
Here's how you could do this.
## 1. Create an AWS connection that enables access to multiple accounts
If you don't yet have one, [set up an AWS connection that supports multiple accounts](/cloud-access/access-levels-permissions#connecting-to-multiple-aws-accounts) using assume roles.
## 2. Get the list of accounts
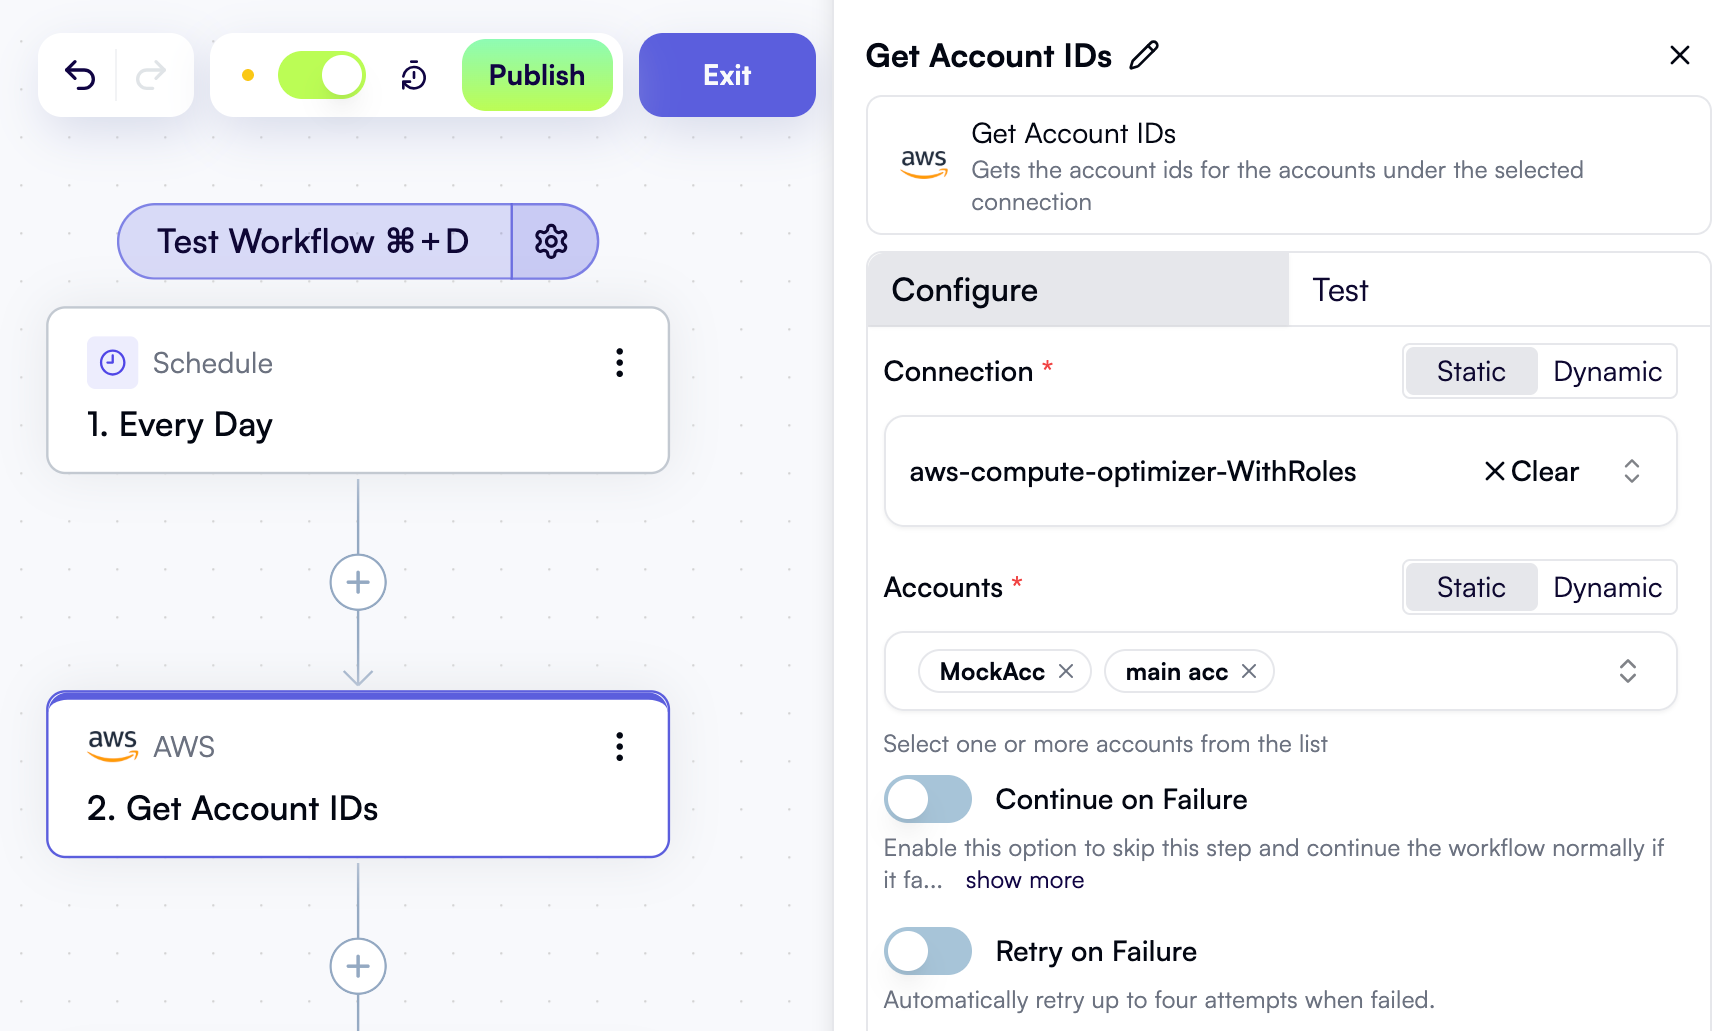
In your workflow, add a **Get Account IDs** AWS action.
Choose the connection that enables access to multiple accounts. Then, in the **Accounts** property, use the multi-select dropdown to select all accounts that you want to iterate over:
;
};
If you want to build a workflow that works across multiple AWS accounts instead of just one, this is possible, but there's a quirk.
Some AWS-related actions have built-in support for multiple AWS accounts via a multi-select dropdown:
In the *AWS* block, these actions are *Get Account IDs*, *EBS Get Volumes*, *EBS Get Snapshots*, *EC2 Get Instances*, *RDS Get Instances*, and *RDS Get Snapshots*.
In addition, all actions in the *AWS Compute Optimizer* block support multiple accounts.
All other actions in AWS-related blocks only support a single account.
This means that if your workflow contains at least one action that only supports a single AWS account, you need to first **get a list of accounts**, then **introduce a loop step to iterate** over them.
Additionally, you'll need a specifically configured AWS connection that enables access to multiple accounts.
Here's how you could do this.
## 1. Create an AWS connection that enables access to multiple accounts
If you don't yet have one, [set up an AWS connection that supports multiple accounts](/cloud-access/access-levels-permissions#connecting-to-multiple-aws-accounts) using assume roles.
## 2. Get the list of accounts
In your workflow, add a **Get Account IDs** AWS action.
Choose the connection that enables access to multiple accounts. Then, in the **Accounts** property, use the multi-select dropdown to select all accounts that you want to iterate over:
 When you test this action, you'll see that it returns an array of objects where each object contains the account ID and the account name:
```json theme={null}
[
{
"accountId": "295912458647",
"accountName": "MockAcc"
},
{
"accountId": "616998899502",
"accountName": "main acc"
}
]
```
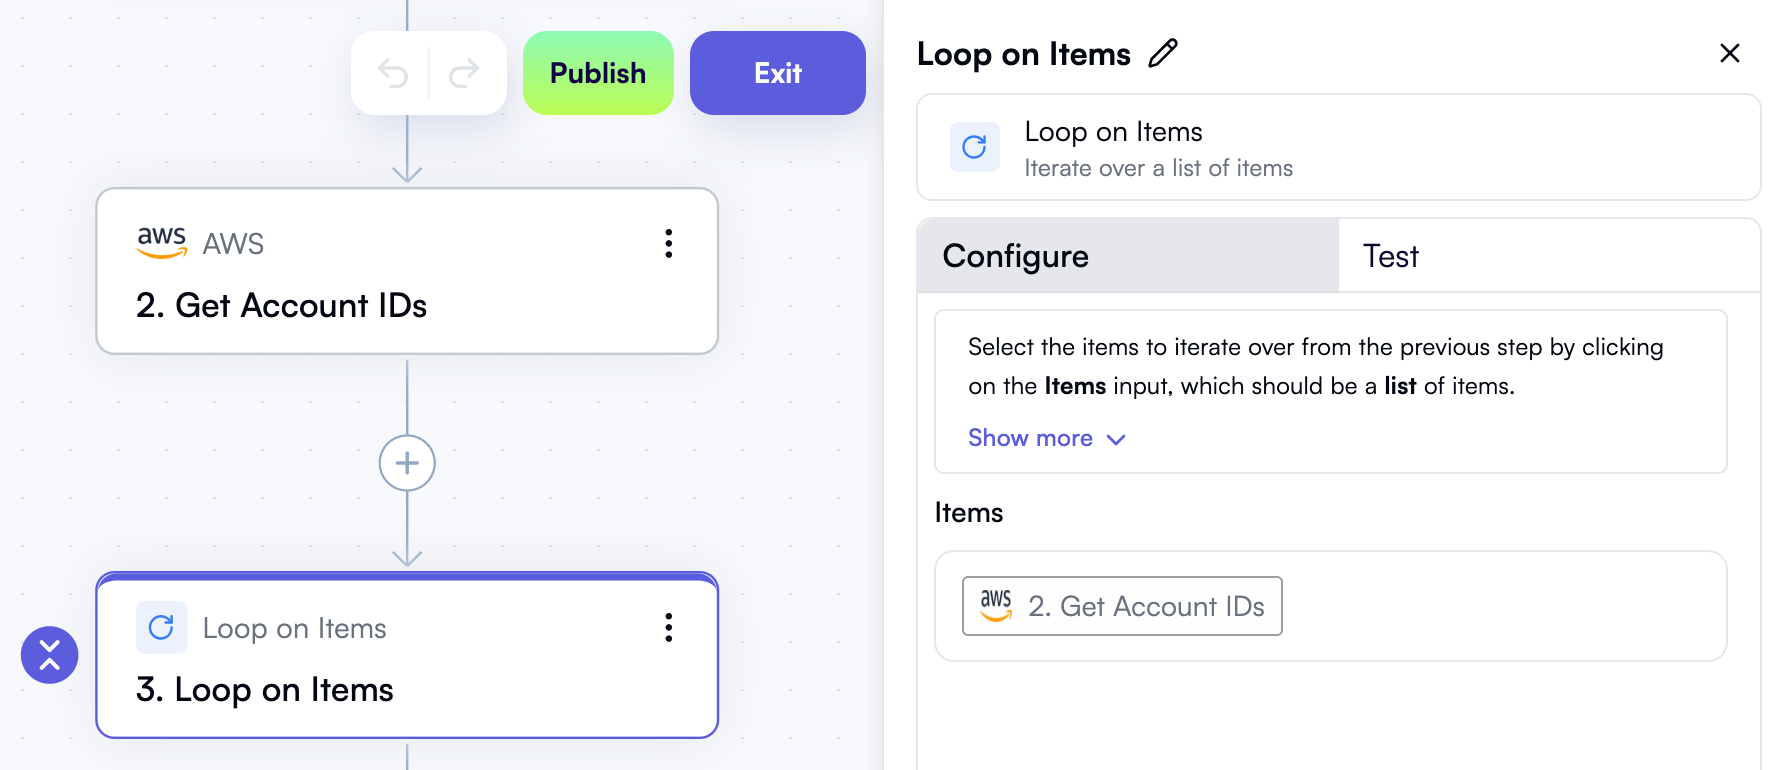
## 3. Iterate over accounts
Add a **Loop on Items** step to your workflow.
In the **Items** property, use the **Data Selector** view to select **Get Account IDs** — that is, the entire output of the previous step:
When you test this action, you'll see that it returns an array of objects where each object contains the account ID and the account name:
```json theme={null}
[
{
"accountId": "295912458647",
"accountName": "MockAcc"
},
{
"accountId": "616998899502",
"accountName": "main acc"
}
]
```
## 3. Iterate over accounts
Add a **Loop on Items** step to your workflow.
In the **Items** property, use the **Data Selector** view to select **Get Account IDs** — that is, the entire output of the previous step:
 ## 4. Add an AWS step inside the loop and make the account property dynamic
Inside the loop, add an AWS action that you want to perform for each account.
In the action's properties, select the connection that enables access to multiple accounts.
To the right of the **Accounts** property label, click **Dynamic**. This will change the property from a dropdown to an input field.
Inside the input field, use **Data Selector** to expand **Loop in Items**, then **item**, then click **Insert** alongside the **accountId** property:
Proceed to setting other properties of the AWS action as needed.
This technique of specifying a single account ID using the **Dynamic** switch works for all AWS actions inside the loop, whether they only support a single account or multiple accounts.
Here's a [sample workflow](https://docs.openops.com/workflows/multiple-aws-accounts.json) that you can [import](/workflow-management/import-export/#importing-workflows) to your OpenOps instance. The workflow uses this approach and includes the **AWS CLI** action inside the loop.
## 4. Add an AWS step inside the loop and make the account property dynamic
Inside the loop, add an AWS action that you want to perform for each account.
In the action's properties, select the connection that enables access to multiple accounts.
To the right of the **Accounts** property label, click **Dynamic**. This will change the property from a dropdown to an input field.
Inside the input field, use **Data Selector** to expand **Loop in Items**, then **item**, then click **Insert** alongside the **accountId** property:
Proceed to setting other properties of the AWS action as needed.
This technique of specifying a single account ID using the **Dynamic** switch works for all AWS actions inside the loop, whether they only support a single account or multiple accounts.
Here's a [sample workflow](https://docs.openops.com/workflows/multiple-aws-accounts.json) that you can [import](/workflow-management/import-export/#importing-workflows) to your OpenOps instance. The workflow uses this approach and includes the **AWS CLI** action inside the loop.